 Kia Sportage: Rail Pressure Sensor (RPS): Repair procedures
Third generation SL (2010–2016) / Kia Sportage SL Service & Repair Manual / Engine Control / Fuel System / Engine Control System / Rail Pressure Sensor (RPS): Repair procedures
| Inspection |
| 1. |
Connect the GDS on the Data Link Connector (DLC). |
| 2. |
Measure the output voltage of the RPS at idle and various engine speed.
|
| Removal |
| 1. |
Turn the ignition switch OFF and disconnect the battery negative (-) cable. |
| 2. |
Release the residual pressure in fuel line (Refer to the
Fuel Delivery System - Repair Procedures - "Release Residual Pressure in
Fuel Line").
|

| 3. |
Remove the intake manifold (Refer to “Intake And Exhaust System” in EM group). |
| 4. |
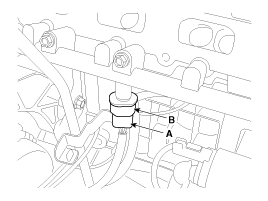
Disconnect the rail pressure sensor connector (A), and then remove the sensor (B) from the delivery pipe.
|
| Installation |
|
| 1. |
Installation is reverse of removal.
|
 Rail Pressure Sensor (RPS): Schematic Diagrams
Circuit Diagram
...
 CVVT Oil Temperature Sensor (OTS): Description and Operation
Description
Continuous Variable Valve Timing (CVVT) system advances or
retards the valve timing of the intake and exhaust valve in accordance
with the ECM control signal which is calculated by ...
Other Information:
Hands Free Mic: Repair procedures
Inspection
1.
Disconnect the negative(-) battery terminal.
2.
Remove the roof trim.
(Refer to the BD group - "Roof trim")
3.
Remove the handsfree mic (A) after loosening the connector and ...
Repair procedures
Inspection
Check it by the procedure below to see if the function of the ECM is normal.
1.
Turn the ignition key to the "ON" position.
2.
Cover the forward facing sensor.
3.
Head a light ...
Categories
- Home
- Kia Sportage QL (2015-2019) Owners Manual
- Kia Sportage QL (2015-2019) Service Manual
- Kia Sportage SL 2010-2016 Owners Manual
- Kia Sportage SL 2010-2016 Service Manual
Copyright © www.kispmanual.com 2014-2024