 Kia Sportage: Fuses
A vehicle’s electrical system is protected from electrical overload damage by fuses.
This vehicle has 3 fuse panels, one located in the driver’s side panel bolster, the other in the engine compartment near the battery.
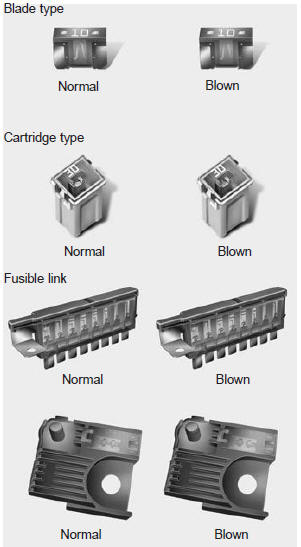
If any of your vehicle’s lights, accessories, or controls do not work, check the appropriate circuit fuse. If a fuse has blown, the element inside the fuse will melt.
If the electrical system does not work, first check the driver’s side fuse panel.
Before replacing a blown fuse, disconnect the negative battery cable. Always replace a blown fuse with one of the same rating.
If the replacement fuse blows, this indicates an electrical problem. Avoid using the system involved and immediately consult an authorized Kia dealer.
Three kinds of fuses are used: blade type for lower amperage rating, cartridge type, and multi fuse for higher amperage ratings.
![]() WARNING - Fuse replacement
WARNING - Fuse replacement
- Never replace a fuse with anything but another fuse of the same rating.
- A higher capacity fuse could cause damage and possibly a fire.
- Never install a wire or aluminum foil instead of the proper fuse - even as a temporary repair. It may cause extensive wiring damage and a possible fire.
- Do not arbitrarily modify or add-on electric wiring of the vehicle.
✽ NOTICE
The actual fuse/relay panel label may differ depending on equipment/ options.
![]() CAUTION
CAUTION
Do not use a screwdriver or any other metal object to remove fuses because it may cause a short circuit and damage the system.
![]() WARNING - Fuse fire
WARNING - Fuse fire
- When replacing a blown fuse or relay with a new one, make sure the new fuse or relay fits tightly into the clips The incomplete fastening fuse or relay may cause the vehicle wiring and electric systems damage and a possible fire.
- Do not remove fuses, relays and terminals fastened with bolts or nuts. These fuses, relays and terminals may be incompletely fastened and could cause a possible vehicle fire. If fuses, relays and terminals fastened with bolts or nuts are blown, we recommend that you consult with an authorized Kia dealer to get them replaced properly.
- Inner panel fuse replacement
- Engine compartment fuse replacement
- Fuse/relay panel description
- Instrument panel fuse panel
- Engine compartment fuse panel
- Engine compartment fuse panel
- Specifications
 Low aspect ratio tire
Low aspect ratio tires, whose aspect ratio is lower than 50, are provided for
sporty looks.
Because the low aspect ratio tires are optimized for handling and braking, it
may be more uncomfortable ...
 Inner panel fuse replacement
1.Turn the ignition switch and all other switches off.
2.Open the fuse panel cover.
3.Pull the suspected fuse straight out. Use the removal tool provided on the
engine compartment fuse panel c ...
Other Information:
Starting the engine with a smart key
1.Carry the smart key or leave it inside the vehicle.
2.Make sure the parking brake is firmly applied
3.Automatic Transaxle - Place the transaxle shift lever in P (Park). Depress
the brake pedal f ...
Positive Crankcase Ventilation (PCV) Valve: Repair procedures
Removal
1.
Disconnect the vapor hose (A).
2.
Remove the PCV valve (B).
Inspection
1.
Insert a thin stick (A) into the PCV valve (B) from the threaded side to check that the plunger move ...
Categories
- Home
- Kia Sportage QL (2015-2019) Owners Manual
- Kia Sportage QL (2015-2019) Service Manual
- Kia Sportage SL 2010-2016 Owners Manual
- Kia Sportage SL 2010-2016 Service Manual