 Kia Sportage: Thermostat: Repair procedures
Third generation SL (2010–2016) / Kia Sportage SL Service & Repair Manual / Engine Mechanical System / Cooling System / Thermostat: Repair procedures
| Removal and Installation |
Disassembly of the thermostat would have an adverse effect,
causing a lowering of cooling efficiency. Do not remove the thermostat,
even if the engine tends to overheat. |

| 1. |
Drain engine coolant so its level is below thermostat. |
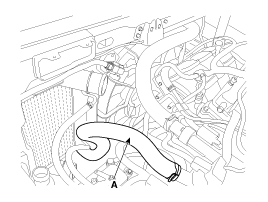
| 2. |
Disconnect the radiator lower hose (A).
|
| 3. |
Remove water inlet fitting (C), gasket (B) and thermostat (A).
|
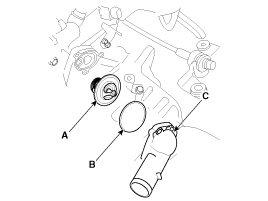
| 4. |
Installation is reverse order of removal.
|

| 5. |
Fill the engine coolant. |
| 6. |
Start the engine and check for leaks. |
| 7. |
Recheck the coolant level. |
| Inspection |
| 1. |
Immerse thermostat in water heated to over 95°C (203°F), then heat for at least 3 minutes to check valve lift.
|
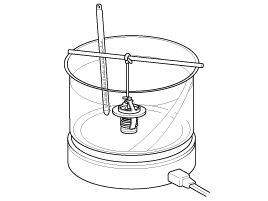
| 2. |
Check the valve opening temperature.
If the valve opening temperature is not as specified, replace the thermostat. |
| 3. |
Check the valve lift.
If the valve lift is not as specified, replace the thermostat. |
 Water pump: Troubleshooting
Troubleshooting
Water Pump
SymptomsPossible CausesRemedyCoolant leakage
•
From the bleed hole of the water pump
Visually check
•
Check leaks after about ten-minute warming up.
...
 Thermostat: Troubleshooting
Troubleshooting
SymptomsPossible CausesRemedyCoolant leakage
•
From the thermostat gasket
Check the mounting bolts
•
Check the torque of the mounting bolts
•
Retighten ...
Other Information:
Overdrive Clutch Control Solenoid Valve(OD/C_VFS): Repair procedures
Inspection
1.
Turn ignition switch OFF.
2.
Remove the air duct (A).
3.
Remove the air cleaner assembly.
(1)
Disconnect the breather hose (A) and brake booster intensifier hose.
(2)
...
Tight corner brake effect
Tight corner brake effect is a unique characteristic of four-wheel drive vehicles
caused by the difference in tire rotation at the four wheels and the zero-degree
alignment of the front wheels and ...
Categories
- Home
- Kia Sportage QL (2015-2019) Owners Manual
- Kia Sportage QL (2015-2019) Service Manual
- Kia Sportage SL 2010-2016 Owners Manual
- Kia Sportage SL 2010-2016 Service Manual
Copyright © www.kispmanual.com 2014-2024