 Kia Sportage: Intake Air Temperature Sensor (IATS): Repair procedures
Third generation SL (2010–2016) / Kia Sportage SL Service & Repair Manual / Engine Control / Fuel System / Engine Control System / Intake Air Temperature Sensor (IATS): Repair procedures
| Inspection |
| 1. |
Turn the ignition switch OFF. |
| 2. |
Disconnect the IATS connector. |
| 3. |
Measure resistance between the IATS terminals 3 and 4. |
| 4. |
Check that the resistance is within the specification.
|
| Removal |
| 1. |
Turn the ignition switch OFF and disconnect the battery negative (-) cable. |
| 2. |
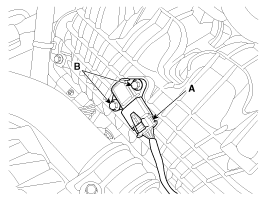
Disconnect the manifold absolute pressure sensor connector (A). |
| 3. |
Remove the installation bolts (B), and then remove the sensor from the surge tank.
|
| Installation |
|

|
| 1. |
Installation is reverse of removal.
|
 Intake Air Temperature Sensor (IATS): Schematic Diagrams
Circuit Diagram
...
 Engine Coolant Temperature Sensor (ECTS): Description and Operation
Description
Engine Coolant Temperature Sensor (ECTS) is located in the
engine coolant passage of the cylinder head for detecting the engine
coolant temperature. The ECTS uses a thermistor that ...
Other Information:
Description and Operation
Warning Lamp Activation
Warning Lamp Behavior after Ignition On
As soon as the operating voltage is applied to the SRSCM
ignition input, the SRSCM activates the warning lamp for a LED lamp
c ...
Windshield Wiper-Washer Switch: Repair procedures
Removal
1.
Disconnect the negative (-) battery terminal.
2.
Remove the steering column upper and lower shrouds (A) after removing 3 screws.
Take care not to damag ...
Categories
- Home
- Kia Sportage QL (2015-2019) Owners Manual
- Kia Sportage QL (2015-2019) Service Manual
- Kia Sportage SL 2010-2016 Owners Manual
- Kia Sportage SL 2010-2016 Service Manual
Copyright © www.kispmanual.com 2014-2024