 Kia Sportage: 26 Brake Control Solenoid Valve(26/B_VFS): Repair procedures
Third generation SL (2010–2016) / Kia Sportage SL Service & Repair Manual / Automatic Transaxle System / Automatic Transaxle Control System / 26 Brake Control Solenoid Valve(26/B_VFS): Repair procedures
| Inspection |
| 1. |
Turn ignition switch OFF. |
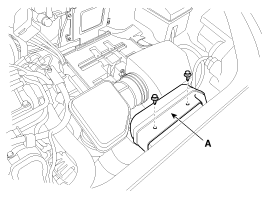
| 2. |
Remove the air duct (A).
|
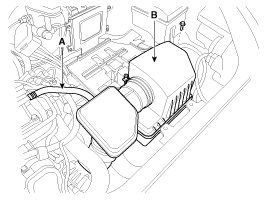
| 3. |
Remove the air cleaner assembly.
|
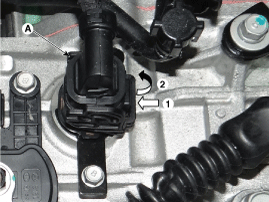
| 4. |
Disconnect the solenoid valve connector (A).
|
| 5. |
Measure resistance between sensor signal terminal and ground terminal. |
| 6. |
Check that the resistance is within the specification. |
| Removal |
Replacing an on/off solenoid valve (SS-A, SS-B) does not
require additional hydraulic pressure adjustment; however, the hydraulic
pressure will need to be adjusted after replacing the VFS solenoid
valve. If replacing the VFS solenoid valve; also replace the valve body
assembly.
(Refer to "Valve Body" in Hydraulic System of this group) |

 26 Brake Control Solenoid Valve(26/B_VFS): Schematic Diagrams
Circuit Diagram
...
 Line Pressure Control Solenoid Valve: Description and Operation
Description
line pressure control solenoid valve is attached to the valve
body. This variable force solenoid valve directly controls the
hydraulic pressure inside the line pressure. ...
Other Information:
Smart key: Repair procedures
Smart Key
Smart Key Code Saving
1.
Connect the DLC cable of GDS to the data link connector (16 pins) in driver side crash pad lower panel, turn the power on GDS.
2.
Select the vehicle model a ...
To defrost outside windshield
1.Set the fan speed to the highest position.
2.Set the temperature to the extreme hot (HI) position.
3.Press the defroster button ().
4.The outside (fresh) air position will be selected automatic ...
Categories
- Home
- Kia Sportage QL (2015-2019) Owners Manual
- Kia Sportage QL (2015-2019) Service Manual
- Kia Sportage SL 2010-2016 Owners Manual
- Kia Sportage SL 2010-2016 Service Manual
Copyright © www.kispmanual.com 2014-2024