 Kia Sportage: Seat Belt Pretensioner (BPT): Repair procedures
Third generation SL (2010–2016) / Kia Sportage SL Service & Repair Manual / Restraint / Seat Belt Pretensioner / Seat Belt Pretensioner (BPT): Repair procedures
| Removal |
| 1. |
Disconnect the battery negative cable, and wait for at least thirty seconds before beginning work. |
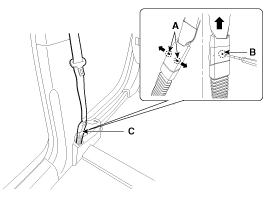
| 2. |
To remove the seat belt anchor pretensioner (C), keep on
pushing the lock pins (A) as arrow direction. And then remove the seat
belt after pushing the lock pin (B).
|
| 3. |
Remove the following parts. (Refer to the Body group- Interior trim)
|
| 4. |
Remove the upper anchor bolt. |
| 5. |
Disconnect the seat belt pretensioner connector (A).
|

| 6. |
Loosen the seat belt pretensioner mounting bolt (B,C) and remove the seat belt pretensioner. |
| Installation |
| 1. |
Remove the ignition key from the vehicle. |
| 2. |
Disconnect the battery negative cable and wait for at least thirty seconds. |
| 3. |
Install the seat belt pretensioner (BPT) with a bolt.
|
| 4. |
Connect the seat belt pretensioner (BPT) connector. |
| 5. |
Install the upper anchor bolts.
|
| 6. |
Install the following parts. . (Refer to the Body group- Interior trim)
|
| 7. |
Insert the seat belt to the anchor pretensioner. |
| 8. |
Reconnect the battery negative cable. |
| 9. |
After installing the seat belt pretensioner (BPT), confirm proper system operation:
|

 Anchor Pretensioner: Description and Operation
Description
Anchor pretensioner operates as well as belt Pretensioner at
the same time If it gets into its deploy condition after a collision. It
is located at near anchor on front seat and it ...
Other Information:
Master Cylinder: Repair procedures
Removal
1.
Turn ignition switch OFF and disconnect the negative (-) battery cable.
2.
Disconnect the battery terminal and then remove the battery.
3.
Disconnect the ECM connector and the E ...
Back up warning system precautions
The Back up warning system may not sound consistently depending on the speed
and shapes of the objects detected.
The Back up warning system may malfunction if the vehicle bumper height
or s ...
Categories
- Home
- Kia Sportage QL (2015-2019) Owners Manual
- Kia Sportage QL (2015-2019) Service Manual
- Kia Sportage SL 2010-2016 Owners Manual
- Kia Sportage SL 2010-2016 Service Manual
Copyright © www.kispmanual.com 2014-2024