 Kia Sportage: Turn Signal Lamp: Repair procedures
Third generation SL (2010–2016) / Kia Sportage SL Service & Repair Manual / Body Electrical System / Lighting System / Turn Signal Lamp: Repair procedures
| Removal |
Rear Turn Signal Lamp
| 1. |
Disconnect the negative (-) battery terminal. |
| 2. |
Remove the rear bumper.
(Refer to BD group - "Rear Bumper") |
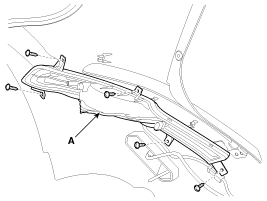
| 3. |
Disconnect the connector. Remove the rear turn signal lamp (A) after loosening 5 screws.
|
| 4. |
Replace the bulb (A) of rear turn signal lamp.
? If replacing the bulb only, you could work it without removing the rear bumper. |
Door Mirror Turn Signal Lamp
| 1. |
Disconnect the negative (-) battery terminal. |
| 2. |
Remove the mirror from the mirror holder.
Be careful not to damage to the clip. |
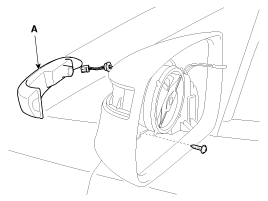
| 3. |
Remove the door mirror turn signal lamp (A) after disassembling screw and connector.
|
| Installation |
Rear Turn Signal Lamp
| 1. |
Install the bulb to the rear turn signal lamp assembly. |
| 2. |
Install the rear turn signal lamp to the rear bumper. |
Door Mirror Turn Signal Lamp
| 1. |
Install the door mirror turn signal lamp to the door mirror. |
| 2. |
Install the door mirror. |
| 3. |
Connect the battery terminal (-). |
 Head Lamps: Repair procedures
Removal
Head lamps become very hot during use; do not touch them or any attaching hardware immediately after they have been turned off.
...
 Room Lamp: Repair procedures
Inspection
1.
Remove the room lamp assembly connector then check for continuity between terminals.
Removal
1.
Disconnect the negative (-) battery terminal.
2.
Detach the lamp lens (A) fro ...
Other Information:
Crankshaft Position Sensor (CKPS): Description and Operation
Description
Crankshaft Position Sensor (CKPS) detects the crankshaft
position and is one of the most important sensors of the engine control
system. If there is no CKPS signal input, the engine ...
Torque Converter Control Solenoid Valve (T/CON_VFS): Repair procedures
Inspection
1.
Turn ignition switch OFF.
2.
Remove the air duct (A).
3.
Remove the air cleaner assembly.
(1)
Disconnect the breather hose (A) and brake booster intensifier hose.
(2)
...
Categories
- Home
- Kia Sportage QL (2015-2019) Owners Manual
- Kia Sportage QL (2015-2019) Service Manual
- Kia Sportage SL 2010-2016 Owners Manual
- Kia Sportage SL 2010-2016 Service Manual
Copyright © www.kispmanual.com 2014-2024