 Kia Sportage: Front Strut Assembly: Repair procedures
Third generation SL (2010ŌĆō2016) / Kia Sportage SL Service & Repair Manual / Suspension System / Front Suspension System / Front Strut Assembly: Repair procedures
| Replacement |
| 1. |
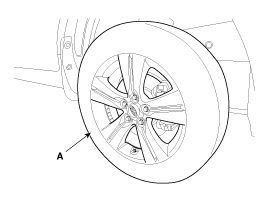
Remove the front wheel & tire.
|

| 2. |
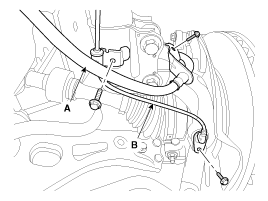
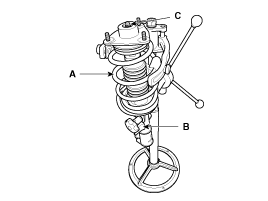
Remove the brake hose (A) & wheel speed sensor bracket (B) from the front strut assembly by loosening mounting bolts.
|
| 3. |
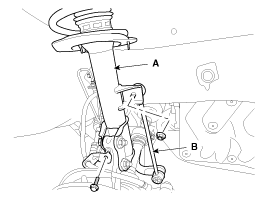
Disconnect the stabilizer link (B) from the front strut assembly (A) after loosening the nut.
|
| 4. |
Disconnect the front strut assembly (A) with the knuckle by loosening the bolt & nut.
|

| 5. |
Remove the cowl top cover.
Refer to the Body group - Cowl top cover |
| 6. |
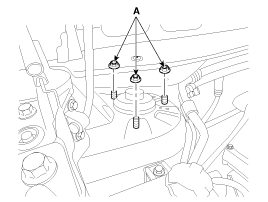
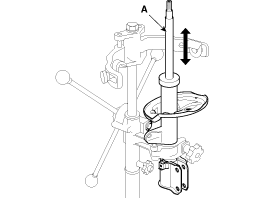
Remove the front strut assembly and then loosen the strut mounting nuts (A).
|
| 7. |
Installation is the reverse of removal. |
| Disassembly |
| 1. |
Using the special tool (09546-26000), compress the coil spring (A).
|
| 2. |
Remove the self-locking nut (C) from the strut assembly (B). |
| 3. |
Remove the insulator, spring seat, coil spring and dust cover from the strut assembly. |
| 4. |
Reassembly is the reverse of the disassembly. |
| Inspection |
| 1. |
Check the strut bearing for wear and damage. |
| 2. |
Check the spring upper and lower seat for damage and deterioration. |
| 3. |
Compress and extend the piston rod (A) and check that there is no abnormal resistance or unusual sound during operation.
|
Disposal
| 1. |
Fully extend the piston rod. |
| 2. |
Drill a hole on the A section to remove gas from the cylinder.
|
 Front Strut Assembly: Components and Components Location
Components
1. Strut assembly2. Insulator3. Bearing4. Spring upper pad5. Spring6. Dust cover7. Spring lower pad
...
 Front Lower Arm: Repair procedures
Replacement
1.
Remove the front wheel & tire.
Tightening torque :
88.3 ~ 07.9N.m (9.0 ~ 11.0kgf.m, 65.1 ~ 79.6lb-ft)
Be careful not to damage to the hub bo ...
Other Information:
Mode selection
The mode selection button controls the direction of the air flow through the
ventilation system.
The air flow outlet port is converted as follows:
Refer to the illustration in the ŌĆ£Manual cl ...
Sunglass holder
To open the sunglass holder, press the cover and the holder will slowly open.
Place your sunglasses with the lenses facing out. To close the sunglass holder,
push it up.
WARNING - Sunglass ...
Categories
- Home
- Kia Sportage QL (2015-2019) Owners Manual
- Kia Sportage QL (2015-2019) Service Manual
- Kia Sportage SL 2010-2016 Owners Manual
- Kia Sportage SL 2010-2016 Service Manual

Copyright ® www.kispmanual.com 2014-2026