 Kia Sportage: Intake Manifold: Repair procedures
Third generation SL (2010ŌĆō2016) / Kia Sportage SL Service & Repair Manual / Engine Mechanical System / Intake And Exhaust System / Intake Manifold: Repair procedures
| Removal and Installation |
| 1. |
Remove the engine cover. |
| 2. |
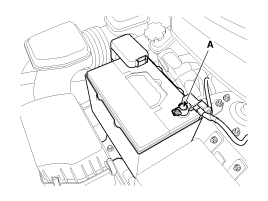
Disconnect the battery negative terminal (A).
|
| 3. |
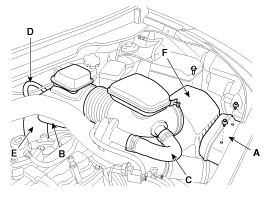
Remove the air cleaner assembly.
|
| 4. |
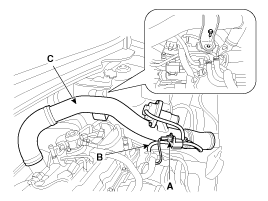
Disconnect the recirculation valve connector (A) and the
vacuum hose (B), and then remove the intercooner inlet pipe & hose
assembly (C).
|
| 5. |
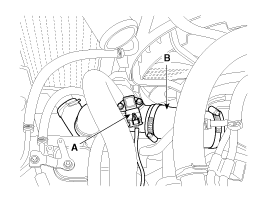
Disconnect the boost pressure sensor connector (A) and then remove the intercooler outlet pipe & hose assembly (B).
|
| 6. |
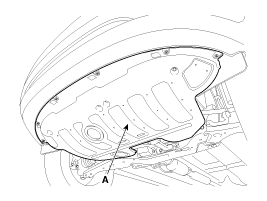
Remove the under cover (A).
|
| 7. |
Loosen the drain plug, and drain the engine coolant. Remove
the radiator cap to drain with speed. (Refer to Cooling system in this
group) |
| 8. |
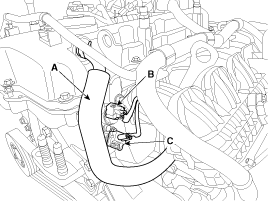
Disconnect the PCV hose (A), the intake OCV (Oil control
valve) connector (B) and the OTS (Oil temperature sensor) connector (C).
|
| 9. |
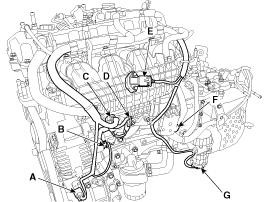
Disconnect the A/C compressor switch connector (A), the
alternator connector (B), the OPS (Oil pressure switch) connector &
injector extension connector (C), the knock sensor connector (D), the
MAPS (Manifold absolute pressure sensor) & IATS (Intake air
temperature sensor) connector (E), the ETC (Electronic throttle control)
connector (F) and the vacuum pump connector (G).
|
| 10. |
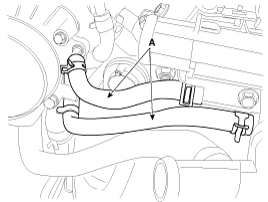
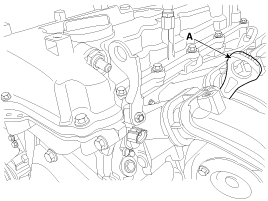
Disconnect the throttle body coolant hoses (A).
|
| 11. |
Remove the oil level gauge (A).
|
| 12. |
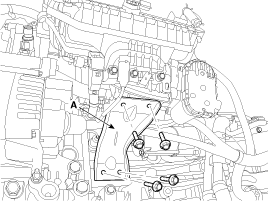
Remove the intake manifold stay (A).
|
| 13. |
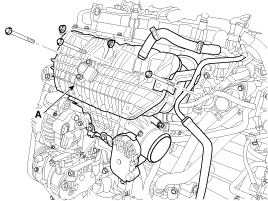
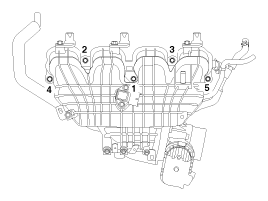
Remove the intake manifold (A) after disconnecting the vacuum hoses.
When installing the intake manifold, tighten the bolts and
nuts with pre-torque first, and then tighten the bolts and nuts with
specified torque in the sequence shown.
|
| 14. |
Installation is reverse order of removal. |
 Intake Manifold: Components and Components Location
Components
1. Intake manifold assembly 2. Electronic throttle body3. Intake manifold stay4. Intake manifold gasket
...
 Exhaust Manifold: Components and Components Location
Components
1. Hear protector2. EWGA(Electric Waste Gate Actuator)3. C-ring4. Turbo manifold module5. Turbocharger stay6. Trubo adapter gasket7. Turbo adapter8. Turbo adapter heat protector9. Oil ...
Other Information:
SRS Control Module (SRSCM): Repair procedures
Removal
1.
Remove the ignition key from the vehicle.
2.
Disconnect the battery negative cable and wait for at least three minutes before beginning work.
3.
Disconnect the DAB, PAB, SAB, CA ...
Theft-alarm stage
The alarm will be activated if any of the following occurs while the system is
armed.
A front or rear door is opened without using the ignition key or transmitter
(or smart key).
The tailga ...
Categories
- Home
- Kia Sportage QL (2015-2019) Owners Manual
- Kia Sportage QL (2015-2019) Service Manual
- Kia Sportage SL 2010-2016 Owners Manual
- Kia Sportage SL 2010-2016 Service Manual
Copyright ® www.kispmanual.com 2014-2025

