
 Kia Sportage: Rear Wiper Motor: Repair procedures
Third generation SL (2010–2016) / Kia Sportage SL Service & Repair Manual / Body Electrical System / Rear Wiper/Washer / Rear Wiper Motor: Repair procedures
| Inspection |
Rear Wiper Motor
| 1. |
Remove the 4P connector from the rear wiper motor. |
| 2. |
Connect battery positive (+) and negative (-) cables to terminals 2 and 1 respectively. |
| 3. |
Check that the motor operates normally. Replace the motor if it operates abnormally.
|
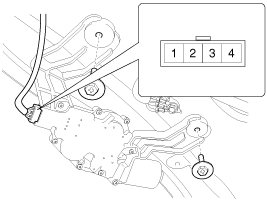
Automatic Stop Operation Check
| 1. |
Operate the motor at low speed using the stalk control. |
| 2. |
Stop the motor operation anywhere except at the off position by disconnecting terminal 2. |
| 3. |
Connect terminals 2 and 3. |
| 4. |
Connect the positive (+) lead from the battery to terminal 4 and the negative (-) lead to terminal 1. |
| 5. |
Check that the motor stops running at the off position.
|
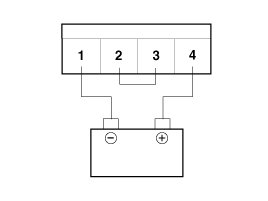
| Removal |
| 1. |
Detach the rear wiper head cap (A).
|
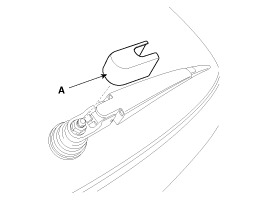
| 2. |
Remove the rear wiper arm & blade (A) after removing rear wiper arm nut (B).
|
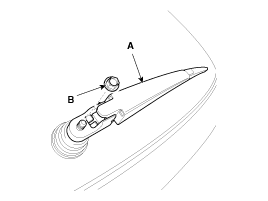
| 3. |
Remove the rear wiper cover (A) and HEX nut (B).
|
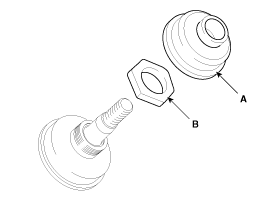
| 4. |
Remove the pad cap (A).
|
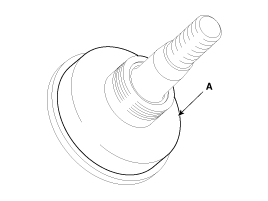
| 5. |
Open the tailgate then remove the tailgate trim.
(Refer to the BD group - "Tailgate") |
| 6. |
Disconnect the rear wiper motor connector (A) then remove the rear wiper motor (B) after loosening bolts (2EA).
|
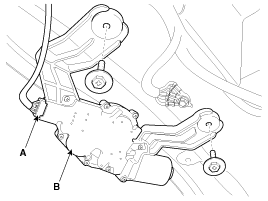
| Installation |
| 1. |
Install the rear wiper motor assembly.
|

| 2. |
Install the tailgate trim.
(Refer to the BD group - "Tailgate") |
| 3. |
Insert the pad cap and HEX nut.
|
| 4. |
Install the rear wiper arm and blade to align with black lowest rear defogger line (A).
|
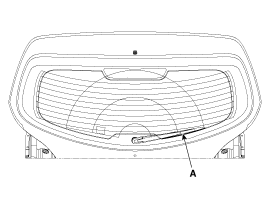
| 5. |
Install the rear wiper arm and rear wiper nut.
|
 Components and Components Location
Component Location
1. Rear wiper motor assembly2. Head cap3. Rear wiper motor mounting bolt4. Rear wiper motor mounting hole5. Pad cap6. Hexagonal nut7. Cover8. Rear wiper arm & blade9. Rear ...
 Rear Washer Switch: Repair procedures
Inspection
Check for continuity between the terminals while operating
the wiper and washer switch. If it is not normal condition, replace
wiper and washer switch.
Rear Wiper Switch
Rear Was ...
Other Information:
Propeller Shaft: Components and Components Location
Components
1. Front propeller shaft2. Center bearing bracket3. Rear propeller shaft
...
Rear seat heater
The seat heater is provided to warm the rear seats during cold weather. With
the ignition switch in the ON position, push either of the switches to warm rear
seats.
During mild weather or under ...
Categories
- Home
- Kia Sportage QL (2015-2019) Owners Manual
- Kia Sportage QL (2015-2019) Service Manual
- Kia Sportage SL 2010-2016 Owners Manual
- Kia Sportage SL 2010-2016 Service Manual

Copyright © www.kispmanual.com 2014-2026