
 Kia Sportage: Repair procedures
Third generation SL (2010–2016) / Kia Sportage SL Service & Repair Manual / Engine Electrical System / Ignition System / Repair procedures
| On-vehicle Inspection |
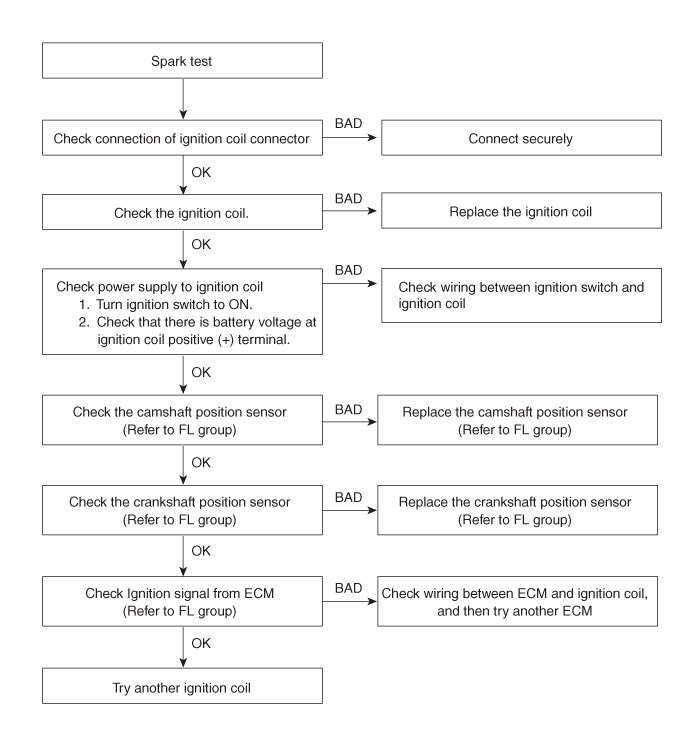
| Spark Test |
| 1. |
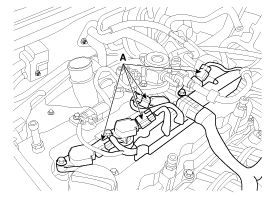
Disconnect the ignition coil connectors (A).
|
| 2. |
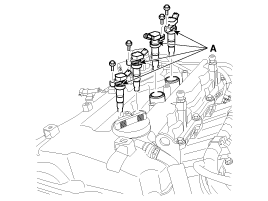
Remove the ignition coils (A).
|
| 3. |
Using a spark plug socket, remove the spark plug. |
| 4. |
Install the spark plug to the ignition coil. |
| 5. |
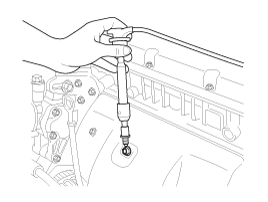
Ground the spark plug to the engine.
|
| 6. |
Check if spark occurs while engine is being cranked.
|

| 7. |
Inspect all the spark plugs. |
| 8. |
Using a spark plug socket, install the spark plug. |
| 9. |
Install the ignition coil. |
| 10. |
Reconnect the ignition coil connector. |
Inspect Spark Plug
| 1. |
Disconnect the ignition coil connectors (A).
|
| 2. |
Remove the ignition coils (A).
|
| 3. |
Using a spark plug socket, remove the spark plug.
|

| 4. |
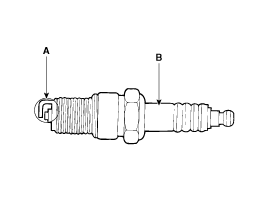
Inspect the electrodes (A) and ceramic insulator (B).
Inspection Of Electrodes
|
| 5. |
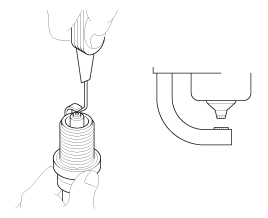
Check the electrode gap (A).
|
Inspect Ignition Coil
| 1. |
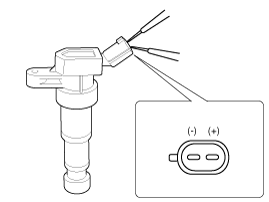
Measure the primary coil resistance between terminals (+) and (-).
|
| Removal and Installation |
| 1. |
Disconnect the ignition coil connectors (A).
|
| 2. |
Remove the ignition coils (A).
|
| 3. |
Installation is the reverse of removal. |
 Description and Operation
Description
Ignition timing is controlled by the electronic control
ignition timing system. The standard reference ignition timing data for
the engine operating conditions are preprogrammed in ...
 Charging System
...
Other Information:
Checking the coolant level
WARNING - Removing radiator cap
Never attempt to remove the radiator cap while the engine is operating or
hot. Doing so might lead to cooling system and engine damage.
Also, hot coolant or s ...
Audio Unit: Repair procedures
Removal
1.
Disconnect the negative (-) battery terminal.
2.
Remove the crash pad passenger''s garnish (A).
(Refer to BD group - "Crash pad")
3.
Disconnect the connectors and remove the cl ...
Categories
- Home
- Kia Sportage QL (2015-2019) Owners Manual
- Kia Sportage QL (2015-2019) Service Manual
- Kia Sportage SL 2010-2016 Owners Manual
- Kia Sportage SL 2010-2016 Service Manual

Copyright © www.kispmanual.com 2014-2026