 Kia Sportage: Fuel Tank: Repair procedures
Third generation SL (2010ŌĆō2016) / Kia Sportage SL Service & Repair Manual / Engine Control / Fuel System / Fuel Delivery System / Fuel Tank: Repair procedures
| Removal |
| 1. |
Release the residual pressure in fuel line (Refer to the Fuel
Delivery System - Repair Procedures - "Release Residual Pressure in
Fuel Line"). |
| 2. |
Remove the rear seat cushion (Refer to ŌĆ£SeatŌĆØ in BD group). |
| 3. |
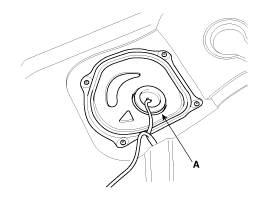
Remove the fuel pump service cover (A).
|
| 4. |
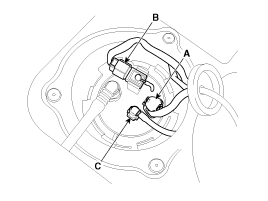
Disconnect the fuel pump connector (A) and the fuel tank pressure sensor connector (B). |
| 5. |
Disconnect the fuel feed tube quick connector (C).
|
| 6. |
Remove the rear - LH wheel & tire. |
| 7. |
Lift the vehicle and support the fuel tank with a jack. |
| 8. |
Remove the center muffler assembly (Refer to ŌĆ£Intake And Exhaust SystemŌĆØ in EM group). |
| 9. |
Remove the propeller shaft (Refer to ŌĆ£Propeller Shaft AssemblyŌĆØ in DS group) [4WD]. |
| 10. |
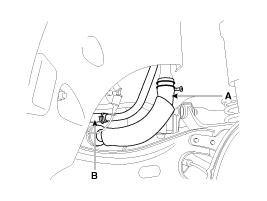
Disconnect the fuel filler hose (A) and the ventilation hose (B).
|
| 11. |
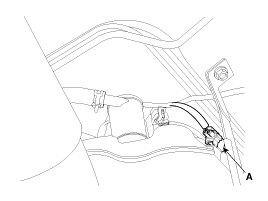
Disconnect thd canister close valve connector (A).
|
| 12. |
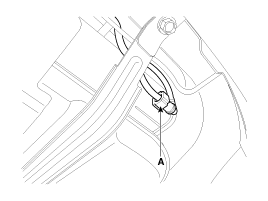
Disconnect the vapor tube quick-connector (A).
|
| 13. |
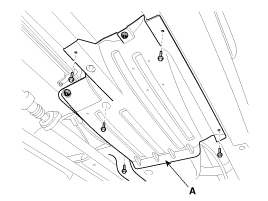
Remove the under cover (A).
|
| 14. |
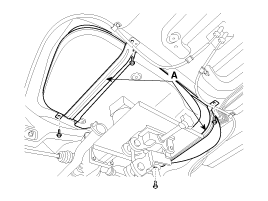
Remove the fuel tank from the vehicle after removing the fuel tank band (A).
|
| Installation |
| 1. |
Installation is reverse of removal.
|
 Repair procedures
Fuel Pressure Test (Low pressure system)
1.
Release the residual pressure in fuel line (Refer to the Fuel
Delivery System - Repair Procedures - "Release Residual Pressure in
Fuel Line").
...
 Fuel Pump: Repair procedures
Inspection
[Fuel pump]
1.
Turn the ignition switch OFF, and then remove battery (-) cable.
2.
Remove the fuel pump assembly.
3.
Check motor operation by fuel pump connector (A) connecti ...
Other Information:
FLEX Steer
The FLEX Steer controls steering effort as driver's preference or road condition.
You can select the desired steering mode by pressing the FLEX Steer button.
The FLEX Steer stays in the last m ...
DBC Switch: Description and Operation
Description
The DBC function is the acronym word of Downhill Brake
Control function. When a vehicle goes down the hill, just pushing the
DBC switch enables the car to keep its vehicle''s speed ...
Categories
- Home
- Kia Sportage QL (2015-2019) Owners Manual
- Kia Sportage QL (2015-2019) Service Manual
- Kia Sportage SL 2010-2016 Owners Manual
- Kia Sportage SL 2010-2016 Service Manual
Copyright ® www.kispmanual.com 2014-2026

