 Kia Sportage: Audio Remote Control: Repair procedures
Third generation SL (2010ŌĆō2016) / Kia Sportage SL Service & Repair Manual / Body Electrical System / Audio / Audio Remote Control: Repair procedures
| Inspection |
| 1. |
Check for resistance between No.6 and No.7 terminals in each switch position.
[Audio System]
|
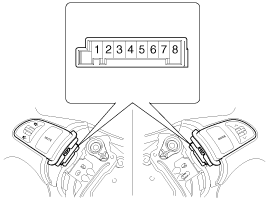
| 2. |
Check for voltage between No.6 and No.7 terminal in each switch position.
[Audio System]
|
| Removal |
| 1. |
Remove the driver airbag module.
(Refer to the RT group - "Airbag module") |
| 2. |
Remove the steering wheel remote control switch mounting screws (2EA).
Disconnect the connector and remove the steering wheel remote control switch (A).
|
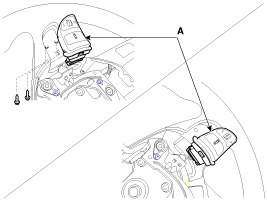
| Installation |
| 1. |
Install the audio remote control switch on the steering wheel. |
| 2. |
Reconnect the audio remote control switch connector and airbag connectors.
|

| 3. |
Install the driver airbag module.
|
 Audio Remote Control: Schematic Diagrams
Circuit Diagram
...
 AUX(Auxiliary) Jack: Schematic Diagrams
Circuit Diagram
...
Other Information:
Luggage box
You can place a first aid kit, a reflector triangle, tools, etc. in the box for
easy access.
Grasp the handle on the edge of the cover and lift it. ...
Starter: Repair procedures
Removal and Installation
1.
Remove the engine cover.
2.
Disconnect the battery negative terminal (A).
Tightening torque :
4.0 ~ 6.0N.m (0.4 ~ 0.6kgf.m, 3.0 ~ 4.4lb-ft)
3.
Remove the ...
Categories
- Home
- Kia Sportage QL (2015-2019) Owners Manual
- Kia Sportage QL (2015-2019) Service Manual
- Kia Sportage SL 2010-2016 Owners Manual
- Kia Sportage SL 2010-2016 Service Manual

Copyright ® www.kispmanual.com 2014-2026