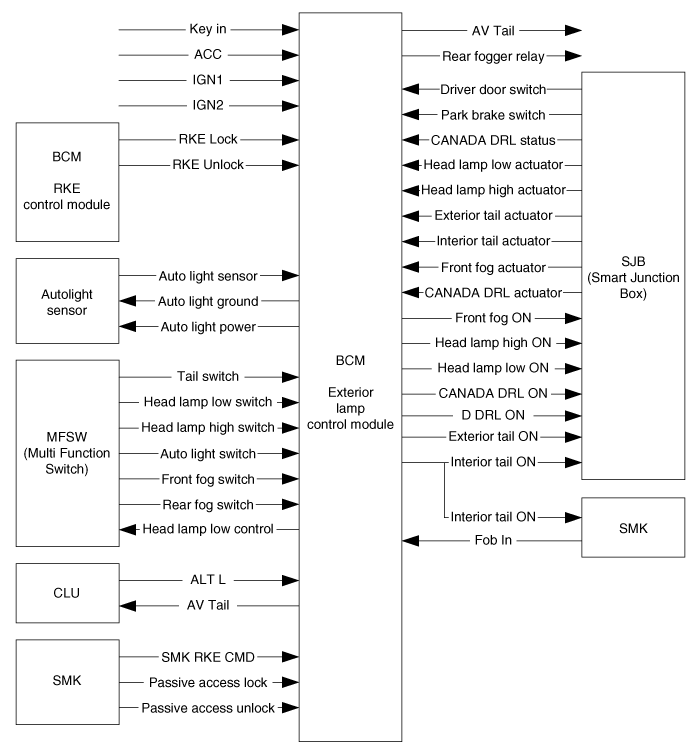
Body
control module receives various input switch signals controlling time
and alarm functions for front washer interlocking wiper, front
intermittent wiper, mist wiper, rear washer interlocking wiper, rear
intermittent wiper, seat belt reminder, key operated warning, parking
start warning, RKE teaching sound, SMK warning, power window timer,
safety power window, rear defogger timer, windshield deicer timer,
decayed room(map) lamp, tail lamp autocut, DRL, escort, head lamp
low/high, tail lamp, Turn signal lamp, hazard lamp, ESS lamp, lane
change, auto light, front fog lamp, AV tail, central door lock/unlock,
AV unlock signal, 2 turn unlock, auto door lock/unlock, IGN key
reminder, crash door unlock, key inter lock, buglar alarm control.
Abbreviations And Definitions
Abbreviations
Definitions
IPM
Intelligent integrated Platform Module (= Body Control Module)
DRL
Daytime Running Lights
MFSW
Multi Function SWitches
IPS
Intelligent Power Switch
ALS
Auto Light Sensor
SW
Switch
J/Box
(Smart) Junction Box
BCM
Body Control Module
SMK
Smart Key Unit
CLU
Cluster
SBW
Seat Belt Warning
DRV
Driver side
AST
Assistant side
RPAS
Rear Parking Assist
The classification of signal characteristics
Symbol
Description
Remarks
L_
Logic Input
?
A_
Analog Input
?
O_
Logic Output
?
C_
Can Signal
?
S_
Serial Communication
?
P_
PWM signal and Frequency Signal
?
D_
Data signal
Special Data Format
V_
Power and Ground supplying
?
b_
Internal variable
?
B_
Body
?
Function
Wiper & Washer Control
Function
Characteristics
Name
Hardware Label
Spec. Designation
Input
Logic
L_IGN2
Ignition 2 Input
L_WiperMistSW
Front Wiper Mist Switch
L_WasherSW
Front Washer Switch
L_WiperIntmtSW
Front Wiper Intermittent Switch
L_RearWiperSW
Rear Wiper Switch
L_RearWasherSW
Rear Washer Switch
L_RearWiperIntmtSW
Rear Wiper Intermittent Switch
Internal
b_HeadLampLowOutput
Head Lamp Low On/Off State
Analog
A_WiperIntmtVol
Front Wiper Intermittent Interval Time Value
Output
Logic
O_WiperRly
Front Wiper Output
O_HeadLampWasherRly
Head Lamp Washer Output
CAN Communication
C_RearWiperRly
Rear Wiper Output
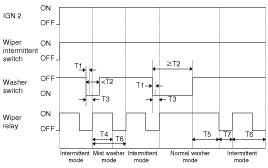
Front Wiper & Washer General Description
1.
Wiper Low Switch Control and Wiper High Switch Control are direct control.
ŌĆō
The MFSW''s Wiper Low Switch and Wiper High Switch outputs are directly connected with Wiper Motor.
ŌĆō
BCM only control Wiper Mist, Wiper Washer and Wiper Intermittent.
In case of IGN2 On(L_IGN2 = ON), if turn on the Wiper Mist
Switch(L_WiperMistswitch= On), then Wiper is controlled, by switch on
time.
ŌĆō
Mist operation does not work at Wiper Washer.
T1 : One wiping, T2 : Mist one time
Front Wiper Intermittent Control
ŌĆō
In case of IGN2 On(L_IGN2 = ON), if turn on the Wiper
Intermittent Switch(L_WiperIntmtswitch= On), then Wiper Low output is
turned on depending on Wiper Intermittent Time(WiperIntmtTime, this
value is defined by A_WiperIntmtVol input value).
T1 : One wiping, T2 : Wiper intmt time
Value Name
Value
One Wiping
0.7 sec ┬▒ 70 msec
Con Wipe Time
2 sec
Front Wiper Washer Control
1.
In case of IGN2 On(L_IGN2 = ON), if user turns on the Washer
Switch(L_Washerswitch= On) more than a given time, then Wiper output
shall be driven depending on Wiper mode.
T1 : Washer SW DET time, T2 : Mist mode time,
T3 : Out delay time, T4 : One wiping,
T5 : Washer mode time
Value Name
Values
Washer SW DET Time
0 sec (Input Filtering Time)
Mist Mode Time
0.2 sec ┬▒ 20 msec
Out Delay Time
0.3 sec ┬▒ 30 msec
One Wiping
0.7 sec ┬▒ 70 msec
Washer Mode Time
3 sec ┬▒ 0.3 sec
2.
During wiper intermittent control, If Washer switch is turned
on, BCM stops the Intermittent control and enter washer control mode
and then after washer control finish, return the wiper intermittent
control.
T1 : Washer SW DET time, T2 : Mist mode time,
T3 : Out delay time, T4 : One wiping,
T5 : Washer mode time, T6 : Wiper intmt time,
T7 : (Wiper intmt time - One wiping)
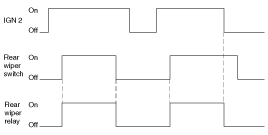
Rear Wiper & Washer General Description
1.
BCM has Rear Wiper Control Logic.
ŌĆō
BCM sends the rear wiper control signal(C_RearWiperRly) to J/Box via CAN.
In case of IGN2 ON(L_IGN2 = On), if user turns on the Rear
Wiper Switch(L_RearWiperswitch= On), BCM controls the Rear Wiper
Output(C_RearWiperRly = On) until Rear Wiper Switch Off
(L_RearWiperswitch= Off)or IGN2 Off(L_IGN2 = Off)
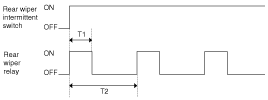
Rear Wiper Intermittent Control
ŌĆō
In case of IGN2 On(L_IGN2 = ON), if user turns on the Rear
Wiper Intermittent Switch(L_RearWiperIntmtswitch= On), then Rear Wiper
Low output is turned on following as Rear Wiper Intermittent
Time(RearWiperIntmtTime).
T1 : Rear wiper one time, T2 : Rear wiper intmt time
Value Name
Value
Rear Wiper One Time
0.7 sec ┬▒ 70 msec
Rear Wiper Intmt Time
6.7 sec ┬▒ 0.67 sec
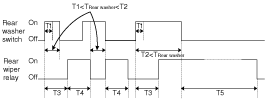
Rear Wiper Washer Control
ŌĆō
In case of IGN2 On(L_IGN2 = ON), if user turns on the Rear
Washer Switch(L_RearWasherswitch= On) more than a given time, then Wiper
output shall be driven depending on Rear Wiper mode.
T1 : Rear wiper washer mode on time,
T2 : Rear wiper mist mode time,
T3 : Rear wiper washer out delay time,
T4 : Rear wiper one time,
T5 : Rear wiper washer mode time
Value Name
Values
Rear Wiper Washer Mode On Time
0.2 sec ┬▒ 20 msec
Rear Wiper Mist Mode Time
0.6 sec ┬▒100 msec
Rear Wiper Washer Out Delay Time
0.3 sec ┬▒ 100 msec
Rear Wiper One Time
0.7 sec ┬▒ 70 msec
Rear Wiper Washer Mode Time
3 sec ┬▒ 0.3 sec
ŌĆō
Rear Washer Wiping During Rear Wiper Intermittent Control
During Rear Wiper Intermittent Control, If Rear Washer Switch
is turned on, BCM stops the Intermittent Control and enter Rear Wiper
Washer Control Mode and then after Rear Wiper Washer Control finish,
return the Rear Wiper Intermittent Control.
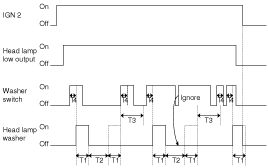
Head Lamp Washer Function
1.
In case of IGN2 ON(L_IGN2 = On) & HEAD LAMP
ON(b_HeadLampLowOutput = On) status, if washer switch
input(L_Washerswitch= On) is detected and keep on the state longer than
ŌĆ£WasherSWTimeŌĆØ, Head Lamp Washer Output is turned On
(O_HeadLampWasher = On) during ŌĆ£Head Lamp Washer On TimeŌĆØ. If
ŌĆ£HeadLampWasherNumberŌĆØ is bigger than 1, Head Lamp washer output
repeats On and Off for ŌĆ£Head Lamp Washer On TimeŌĆØ and ŌĆ£Head Lamp
Washer Off TimeŌĆØ and ŌĆ£HeadLampWasherNumberŌĆØ times.
2.
When another Head Lamp Washer is requested during Head Lamp Washer activation, the second is ignored.
3.
After an output activation of the Head Lamp Washer, there is
an inhibition time for ŌĆ£HeadLampWasherInhibitTimeŌĆØ. During the
inhibition time, Head Lamp washer request is ignored.
4.
After beginning the output, even though the precondition is
not satisfied (Head Lamp Off), output does not stop. But in IGN2 off,
output is stop.
T1 : Head lamp washer on time,
T2 : Head lamp washer off time,
T3 : Head lamp washer inhibit time,
T4 : Washer SW time
Name
Value
Head Lamp Washer Number
1 (TBD)
Head Lamp Washer On Time
1.2 ┬▒ 0.1 sec (TBD)
Head Lamp Washer Off Time
1.2 ┬▒ 0.1 sec (TBD)
Washer SW Time
0 sec
Head Lamp Washer Inhibit Time
5 sec
Exterior Lighting Control
Function
Characteristics
Name
Hardware Label
Spec. Designation
Input
Logic
L_KeyIn
Key In signal
L_ACC
Accessory Signal
L_IGN2
Ignition 2 Power
L_AutoLightSW
Head Lamp Auto Switch
L_HeadLampLowSW
Head Lamp Low Switch
L_TailSW
Tail Lamp Switch
L_FrontFogSW
Front Fog Switch
L_HeadLampHighSW
Head Lamp High Switch
L_RearFogSW
Rear Fog Switch
Analog
A_AutoLightSnsr
Auto Light Sensor Analog Input
A_IGN1
Ignition 1 Power
CAN Communication
C_FobIn
Fob Key Insert State
C_ALT_L
Engine is running
C_PassiveAccessLock
SMK Passive access lock for door module
C_PassiveAccessUnlock
PIC Passive access unlock for door module
C_SMKRKECMD
SMK FOB Keyless Command
C_DRVDRSW
Driver Door Switch
C_ParkBrakeSW
Parking Brake Switch
C_CANADA_DRLSts
CANADA DRL Option
C_HLampLOW_Act
Head Lamp Low Beam Activity
C_HLampHIGH_Act
Head Lamp High Beam Activity
C_EXTTail_Act
External Tail Lamp Activity
C_INTTail_Act
Internal Tail Lamp Activity
C_FrontFog_Act
Front Fog Lamp Activity
C_CANADA_DRL_Act
CANADA DRL Activity(High beam 50%)
Internal
b_RKELock
Lock Request by RKE in non-SMK Variant
b_RKEUnlock
Unlock Request by RKE in non-SMK Variant
Output
Logic
O_HeadLampLowCTRL
Head Lamp Low Output Status (Active Low)
O_RearFogRLY
Rear Fog Control
O_AVTail
Auto Light output to AV module
V_AutoLightPwr
Supplying Power to Auto Light Module
V_AutoLightGND
Supplying Ground to Auto Light Module
CAN Communication
C_INTTailON
Internal Tail Lamp ON Command
C_EXTTailON
External Tail Lamp ON Command
C_HeadLampLowON
Head Lamp Low Command
C_HeadLampHighON
Head Lamp High Command
C_FrontFogON
Front Fog Command
C_CANADA_DRLON
CANADA DRL ON Command (high beam 50%)
C_AV_Tail
AV Tail
C_D_DRL_ON
Dedicated DRL Command
Tail Lamp Control
1.
This function describes the following features.
ŌĆō
Turn on and off Tail Lamp by switch input.
ŌĆō
Turn on and off Tail Lamp in Auto Light Control command.
ŌĆō
Automatically cut off Tail Lamps if a driver forgets to turn them off.
ŌĆō
Output control of Tail Lamp
2.
Tail Auto Cut Function Condition
ŌĆō
The ŌĆ£Tail Auto CutŌĆØ strategy ensures that Tail lamps are turned off even if a driver forgets to turn them off.
ŌĆō
When the Tail lamp is turned on by Tail lamp SW, after key
insertion, and if a user removes key and opens the driver side door(or
vice versa), the Tail lamps are automatically turned off.
ŌĆō
While ŌĆ£Tail Auto CutŌĆØ function is active, if a user turns
off the Tail lamp switch or inserts key, ŌĆ£Tail Auto CutŌĆØ function
will be deactivated.
During the activation of Escort function, no Tail Auto Cut
mode is possible and it is only after escort function deactivation that
Tail Auto Cut mode can be applied.
Head Lamp Control
1.
This function describes the following features.
ŌĆō
Turn on and off Head Lamp Low by Head Lamp Low Switch input.
ŌĆō
Turn on and off Head Lamp Low by Escort Function.
ŌĆō
Turn on and off Head Lamp Low by Auto Light Control Request.
ŌĆō
Turn on and off Head Lamp High by Head Lamp High Switch input.
ŌĆō
Turn on and off Head Lamp High and Low by Passing Switch Input.
ŌĆō
Output control of Head Lamp Low.
ŌĆō
Output control of Head Lamp High.
ŌĆō
Output control of Head Lamp High Indicator.
ŌĆō
Output control of EC DRL Lamp
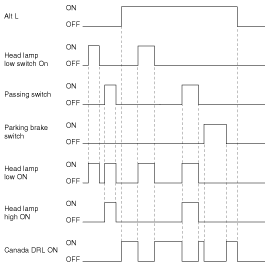
2.
Head Lamp Low Control
ŌĆō
In IGN ter minal State(b_IGN = ON), if turn on the Head Lamp
LOW SW(L_HeadLampLowSW = ON) or Auto Light sensor value shows head lamp
On, Head Lamp Low outputs are turned on (C_HLampLowON = On).
ŌĆō
When Tail lamp Off and headlamp Off conditions are satisfied
at the same time, Head Lamp LOW and Tail LAMP turned off simultaneous
immediately.
3.
Head Lamp High Control
ŌĆō
In IGN ter minal State(b_IGN = ON) and Head Lamp Low
On(O_HeadLampLowCTRL = ON), if turn on the Head Lamp High
SW(L_HeadLampHighSW = ON), Head Lamp High Outputs are turned on
(C_HLampHighON = ON).
ŌĆō
In Auto light mode , If Head Lamp High switch turn on , when Head lamp Low is ''on'' then Head Lamp High activation.
ŌĆō
So, in this case used head lamp low output signal.
[O_HeadLampLowCTRL ]this signal is active low, when HeadLampLow On
condition, [O_HeadLampLowCTRL = On], it can get the head lamp high
switch state .
ŌĆō
when HeadLampLow Off condition [O_HeadLampLowCTRL = Off ],
head lamp high switch is not activated, even if multifunction Head Lamp
High switch is on .
4.
Passing Control
ŌĆō
In IGN ter minal State(b_IGN = ON), If Head Lamp Passing
conditon Input(b_PassingSW = ON) is detected then Head Lamp High
Output(C_HLampHighON = ON) is turned on and Head Lamp Low
Output(C_HLampLowON= ON) at the same time.
5.
CANADA DRL (NA DRL)
ŌĆō
If alternator is active(C_AltL = On), BCM activates CANADA
DRL functionality and turns on the Head Lamp High (C_CANADA_DRLON=On).
ŌĆō
Deactivation condition
a.
Head Lamp Low On request by Head Lamp switch or auto Light Head Lamp Low control
b.
Head High On request by Passing switch
c.
Parking Brake switch On
6.
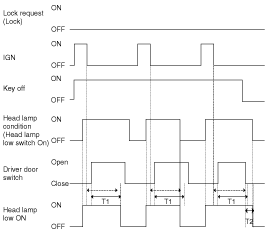
Escort Function
ŌĆō
After user generates the call of head lamp low
light(b_HeadLampLowSWOn = ON), if switch off ignition(b_IGN =Off and
b_START=Off), and then keep Head Lamp Low Output On (C_HLampLowON= ON)
state during 20 min.
ŌĆō
And after open and close driver side door(C_DRVDRSW = ON >
C_DRVDRSW = Off), user will have consequently lighting of head lamp
low(C_HLampLowON = ON) during only 30 sec.
ŌĆō
During active ŌĆ£Escort FunctionŌĆØ, if receive Lock request 2
times (b_2LOCK =2 ) or cancel the lighting request of head lamp low
(L_HeadLampLowSW = Off & L_AutoLightSW = Off), this function is
released.
While escort function is activated, Tail lamp is keeping the
turn on state and does not go to Autocut and after finish escort state
and user removes key, it can go Autocut mode.
While the ŌĆ£Escort FunctionŌĆØ is activated by ŌĆśHead Lamp
Low SwitchŌĆÖ, if change from ŌĆśHead Lamp Low SwitchŌĆÖ to ŌĆśLamp Auto
SwitchŌĆÖ, ŌĆ£Escort FunctionŌĆØ is deactivated, because Lamp Auto mode
is ŌĆśLamp OffŌĆÖ condition.
While the ŌĆ£Escort FunctionŌĆØ is activated by ŌĆśLamp Auto
SwitchŌĆÖ, if change from ŌĆśLamp Auto SwitchŌĆÖ to ŌĆśHead Lamp Low
SwitchŌĆÖ, ŌĆ£Escort FunctionŌĆØ is keeping the activation state,
because of ŌĆśHead Lamp OnŌĆÖ condition.
After IGN ter minal off 20 minute timers is started, but as soon as door is opened and closed then 30 sec timer is engaged.
T1 : Ecsort 20m time, T2 : Ecsort 30s time
T1 : Ecsort 20m time, T2 : Ecsort 30s time
Auto Light Control
1.
This function describes the following features.
ŌĆō
Input detection by Auto Light Sensor.
ŌĆō
Generate Auto Light Out Status data.
ŌĆō
Send Auto Light Out Status.
ŌĆō
Tail Lamp Control by Auto light Mode.
ŌĆō
Head Lamp Low Control by Auto light Mode.
ŌĆō
AV Tail Control by Auto Light sensor level.
2.
Variant
Variant
NA
Description
TailON Level
1.57V ┬▒ 0.10V
TailOFF Level
2.56V ┬▒ 0.10V
HeadON Level
1.57V ┬▒ 0.10V
HeadOFF Level
2.56V ┬▒ 0.10V
AVTailON Level
0.41V ┬▒ 0.10V
AVTailOFF Level
0.9V ┬▒ 0.10V
On filtering Time
12 + 0.1 sec
Off Filtering Time
12 + 0.1 sec
AV Tail Output Control
1.
In ACC, IGN, START ter minal states, monitoring of the auto
light sensor supplyŌĆÖs range (AutoLightPwr) is performed and a failure
is raises up (Auto Light failure) when the supplyŌĆÖs voltage is out of
range (outside of range [4V :6V]).
If Auto Light failure occurs and as long as this error is
present, the tail lamp and head lamp low must be turned on regardless of
the sunlight level provided by the sensor.
When physical Auto light sensor failure occurs the Lamps are
turned on, because a zero voltage level is provided by the sensor when
internal failure is present.
This is designed to prevent any head lamp cut off when the failure occurs during the night.
AV Tail Output Control is started In ACC, IGN, START regardless of MFSW Auto Light switch.
CAN signal AV_Tail is set/reset at the same time as AV Tail.
Front Fog Lamp Control
ŌĆō
In case of Tail Lamp Output On (b_TailLamp = On), if Front
Fog Lamp Switch input is detected(L_FrontFogSW = On), Front Fog Lamp
outputs (C_FrontFogON = On) is turned ON.
Interior Lamp Control
Function
Characteristics
Name
Hardware Label
Spec. Designation
Input
Logic
L_ACC
ACC input
L_IGN2
Ignition 2 Input
L_KeyIn
Key In Signal
Analog
A_IGN1
Ignition 1 Input
CAN Communication
C_FobIn
Fob In SW
C_DRVDRSW
Driver Door Open/Close
C_ASTDRSW
Assist Door Open/Close
C_RLDRSW
Rear Left Door Open/Close
C_RRDRSW
Rear Right Door Open/Close
C_DRVUnlockState
Driver Door Unlock State
C_ASTUnlockState
Assistant Door Unlock State
C_RLUnlockState
Rear Left Door Unlock State
C_RRUnlockState
Rear Right Door Unlock State
C_PassiveAccessUnlock
Passive Access Unlock
Output
Logic
O_HeadLampLowCTRL
Head Lamp Low Output Status (Active Low)
O_RearFogRLY
Rear Fog Control
O_AVTail
Auto Light output to AV module
V_AutoLightPwr
Supplying Power to Auto Light Module
V_AutoLightGND
Supplying Ground to Auto Light Module
CAN Communication
C_INTTailON
Internal Tail Lamp ON Command
C_EXTTailON
External Tail Lamp ON Command
C_HeadLampLowON
Head Lamp Low Command
C_HeadLampHighON
Head Lamp High Command
C_FrontFogON
Front Fog Command
C_CANADA_DRLON
CANADA DRL ON Command (high beam 50%)
C_AV_Tail
AV Tail
C_D_DRL_ON
Dedicated DRL Command
Room Lamp Control
1.
Transitions from ŌĆ£Room Lamp OffŌĆØ state :
State
Description
Initial Condition
ŌĆ£Room Lamp OffŌĆØ state : A_IGN1 = Off & b_AllDoorsClose = On & C_TGSW =Off
Event
1.
b_KeyOn = Off & b_Unlock = Off >On
: (Unlock by RKE or Passive)
2.
b_KeyOn = On>Off
Action
ŌĆó
State changed to ŌĆ£Room Lamp 30 sec OnŌĆØ
ŌĆó
Start RoomLamp30Timer
ŌĆó
O_RoomLamp = On (during RoomLamp30Time)
State
Description
Initial Condition
ŌĆ£Room Lamp OffŌĆØ state : A_IGN1 = Off
Event
1.
b_AnyDoorOpen = Off > On or
2.
Reset & b_AnyDoorOpen = On
Action
ŌĆó
State changed to ŌĆ£Room Lamp 20 min OnŌĆØ
ŌĆó
Start RoomLamp20Timer
ŌĆó
O_RoomLamp = On (during RoomLamp20Time)
State
Description
Initial Condition
ŌĆ£Room Lamp OffŌĆØ state :
Event
A_IGN1 = On & b_AnyDoorOpen = On
Action
ŌĆó
State changed to ŌĆ£Room Lamp OnŌĆØ
ŌĆó
O_RoomLamp = On
T1 : Room lamp 30 time, T2 : Room lamp 20 time
Value name
Value
Room Lamp 30 Time
30 sec ┬▒ 3 sec
Room Lamp 20 Time
20 min ┬▒ 1 min
2.
Transitions from ŌĆ£Room Lamp 30 sec OnŌĆØ state :
State
Description
Initial Condition
ŌĆ£Room Lamp 30 sec OnŌĆØ state :
Event
1.
A_IGN1 == On or
2.
RoomLamp30Timer ? RoomLamp30Time or
3.
C_TGSW == Off & b_AllDoorsLock == Off > On or
4.
b_ATWSARM == On
Action
ŌĆó
State changed to ŌĆ£Room Lamp DecayingŌĆØ
ŌĆó
Cancel RoomLamp30Timer
ŌĆó
Start RoomLampDecayTimer
ŌĆó
O_RoomLamp = Decaying (Decaying time : RoomLampDecayTime)
State
Description
Initial Condition
ŌĆ£Room Lamp 30 sec OnŌĆØ state : A_IGN1 == Off & b_AllDoorsClose == On & C_TGSW == Off
Event
1.
b_KeyOn == Off & b_Unlock == Off >On
: (Unlock by RKE or Passive)
2.
b_KeyOn == On>Off
Action
ŌĆó
State remains ŌĆ£Room Lamp 30 sec OnŌĆØ
ŌĆó
Re-start RoomLamp30Timer (re-start for additional RoomLamp30Time)
State
Description
Initial Condition
ŌĆ£Room Lamp 30 sec OnŌĆØ state : A_IGN1 == Off
Event
b_AnyDoorOpen == Off>On
Action
ŌĆó
State changed to ŌĆ£Room Lamp 20 min OnŌĆØ
ŌĆó
Cancel RoomLamp30Timer
ŌĆó
Start RoomLamp20Timer
ŌĆó
O_RoomLamp = On (during RoomLamp20Time)
T1 : Room lamp 30 time, T2 : Room lamp 20 time
Value name
Value
Room Lamp 30 Time
30 sec ┬▒ 3 sec
Room Lamp 20 Time
20 min ┬▒ 1 min
3.
Transitions from ŌĆ£Room Lamp 20 min OnŌĆØ state :
State
Description
Initial Condition
ŌĆ£Room Lamp 20 min OnŌĆØ state :
Event
ŌĆó
RoomLamp20Timer ? 20 min or
ŌĆó
A_IGN1 == Off & b_AllDoorsClose == On & C_TGSW == Off & b_AllDoorsLock == On
Action
ŌĆó
State changed to ŌĆ£Room Lamp DecayingŌĆØ
ŌĆó
Cancel RoomLamp20Timer
ŌĆó
Start RoomLampDecayTimer
ŌĆó
O_RoomLamp = Decaying (Decaying time : RoomLampDecayTime)
State
Description
Initial Condition
ŌĆ£Room Lamp 20 min OnŌĆØ state : A_IGN1 == Off
Event
b_AllDoorsClose == On & C_TGSW == Off & b_AllDoorsLock == Off
Action
ŌĆó
State changed to ŌĆ£Room Lamp 30 sec OnŌĆØ
ŌĆó
Cancel RoomLamp20Timer
ŌĆó
Start RoomLamp30Timer
ŌĆó
O_RoomLamp = On (during RoomLamp30Time)
State
Description
Initial Condition
ŌĆ£Room Lamp 20 min OnŌĆØ state :
Event
A_IGN1 = On
Action
ŌĆó
State changed to ŌĆ£Room Lamp OnŌĆØ
ŌĆó
Cancel RoomLamp20Timer
ŌĆó
O_RoomLamp = On
T1 : Room lamp 30 time, T2 : Room lamp 20 time
Value name
Value
Room Lamp 30 Time
30 sec ┬▒ 3 sec
Room Lamp 20 Time
20 min ┬▒ 1 min
4.
Transitions from ŌĆ£Room Lamp DecayingŌĆØ state :
State
Description
Initial Condition
ŌĆ£Room Lamp DecayingŌĆØ state :
Event
RoomLampDecayTimer ? RoomLampDecayTime
Action
ŌĆó
State changed to ŌĆ£Room Lamp OffŌĆØ
ŌĆó
Cancel RoomLampDecayTimer
ŌĆó
O_RoomLamp = Off
State
Description
Initial Condition
ŌĆ£Room Lamp DecayingŌĆØ state : A_IGN1 == Off & b_AllDoorsClose == On & C_TGSW == Off
Event
1.
b_KeyOn == Off & b_Unlock == Off >On
: (Unlock by RKE or Passive)
2.
b_KeyOn == On>Off
Action
ŌĆó
State changed to ŌĆ£Room Lamp 30 sec OnŌĆØ
ŌĆó
Cancel RoomLampDecayTimer
ŌĆó
Start RoomLamp30Timer
ŌĆó
O_RoomLamp = On (during RoomLamp30Time)
State
Description
Initial Condition
ŌĆ£Room Lamp DecayingŌĆØ state :
Event
A_IGN1 == On & b_AnyDoorOpen == On
Action
ŌĆó
State changed to ŌĆ£Room Lamp OnŌĆØ
ŌĆó
Cancel RoomLampDecayTimer
ŌĆó
O_RoomLamp = On
State
Description
Initial Condition
ŌĆ£Room Lamp DecayingŌĆØ state : A_IGN1 == Off
Event
b_AnyDoorOpen == Off > On
Action
ŌĆó
State changed to ŌĆ£Room Lamp 20 min OnŌĆØ
ŌĆó
Cancel RoomLampDecayTimer
ŌĆó
Start RoomLamp20Timer
ŌĆó
O_RoomLamp = On (during RoomLamp20Time)
T1 : Room lamp 30 time, T2 : Room lamp 20 time,
T3 : Room lamp decay time
Value name
Value
Room Lamp 30 Time
30 sec ┬▒ 3 sec
Room Lamp 20 Time
20 min ┬▒ 1 min
Room Lamp Decay Time
2 sec ┬▒ 0.2 sec
5.
Transitions from ŌĆ£Room Lamp OnŌĆØ state :
State
Description
Initial Condition
ŌĆ£Room Lamp OnŌĆØ state : A_IGN1 == On
Event
b_AllDoorsClose == On & C_TGSW == Off
Action
ŌĆó
State changed to ŌĆ£Room Lamp DecayingŌĆØ
ŌĆó
Start RoomLampDecayTimer
ŌĆó
O_RoomLamp = Decaying (Decaying time : RoomLampDecayTime)
State
Description
Initial Condition
ŌĆ£Room Lamp OnŌĆØ state :
Event
A_IGN1 == Off & b_AllDoorsClose == On & C_TGSW == Off
Action
ŌĆó
State changed to ŌĆ£Room Lamp 30 sec OnŌĆØ
ŌĆó
Start RoomLamp30Timer
ŌĆó
O_RoomLamp = On (during RoomLamp30Time)
State
Description
Initial Condition
ŌĆ£Room Lamp OnŌĆØ state :
Event
A_IGN1 == Off & b_AnyDoorOpen == On
Action
ŌĆó
State changed to ŌĆ£Room Lamp 20 min OnŌĆØ
ŌĆó
Start RoomLamp20Timer
ŌĆó
O_RoomLamp = On (during RoomLamp20Time)
Key Hole Illumination Lamp Control
1.
General Description
ŌĆō
Key hole illu mination provides a convenient ring illu
mination around the area where the driver has to insert his ignition key
to switch ter minals.
ŌĆō
Key Hole illu mination activated by drive or assistant door open, and after close it maintain illumi on during 30 seconds.
2.
Transition from "Key Hole Illu mination Off"
State
Description
Initial Condition
"Key Hole Illu mination Off" state : A_IGN1 == Off
Event
ŌĆó
C_DRVDRSW == On Or
ŌĆó
C_ASTDRSW == On
Action
ŌĆó
State changed to ŌĆ£Key Hole Illu mination OnŌĆØ
ŌĆó
O_KeyHoleIllum = On
3.
Transition from "Key Hole Illu mination On"
State
Description
Initial Condition
"Key Hole Illu mination On" state :
Event
ŌĆó
A_IGN1 == On or
ŌĆó
b_BAState1 == On & C_DRVDRSW == Off & C_ASTDRSW == Off
Action
ŌĆó
State changed to ŌĆ£Key Hole Illu mination OffŌĆØ
ŌĆó
O_KeyHoleIllum = Off
State
Description
Initial Condition
"Key Hole Illu mination On" state :
ŌĆó
A_IGN1 == Off & b_BAState1 == Off
Event
C_DRVDRSW == Off & C_ASTDRSW == Off
Action
ŌĆó
State changed to ŌĆ£Key Hole Illu mination 30ŌĆØ
ŌĆó
Start Illumi30Timer
ŌĆó
O_KeyHoleIllum = On (during Illumi30Time)
4.
Transition from "Key Hole Illu mination 30"
State
Description
Initial Condition
"Key Hole Illu mination 30" state :
Event
ŌĆó
A_IGN1 == On or
ŌĆó
Illumi30Timer ? Illumi30Time
ŌĆó
b_BAState1 == On
Action
ŌĆó
State changed to ŌĆ£Key Hole Illu mination OffŌĆØ
ŌĆó
Cancel Illumi30Timer
ŌĆó
O_KeyHoleIllum = Off
State
Description
Initial Condition
"Key Hole Illu mination 30" state : A_IGN1 == Off
Event
ŌĆó
C_DRVDRSW == On Or
ŌĆó
C_ASTDRSW == On
Action
ŌĆó
State changed to ŌĆ£Key Hole Illu mination OnŌĆØ
ŌĆó
Cancel Illumi30Timer
ŌĆó
O_KeyHoleIllum = On
T1 : Illumi 30 time
Value Name
Value
Illumi 30 Time
30 sec ┬▒ 3 sec
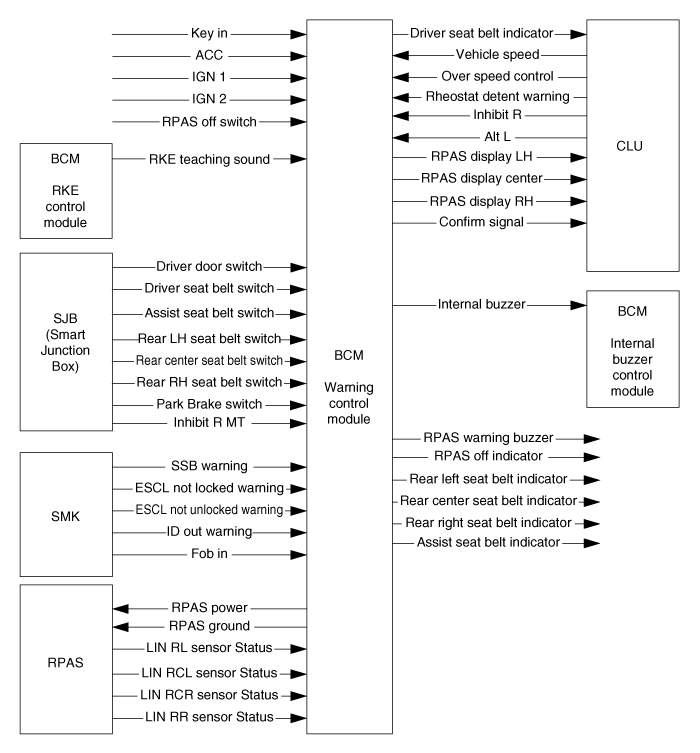
Warning Control
Function
Characteristics
Name
Hardware Label
Spec. Designation
Input
Logic
L_KeyIn
Key In Signal
L_ACC
Accessory Input
L_IGN2
Ignition 2 Input
L_RPASOffSW
RPAS warning Off switch.
Analog
A_IGN1
Ignition 1 Input
CAN Communication
C_FobIn
Fob In SW
C_10km
10km/h Vehicle Speed which CLU calculates
C_VehicleSpeed
Vehicle speed from Power Train High CAN
C_InhibitR
Inhibit R State
C_AltL
Alternator Level
C_OverSpeedCtrl
Over Speed Warning Control Command
C_DRVSeatBeltSW
Driver Side Seat Belt Switch
C_ASTSeatBeltSW
Assist Side Seat Belt Switch
C_RearLHSeatBeltSW
Rear Left Side Seat Belt Switch
C_RearCTRSeatBeltSW
Rear Center Seat Belt Switch
C_RearRHSeatBeltSW
Rear Right Side Seat Belt Switch
C_Rheostat_Detent_Warning
RHEOSTAT Detent Warning Control Command
C_ParkBrakeSW
Parking Brake Switch
C_DRVDRSW
Driver Door Open/Close State
C_SSB_Warning
SSB Warning state
C_IDOUT_WNG
ID Out Warning state
C_ESCL_Notlocked_Warning
ESCL not locked warning State
C_ESCL_Notunlocked_Warning
ESCL not unlocked warning State
LIN Communication
LIN_RLSnsrStatus
RPAS Rear Left Sensor State
LIN_RCLSnsrStatus
RPAS Rear Center Left Sensor State
LIN_RCRSnsrStatus
RPAS Rear Center Right Sensor State
LIN_RRSnsrStatus
RPAS Rear Right Sensor State
Internal
b_RKETeachingSound
When each RKE keyŌĆÖs teaching is ended, this event is triggered.
Output
CAN Communication
C_DRVSeatBeltIND
Driver Seatbelt Indicator state
C_RPASDisplayLH
Status of the LH Sensor
C_RPASDisplayCTR
Status of the LH&RH Center Sensor
C_RPASDisplayRH
Status of the RH Sensor
C_R_Confirm_Signal
"R" Gear Position Status for Cluster Display
Logic
O_InternalBuzzer
Internal Buzzer Output
V_RPASPwr
RPAS Power Output
V_RPASGND
RPAS GND
O_ASTSeatBeltIND
Assistant Side Seat Belt Indicator
O_RLSeatBeltIND
Rear Left Side Seat Belt Indicator
O_RCSeatBeltIND
Rear Center Seat Belt Indicator
O_RRSeatBeltIND
Rear Right Side Seat Belt Indicator
O_RPASOffIND
RPAS Off Indicator
O_RPASWarningBuzzer
RPAS External Buzzer Output
Warning Control
1.
The Warning function offers the following features
ŌĆō
Seat Belt Warning
ŌĆō
Seat Belt Re minder
ŌĆō
Over Speed Warning
ŌĆō
Key Reminder Warning
ŌĆō
Parking Brake Warning
ŌĆō
RKE Key Teaching sound
ŌĆō
SMK System Warning
ŌĆō
RAPS Warning
ŌĆō
Rheostat Detent Warning
2.
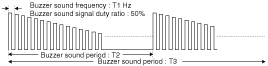
Buzzer Operation
ŌĆō
For Warning Sound Control Function, two types of Buzzers are
used. One is Internal Buzzer, and it is located in BCM. The other is
External Buzzer, and it is located in SMK.
Name
Characteristics
Internal Buzzer Sound frequency
T1 Hz
Internal Buzzer Sound Signal Duty Ratio
50%
Internal Buzzer Sound Period
T2 sec + 5% sec
Internal Buzzer Sound duration
T3 sec + 5% sec
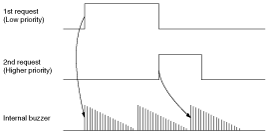
3.
Priority of Warning Buzzer Condition
ŌĆō
If there are multiple warning conditions simultaneously, the
warning shall activate the warning based on the pre-defined priority :
(1st is the highest priority)
Priority
Name
Control Logic
Internal Buzzer Control
1
Diagnostic sound
BCM
BCM
2
Seat Belt warning / Seat Belt Re minder
3
Over Speed Warning
CLU
4
Key Reminder(Operated) warning
BCM
5
Parking Brake Warning
6
Steering Column Not Locked Warning
SMK
7
ID Out Warning
8
Steering Column Not Unlocked Warning
9
SSB Button Warning
10
RKE Key Teaching sound
BCM
11
Rheostat Detent Warning
CLU
Internal Buzzer Sound Description
ŌĆō
BCM has an Internal Buzzer and Cluster has a Warning Indicator.
1)
New request while buzzer activate by a previous request
2)
If a buzzer is active by a previous request, new request with
higher priority cannot interrupt previous request. The new request will
activate the buzzer as soon as the previous request sound period is
completed.
3)
Synchronization of Internal Warning Buzzer Sound and
Indicator. To synchronize Indicator and Internal Warning buzzer, BCM
sends the Indicator Blinking and activate Internal Warning Buzzer.
Cluster checks received request and operates indicator.
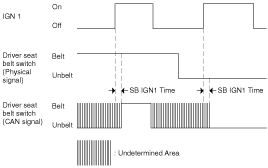
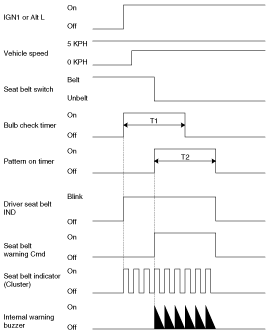
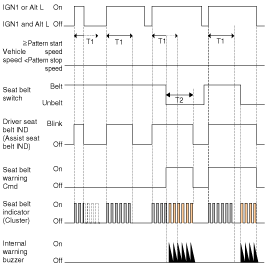
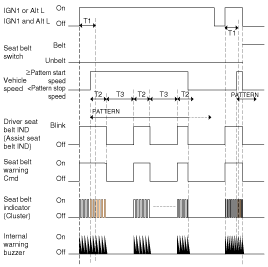
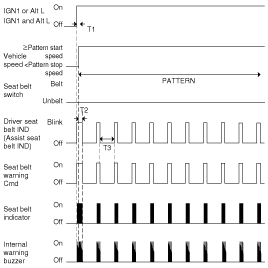
Seat Belt Warning
1.
When driver or passengers have their seat belts unfasten
during driving, sound or indicator warning re mind them of fastening
their seat belts.
2.
This function offers following features
(1)
Turn on/off and blinking Driver side seatbelt indicator depending on Driver side seatbelt switch input.
(2)
Turn on/off and blinking Assistant side seatbelt indicator depending on Assistant side seatbelt switch input.
(3)
Turn on/off Internal Warning Buzzer depending on Driver side or Assistant side seatbelt switch input.
(4)
If vehicle speed exceeds a specific value, seatbelt indicator
and Internal Warning Buzzer should be activated in accordance with
defined pattern.
3.
General Description
(1)
When driver unfasten his seat belts during driving, BCM warns driver by warning sound or indicator.
(2)
Turn on/off and blinking Driver side seatbelt indicator depending on Driver side seatbelt switch input.
(3)
Turn on/off Internal Buzzer depending on Driver side seatbelt switch input.
(4)
Just after IGN1 On(A_IGN1 = On), to get the SeatBelt
fastened/unfastened information, it takes about "SBIGN1Time(Typically
100 msec)", and before this time, J/Box indicates that seatbelt is
fastened via CAN. So, from the moment IGN1is On(A_IGN1 = ON) and after
"SBIGN1Time", the seat belt/unbelt logic can start.
4.
Seat Belt Reminder Function Description
T1 : Bulb check time, T2 : Pattern on time
T1 : Bulb check time, T2 : Pattern on time
T1 : Bulb check time, T2 : Pattern on time,
T3 : Pattern off time
PATTERN : Pattern number times (T2 ON / T3 OFF)
T1 : Bulb check time, T2 : Pattern on time,
T3 : Pattern off time
PATTERN : Pattern number times (T2 ON / T3 OFF)
Name
Value
SB IGN1 Time
100 ┬▒10msec
Bulb Check Time
6 ┬▒ 0.1 sec
Pattern On Time
6 ┬▒ 0.1 sec
Pattern Off Time
24 ┬▒ 0.1 sec
Pattern Start Speed
10 km/h
Pattern Stop Speed
5 km/h
Pattern Number
11
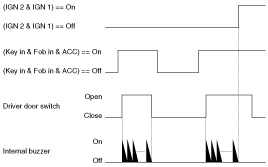
Key Reminder Warning(Key Operated Warning) Function
1.
Internal Buzzer Control by Key Reminder Warning function
2.
If driver opens the driver side door and go away from the car
during key is inserted or ACC state, a sound warning re minds a driver
that key has to be taken off or ACC state has to be changed to Off
state.
3.
This warning Function does not operate in China Variant.
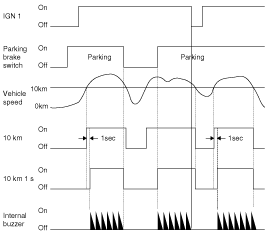
Parking Brake Warning
1.
Internal Buzzer Control by Parking Brake Warning Function
2.
If driver drives the vehicle with parking brake On or not
completely released and vehicle speed exceeds the specific value of
10km/h, a sound warning re minds the driver that parking brake has to be
released.
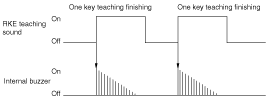
RKE Teaching Sound
1.
Internal Buzzer Control by RKE Teaching Sound Function
2.
When each RKEŌĆÖs Teaching is ended, Warning buzzer is operated, one time.
SMK System Warning Sound
1.
Internal Buzzer control for SMK System warning
2.
SMK System Warnings conditions of activation are controlled
by the SMK unit. When a condition is satisfied, SMK unit sends
corresponding warning request to BCM and cluster by CAN.
3.
BCM only operates the Internal Buzzer.
4.
The internal buzzer is controlled by the BCM and Sound duration is controlled by SMK.
(1)
Steering Column Not Locked Warning
ŌĆó
This warning requires activation of the Internal Buzzer during C_ESCL_Notlocked_Warning = On.
ŌĆó
SMK Warning Buzzer Sound Period : 0.6s + 0.06 sec
(2)
ID Out Warning1
ŌĆó
This warning requires activation of the Internal Buzzer during C_IDOUT_WNG = On.
ŌĆó
SMK Warning Buzzer Sound Period : 5s + 0.1 sec
(3)
Steering Column Not Unlock Warning
ŌĆó
This warning requires activation of the Internal Buzzer during C_ESCL_Notunlocked_Warning = On.
ŌĆó
SMK Warning Buzzer Sound Period : 1s + 0.1 sec
(4)
SSB Button Warning
ŌĆó
This warning requires activation of the Internal Buzzer during C_SSB_Warning = On.
ŌĆó
SMK Warning Buzzer Sound Period : 0.6s + 0.06 sec
Rheostat Detent Warning Sound
1.
Internal Buzzer control for Rheostat Detent warning
2.
Rheostat Detent System Warnings conditions of activation are
controlled by the CLU unit. When a condition is satisfied, CLU unit
sends corresponding warning request to BCM by CAN.
3.
BCM only operates the Internal Buzzer
4.
The internal buzzer is controlled by the BCM and Sound duration is controlled by BCM.
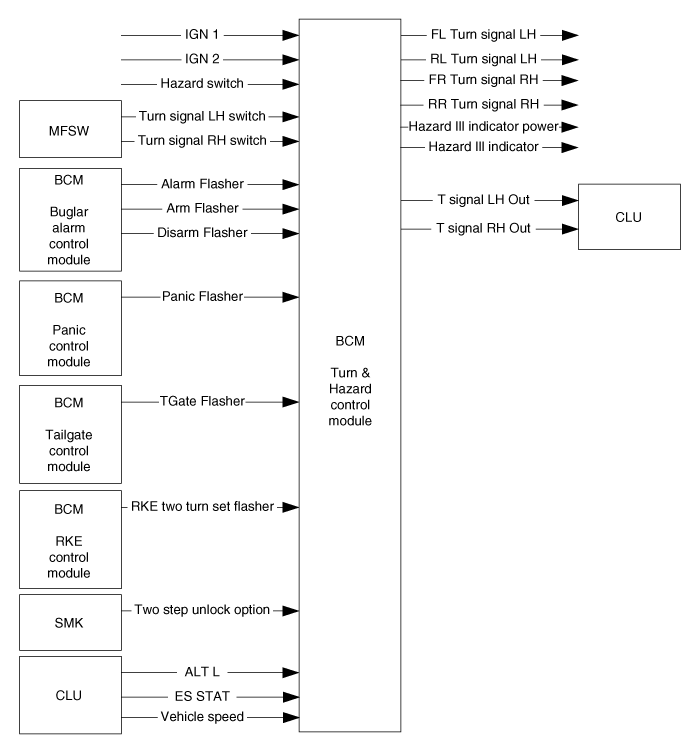
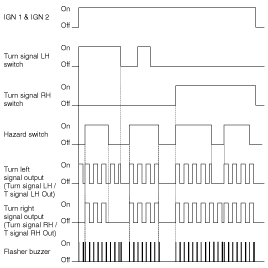
Turn and Hazard Control
Function
Characteristics
Name
Hardware Label
Spec. Designation
Input
Logic
L_IGN2
Ignition 2 Input
L_HazardSW
Hazard Switch
L_TurnSigLHSW
Turn Left Signal Switch
L_TurnSigRHSW
Turn Right Signal Switch
Analog
A_IGN1
Ignition 1 Input
CAN Communication
C_TwoStepUnlockOption
SMK RKE Two steps Unlock Mode Setting
C_ALT_L
Engine is running
C_ES_STAT
ESS system status
C_VehicleSpeed
Vehicle speed from Power Train High CAN
Internal
b_AlarmFlasher
Alarm Flasher Request
b_ArmFlasher
ARM Flasher Request
b_DisarmFlasher
DISARM Flasher Request
b_PanicFlasher
Panic Flasher Request
b_TGateFlasher
Tailgate Flasher Request
b_RKETwoTurnSetFlasher
BCM Two steps Unlock Mode Setting
Output
Logic
O_TurnSigFLH
Flasher FLeft Lamp Output
O_TurnSigRLH
Flasher RLeft Lamp Output
O_TurnSigFRH
Flasher FRight Lamp Output
O_TurnSigRRH
Flasher RRight Lamp Output
V_HazardIllINDPwr
Hazard IND Power Output
O_HazardIllIND
Hazard IND Output
CAN Communication
C_TSigLHOut
Turn LH Signal Lamp Out Status for indicator in CLU
C_TSigRHOut
Turn RH Signal Lamp Out Status for indicator in CLU
Flasher Buzzer Control Function
1.
To provide an audible feedback to the driver when flasher is active, a Flasher Buzzer is used.
2.
While Flasher Lamp is operated, the flasher buzzer is activated at the time of Output On/Off transition.
3.
Flasher Buzzer is controlled by the Cluster.
4.
BCM turns on/off the turn left or/and turn Right flasher,
cluster controls the flasher buzzer following the activation request
from BCM.
T1 : 2 [KHz], 50% duty
Hazard Control Function
1.
Activating the Hazard switch generates the Hazard signal,
regardless of the Ignition key position. The Hazard signal is a
permanent sequence. It goes off when the Hazard switch is deactivated.
The signal drives both the Left and Right sides.
2.
If it is detected the Bulb failure, flasher starts fault
flashing. But it is only possible in IGN1 and IGN2(A_IGN1 = On &
L_IGN2 = On) on status.
Turn Signal Control Function
1.
If the Left (or Right) turn switch is active and if IGN2 is On, the left (or Right) turn signal outputs are driven.
2.
The turn signal is active as long as both conditions
((L_TurnSigLHSW or L_TurnSigRHSW = On) and L_IGN2 = On) are true and is
turned Off when one of these conditions is no longer detected.
3.
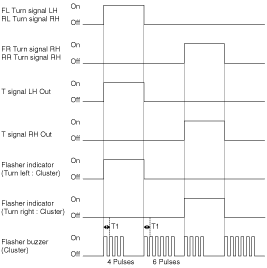
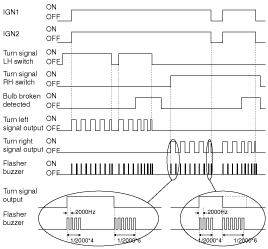
If bulb failure(outage or open load) is detected on the activated turn signal side, the flasher is operated with fault flashing.
4.
This failure can be detected only when IGN1 and IGN2 On (A_IGN1 == On and L_IGN2 == On).
5.
While Turn switch is On and failure was detected, even if
bulb failure is no longer detected, keep the fault flashing and after
next Turn switch On or IGN On transition, flasher is activated with
normal blinking.
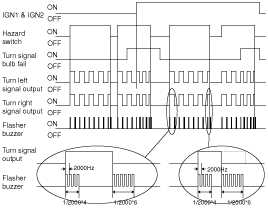
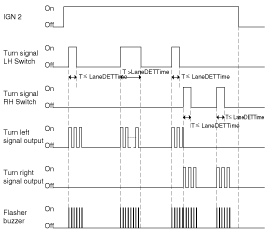
Lane Change Turn Signal Control Function
1.
Flasher lane-change feature means that a momentary activation of the turn switch will cause 3 flashes on the indicator circuit.
2.
This lane-change feature operates under the following conditions :
A.
Lane change mode enabled (b_LaneEnable = On)
B.
Ignition 2 shall be On, and the lane change feature is not available if Ignition 2 is Off.
C.
During flashing by lane change mode, it should detect the "Bulb-Failure" mode.
D.
During the Lane Change mode operation, if the user moves the
turn switch to the other direction, then Lane change mode is finished
and the other directionŌĆÖs flashing (Normal or Lane change flashing)
will start depending on the Turn Switch On Period.
Flasher Failure Control Function
1.
This function describes the following features
A.
Bulb Failure Detection
B.
SCG (SHORT to GND) Fault detection
2.
BCM is monitoring the Turn Signal Output.
3.
During Turn signal control or Hazard control, if Bulb failure detected, Flasher is operated with fault flashing.
4.
Bulb Failure Detection Condition
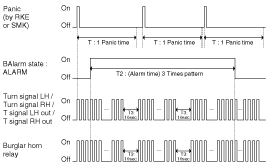
Burglar Alarm Flashing Control Function
1.
This function describes the following features :
ŌĆō
Management of request for Alarm flashing by Burglar Alarm Manager
ŌĆō
Alarm Flashing Control
ŌĆō
Arm Flashing Control
ŌĆō
Disarm Flashing Control
2.
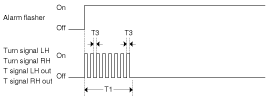
Alarm Flashing Control
ŌĆō
If there is a request for having the alarm flashing
(b_AlarmFlasher == On), a pattern of Turn left and turn right bulb
flashing is performed.
ŌĆō
When the request is no longer present (b_AlarmFlasher == Off)
the driving of the turn left and turn right bulbs flashing by Alarm is
stopped without delay.
ŌĆō
The flashing shall be synchronized with Horn Alarm activation.
ŌĆō
Depending on the variant setting, flashing pattern consist in 1 or 3 group of flashing as described in below figure.
T1 : 27 sec + 0 sec / -2.7 sec,
T2 : 10 sec ┬▒ 1 sec,
T3 : 450 msec ┬▒ 45 msec
T1 : 27 sec + 0 sec / -2.7 sec,
T3 : 450 msec ┬▒ 45 msec
3.
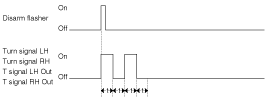
Arm/Disarm Flashing Control
ŌĆō
If there is a request for having the arm flashing
(b_ArmFlasher == Off > On) or disarm flashing (b_DisarmFlasher == Off
> On), a pattern of Turn left and turn right bulb flashing is
performed.
ŌĆó
Arm Flashing Pattern
T : 1 sec ┬▒ 0.1 sec
ŌĆó
Disarm Flashing Pattern
T : 500 msec ┬▒ 50 msec
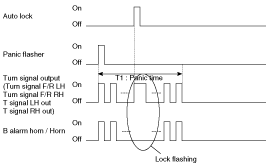
Panic Flashing Control Function
1.
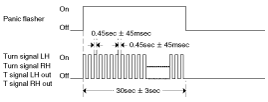
If there is a request for having the Panic flashing
(b_PanicFlasher == On), a pattern of Turn left and turn right bulb
flashing is performed.
2.
When the request is no longer present (b_PanicFlasher == Off)
the driving of the turn left and turn right bulbs flashing by Panic is
stopped without delay.
3.
The flashing shall be synchronized with Horn activation.
Tailgate Flashing Control Function
1.
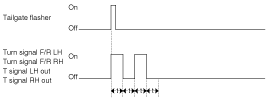
If there is a request for having the Tailgate flashing
(b_TGateFlasher == Off>On), a pattern of Turn left and turn right bulb
flashing is performed.
2.
Tailgate flashing is two times flash ,each operation time is 500ms having 500ms pausing time.
T : 500 msec ┬▒ 50 msec
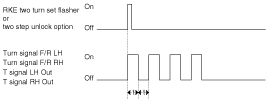
RKE Two Turn Unlock Set Flashing Control Function
1.
This function describes the following features :
ŌĆō
Management of request for RKE Two Turn Unlock Set/Reset complete flashing by RKE Lock Control Manager and SMK unit
2.
Function Description
ŌĆō
If there is a request for having the Two Turn Unlock
Set/Reset flashing by RKE (b_RKETwoTurnSetFlasher = Off>On) or by SMK
RKE(C_TwoStepUnlockOption = Off>On), a pattern of Turn left and turn
right bulb flashing is performed.
ŌĆō
RKE Two Turn Unlock Set/Reset flashing has four times flashing in 2s ,each operation has 250ms ON time and 250ms OFF time.
T : 250 msec ┬▒ 25 msec
Flasher Function Priority Control Function
1.
If conditions of activating flashing conflict with each other, functional priorities are as following :
Priority
Flasher Function Name
1
Arm / Disarm Flashing (Burglar Alarm system)
2
Burglar Alarm Flashing (Burglar Alarm system)
3
Panic Flashing
4
Hazard Flashing
5
Turn Signal Flashing
6
Tailgate Flashing
7
RKE Two Turn Set/Reset Flasher
2.
Turn Signal and Hazard Priority
A.
During Hazard flashing, if Turn Flashing is requested, keep the Hazard operation.
B.
During turn flashing, if Hazard flashing is requested, interrupt the turn flashing and start Hazard operation immediately.
C.
During Hazard operation if Hazard and Turn SW are On at the
same time, if Hazard SW is turned Off, turn flashing starts to operate
but, does not discontinue the running period.
3.
Burglar Alarm and Panic Priority
(1)
Panic Alarm must be independent of the Burglar Alarm state (ARM, DISARM, ALARM,...) but is stopped when entering in ARM mode.
A.
During Burglar Alarm is in progress, a panic alarm function can be started and stopped
B.
During Panic Alarm Flashing is in progress, a Burglar Alarm can start.
(2)
The activation of the horn and hazard lamps by Burglar Alarm is higher priority than Panic mode
(3)
If Alarm is in progress (3 Times pattern) during the 10s off time of the pattern the horn should be off.
4.
Autolock and Panic Priority
(1)
During the activation of Horn and Hazard by Panic-Alarm, if
get a AutoLock(b_AutoLockCmd) request from Burglar Alarm Function, it
keeps the activation of Horn and Hazard by Panic-Alarm but do lock
flashing.
Doors Lock/Unlock Control
Function
Characteristics
Name
Hardware Label
Spec. Designation
Input
Logic
L_ACC
ACC
L_IGN2
Ignition 2
L_KeyIn
Key In Signal
Analog
A_IGN1
Ignition 1 Input
PWM
P_CrashInput
Crash Unlock Pulse
CAN Communication
C_ASTDRSW
Assistant Door Open/Close Status
C_AltL
Engine is running
C_ASTUnlockState
Assistant Door Unlock Status
C_DRVDRSW
Driver Door Open/Close Status
C_DRVKeyLockSW
Key Cylinder Lock SW In Driver Door*
C_DRVKeyUnlockSW
Key Cylinder Unlock SW In Driver Door *
C_ASTKeyUnlockSW
Key Cylinder Unlock SW In Assist Door
C_DRVUnlockState
Drive Door Unlock Status
C_FobIn
Fob In SW
C_InhibitP
Inhibit P State
C_PassiveLock
PIC Passive access lock for door module
C_PassiveUnlock
PIC Passive access unlock for door module
C_P_FL
Passive command from Front Left
C_P_FR
Passive command from Front Right
C_PwdwDRLockSW
Central Door Lock Switch
C_PwdwDRUnlockSW
Central Door Unlock Switch
C_RLDRSW
Rear Left Door Open/Close Status
C_RLUnlockState
Rear Left Door Unlock Status
C_RRDRSW
Rear Right Door Open/Close Status
C_RRUnlockState
Rear Right Door Unlock Status
C_SMKRKECMD
SMK FOB RKE Command
C_VehicleSpeed
Vehicle speed from power train CAN
Internal
b_BAState
BurglarAlarm State Information
b_PState
?
b_Relock
Lock command by Burglar Alarm
b_RKELock
RKE Lock Command
b_RKEUnlock
RKE Unlock Command
m_RKETwoTurnSet
RKE Two Turn Unlock Set
Internal
b_AutoLockState
Auto Door Lock Active Marker
b_CRASHSts
Crash unlock State
b_CtrLockREQ
Locking actuation in progress
b_CtrUnlockREQ
Central Door Unlock Request
b_KeyLockREQ
Lock Request by Mechanical Key
b_KeyUnlockREQ
Unlock Request by Mechanical Key
b_RKELockREQ
Lock Request by RKE
b_RKEUnlockREQ
Unlock Request by RKE
b_SMKLockREQ
Lock Request by SMK
b_SMKUnlockREQ
Unlock Request by SMK
b_TwoTurnMarker
Two Turn unlock Status
LockOutTime
Locking activation time
OffDelayTime
After Locking/unlocking activation time
TwoTurnTimer
Two Turn unlock timer
TwoTurnTime
Two Turn unlock time
UnlockOutTime
Unlocking activation time
b_DeadLockMarker
Dead Lock Status
b_TUnlockREQ
Unlock Request by Two Turn
Output
Internal
C_DEADLock
Dead Lock Command
Communication
C_DEADUnlock
Dead Unlock Command
C_DoorLockRly
Central Door Lock Output
C_DoorUnlockRly
Central Door Unlock Output
C_DRVDRUnlockRly
Driver Door Unlock Output
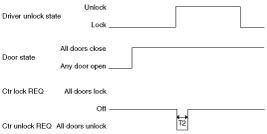
Central Door Lock/Unlock Function
1.
If the central locking/unlocking request is detected, central
locking function is operated and outputs all doors lock/unlock during
LockOutTime / UnlockOutTime. (Generally this value is 500 msec).
And then, it have delay time for next Lock/Unlock Operation
for OffDelayTime(Generally this value is 100 msec). However Central lock
shall be inhibited while crash unlock is active.
2.
Central Lock/Unlock Operation Condition
Request
Central Lock
Central Unlock
Central Lock/Unlock SW
In Crash Unlock not Active State
b_BAState = Off
(DISARM, AutoLockTimer1,
AutoLockTimer2, ARMHOLD, PREARM)
Mechanical Key Lock/Unlock
1. Ter minal Off(b_KeyOn = Off)
All
2. In Crash Unlock not Active State
RKE Lock/Unlock
In Crash Unlock not Active State
All
Passive Lock/Unlock
In Crash Unlock not Active State
All
3.
Action of Actuator
ŌĆō
When reverse command (Lock/Unlock) input occurred during
outputting (Lock/Unlock). > Command Output is stop and new command
output is activated.
T1 : Lock out time, T2 : Unlock out time, T3 : Off delay time
ŌĆō
When same input is occurred during output. > DonŌĆÖt care the second request.
T1 : Lock out time, T2 : Unlock out time
ŌĆō
When input is occurred during Off Delay Time > After Delay time, output.
T1 : Lock out time, T2 : Unlock out time, T3 : Off delay time
Priority of Door Lock/Unlock
Priority
Function
Note
1
Crash Unlock
?
2
Central Lock/Unlock
Lock/Unlock Request by SMK, RKE, Central Switch, and Mechanical Key have same priority.
3
AutoDoor Lock/Unlock
?
4
Key Reminder Unlock
?
Mechanical Door Lock/Unlock Function
1.
Lock/Unlock Request by Mechanical Key
ŌĆō
When the mechanical Key is operated for a lock operation then
for a duration of ŌĆ£MLockTimeoutTimeŌĆØ (3 sec) the BCM shall monitor
the corresponding knob''s state; if the knobs are in lock state within
this MLockTimeoutTime then a central lock operation is issued; if any
knob remains in unlock state at the end of this MLockTimeoutTime then no
central lock operation is issued.
ŌĆō
When the mechanical Key is operated for an unlock operation
then for a duration of ŌĆ£MUnlockTimeoutTimeŌĆØ (3 sec) the BCM shall
monitor the corresponding knob''s state; if the knobs are in unlock
state within this MLockTimeoutTime then a central unlock operation is
issued; if any knob remains in lock state at the end of this
MLockTimeoutTime then no central unlock operation is issued.
ŌĆō
Mechanical key is applicable to driver side door and passenger side door.
ŌĆō
Outside Mirrors go Fold/Unfold state with relation to Mechanical Key Lock/Unlock operation.
Name
Value
MOffDelayTime
100 msec ┬▒ 10 msec
MLockTime
500 msec ┬▒ 50 msec
MUnlockTime
500 msec ┬▒ 50 msec
MLockTimeoutTime
3 sec ┬▒ 0.3 sec
MUnlockTimeoutTime
3 sec ┬▒ 0.3 sec
RKE / SMK FOB Door Lock/Unlock Function
1.
Lock/Unlock Request by RKE
ŌĆō
Central Lock/Unlock operations by RKE are enabled in Key Out
state(IGNSW =KeyOff), not managed in this module but in the modules
generating the RKE commands.
ŌĆō
The central locking/unlocking function is operated at the reception of RKE lock/unlock command.
ŌĆō
Outside Mirrors go Fold/Unfold state with relation to RKE / SMK FOB Lock/Unlock operation.
Burglar Alarm Relock Door Lock Function
1.
Lock Request by Burglar Alarm Function
ŌĆō
Central Lock Operation is possible by Burglar Alarm Function, this signal is considered as equivalent to Burglar Alarm Relock.
SMK Passive Access Door Lock/Unlock Function
1.
Lock/Unlock Request by SMK
ŌĆō
Central Lock/Unlock operations by SMK are enabled in Key Out
state(IGNSW =KeyOff), not managed in this module but in the modules
generating the SMK commands.
ŌĆō
The central locking/unlocking function is operated at the reception of SMK lock/unlock command.
ŌĆō
Outside Mirrors go Fold/Unfold state with relation to SMK Passive Access Lock/Unlock operation.
Central Door Lock/Unlock Button Function
1.
Lock/Unlock Request by Central Lock/Unlock Switch
ŌĆō
Central locking shall be inhibited in following condition
A.
Central lock inhibit condition : When crash unlock is active
B.
Central unlock inhibit condition : b_BAState is on (ARMWAIT, ARM, ALARM, REARM).
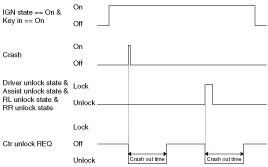
Crash Unlock Function (Without 30 sec timer)
1.
Behavior Characteristics
ŌĆō
This function is to make unlock status in emergency case.
ŌĆō
If the crash is occurred (b_Crash ==On, when P_CrashUnlock
signal is changed to crash status), output all doors unlock during
ŌĆ£CrashUnlockTimeŌĆØ
ŌĆō
After crash unlocking, If safety knob state is changed unlock to lock, all doors are unlocked, again.
ŌĆō
After crash is activated, Central Lock and Auto Door Lock Function can not operate until Key off.
2.
P_CrashInput signal (PWM)
ŌĆō
Before crash : When crash condition is not present, input is
made as follows ( b_Crash ==Off at P_CrashInput signal event is as
follows)
ŌĆō
After Crash :
a.
When crash happen, input is made as follow signal.
b.
BCM should be enabled (b_Crash ==On) when received at least one pulse during P_CrashInput signal appeared.
c.
P_CrashInput signal activated during 200 ms after crash.(10 cycle)
ŌĆō
State Description
Name
Value
Crash Off Delay Time
0 msec
Crash Out Time
5 ┬▒ 0.5 sec
Auto Door Lock/Unlock Function
1.
This function describes the following features
ŌĆō
Door Lock by Shift-Lever
ŌĆō
Door Lock by Vehicle Speed
ŌĆō
Door Unlock by Shift-Lever
ŌĆō
Door Unlock by Key Off
2.
During driving, it makes lock state and after finish driving, makes unlock state, automatically
3.
Auto Door Lock
ŌĆō
Shift Lever Option : During ignition on and engine is
running, and when all doors are closed and any door is unlocked, if the
shift lever position is change P position to other position, all doors
are locked.
T1 : Auto lock time
ŌĆō
Vehicle Speed Option
A.
Vehicle Speed Auto Lock Condition
a.
During ignition on, and when any door is unlocked, if
vehicle speed is exceeded the ŌĆ£AutoDoorLockSpeedŌĆØ Km/h, output all
doors lock.
b.
After output all doors lock, if any door is not locked, output all doors lock ŌĆ£AutoReLockNumberŌĆØ times.
c.
Between each lock output, it have ŌĆ£AutoLockDelayTimeŌĆØ time gap.
d.
During ŌĆ£AutoReLockNumberŌĆØ times all doors lock output, if all doors state are changed lock, stop this output.
e.
During vehicle speed is over ŌĆ£AutoDoorLockSpeedŌĆØ Km/h, if any door is unlocked, output all doors lock, again.
f.
However after ŌĆ£AutoReLockNumberŌĆØ times all doors lock
output, even if any door is unlocked, before ignition off(b_IGNState ==
Off) or all doors is changed to lock, there is no additional lock
output.
B.
Vehicle Speed Auto Lock State Release Condition
a.
After auto lock, it does not operate again. But in below
condition, auto lock state is release and if it meet the Auto Lock
condition, auto lock operate again.
b.
Any Knob state is changed to unlock(So, when vehicle speed is
exceeded the ŌĆ£AutoDoorLockSpeedŌĆØ Km/h, any knob state change to
unlock, auto lock function is operate, again.)
c.
After Crash Unlock output(But, in Crash active state, Auto lock does not operate.)
d.
Ignition off (b_IGNState == Off)
e.
Vehicle Speed is below ŌĆ£AutoDoorLockSpeedŌĆØ Km/h,(So, if
vehicle speed is exceeded the ŌĆ£AutoDoorLockSpeedŌĆØ Km/h and any knob
states are unlock, auto lock function is operate, again)
T1 : Auto lock time, T5 : Auto lock delay time
C.
Knob Lock Fail Condition
a.
After ŌĆ£AutoReLockNumberŌĆØ times all doors lock output, failed Knob is enter the knob Fail mode.
b.
So, when meet vehicle speed Auto Locking condition again,
that time it does not consider the previously failed knob.(Auto Lock 3
times not operate.), However, another knob have a fail, operate Auto
Lock 3 times.
c.
This failed knob state is release in below condition.
d.
The failed knob is changed unlock to lock.
e.
Ignition off (b_IGNState == Off)
4.
Auto Door Unlock
ŌĆō
Shift Lever Option : During ignition on and engine is
running, and when all doors are closed and any door is locked, if the
shift lever position is change other position to P position, all doors
are unlocked.
T2 : Auto lock time
ŌĆō
Driver Safety Knob Unlock Option : When Autolock is not
activated and all doors are closed, if the driver door safety knob is
changed from lock to unlock, all doors are unlocked.
T2 : Auto lock time
ŌĆō
Key Off Option : When Ignition key (or Fob) switch status is
not off and any door is locked, if Ignition key (or Fob) switch status
change to off, all doors are unlocked.
T2 : Auto lock time
Name
Value
Auto Lock Time
500 msec ┬▒ 50 msec
Auto Unlock Time
500 msec ┬▒ 50 msec
Auto ReLock Number
3 times
Auto Off Delay Time
500 msec ┬▒ 50 msec
Auto Door Lock Speed
15 km/h
Key Reminder Unlock Function
1.
This function is making unlock status when user forget the key inside the vehicle and lock the door.
T1 : Key refirst unlock time
T1 : Key refirst unlock time, T2 : 0.5 sec
Name
Value
Key ReFirst Unlock Time
1 sec ┬▒ 0.1 sec
Key ReUnlock Time
500 msec ┬▒ 50 msec
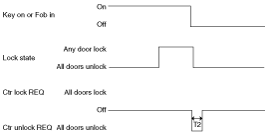
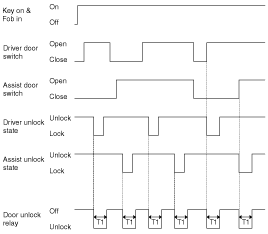
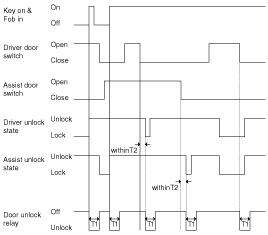
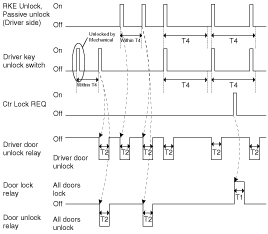
Two Turn Unlock
In case of NA variant, if the unlock request from mechanical
key, RKE, or Passive Unlock is detected, 2 Turn unlock function is
operated.
1.
If unlock by mechanical key(C_DRVKeyUnlockSW = On) in driver side, Driver Door is unlock by mechanical and start 4 sec counting.
2.
If receive the unlock request from RKE, or Passive Unlock in
Driver Side at driver side, output only driver side door and start 4 sec
counting.
3.
Within 4sec, if the unlock request from mechanical key,
Passive Unlock at driver side at driver side is detected, outputs all
doors unlock.
4.
Without 4sec, if the unlock request from mechanical key,
Passive Unlock at driver side or RKE is detected, Driver door is only
unlocked, again.
5.
Even if within 4sec, if Driver Knob Switch status is changed
unlock to lock, stop 4sec counting. In that state, if the unlock request
from mechanical key, Passive Unlock at driver side is detected, Driver
door only is unlocked.
T1 : Lock out time, T2 : Unlock out time,
T4 : Two turn time
Tailgate Release Control
Function
Characteristics
Name
Hardware Label
Spec. Designation
Input
CAN Communication
C_TGSW
Tailgate closing status
C_TG_ReleaseSW
Tailgate Release SW
C_DRVUnlockState
Driver door unlock state
C_ASTUnlockState
Assist door unlock state
C_RLUnlockState
Rear Left door unlock state
C_RRUnlockState
Rear Right door unlock state
C_DRVDRSW
Driver door closing state
C_ASTDRSW
Assist door closing state
C_RLDRSW
Rear Left door closing state
C_RRDRSW
Rear Right door closing state
C_SMKRKECMD
SMK FOB Keyless Command
C_PassiveAccessUnlock
PIC Passive access unlock for door module
C_DRVKeyLock
Driver Key Lock signal
C_SMKRKETrunk
RKE trunk/tailgate command
C_VehicleSpeed
Vehicle speed from Power Train High CAN
C_P_TRUNK
Passive command from trunk or tailgate
Internal
ATWSState
Burglar Alarm State Information (all state indicated)
DISARM, AUTOLOCKTIMER1, AUTOLOCKTIME2
PREARM, ARMWAIT, ARM, ARMHOLD
REARM, ALARM
b_AutoLockCmd
Auto Lock Command(Event Signal)
Off : After create On event, automatically turned Off.
b_RKELock
RKE Lock command : (Non-SMK Variant)
b_RKETailgate
RKE Tailgate Release command : (Non-SMK Variant)
b_AllDoorUnlockState
All Door Unlock State
b_AllDoorOpenState
All Door Open State
Output
Logic
O_TurnSigFLH
Flasher Lamp Output ŌĆō Front Left
O_TurnSigRLH
Flasher Lamp Output ŌĆō Rear Left
O_TurnSigFRH
Flasher Lamp Output ŌĆō Front Right
O_TurnSigRRH
Flasher Lamp Output ŌĆō Rear Right
Internal
b_TailgateFlasher
Tailgate Flasher Request(Event Signal)
- After create On event, automatically turned Off.
CAN Communication
C_TSigLHOut
Turn LH Signal Lamp Out Status for indicator in CLU
C_TSigRHOut
Turn RH Signal Lamp Out Status for indicator in CLU
C_TGReleaseRly
Trunk or Tailgate Release Relay Control Command
Tailgate Release Control
1.
"Tailgate_Release_Mode" State
State
Description
Initial Condition
Tailgate Inhibition Mode State
Event
All Door Knob Unlock
Action
State is changed to Tailgate Release Mode State
State
Description
Initial Condition
Tailgate 30Sec Mode State
Event
All Door Knob Unlock
Action
ŌĆó
Cancel Tailgate 30SecTimer
ŌĆó
State is changed to Tailgate Release Mode State
State
Description
Initial Condition
ŌĆó
Tailgate Release Mode State
ŌĆó
All Door Knob Unlock
Event
Tailgate Release Command by RKE
Action
ŌĆó
Two Times Flashing
ŌĆó
During 0.5 sec, turn on the Tailgate Release Relay
ŌĆó
State is kept Tailgate Release Mode State
State
Description
Initial Condition
ŌĆó
Tailgate Release Mode State
ŌĆó
Vehicle Speed is below 5km/h
ŌĆó
All Door Knob Unlock(b AllDoorUnlockState == Unlock)
Event
Tailgate Release Command by Tailgate Release Switch
Action
ŌĆó
During 0.5 sec, turn on the Tailgate Release Relay
ŌĆó
State is kept Tailgate Release Mode State
2.
"Tailgate_30Sec_Mode" State
State
Description
Initial Condition
Tailgate Inhibition Mode State
Event
Tailgate Release Command by RKE
Action
ŌĆó
Start Tailgate30SecTimer
ŌĆó
State is changed to Tailgate 30Sec Mode State
State
Description
Initial Condition
ŌĆó
Tailgate 30Sec Mode State
ŌĆó
All Door Unlock State = Unlock
Event
Tailgate Release Command by RKE
Action
ŌĆó
Two Times Flashing
ŌĆó
During 0.5 sec, turn on the Tailgate Release Relay
ŌĆó
Re-Start Tailgate30SecTimer
ŌĆó
State is kept Tailgate 30Sec Mode State
State
Description
Initial Condition
ŌĆó
Tailgate 30Sec Mode State
ŌĆó
Vehicle Speed is below 5km/h
ŌĆó
All Door Unlock State = Unlock
Event
Tailgate Release Command by Tailgate Release Switch
Action
ŌĆó
During 0.5 sec, turn on the Tailgate Release Relay
ŌĆó
State is kept Tailgate 30Sec Mode State
3.
"Tailgate_Inhibition_Mode" State
State
Description
Initial Condition
Tailgate Release Mode State
Event
ŌĆó
All Door Unlock State = Unlock
Action
State is changed to Tailgate Inhibition Mode State
State
Description
Initial Condition
ŌĆó
Tailgate 30Sec Mode State
ŌĆó
All Door Unlock State = Unlock
Event
ŌĆó
Lock Command by RKE or SMK or Mechanical Key or AutoLock command
ŌĆó
Tailgate Open
ŌĆó
Expire Tailgate 30 sec Timer
ŌĆó
Burglar Alarm State is changed to ARMWAIT
Action
ŌĆó
Cancel Tailgate30SecTimer
ŌĆó
State is changed to Tailgate Inhibition Mode State
State
Description
Initial Condition
ŌĆó
Tailgate Inhibition Mode State
ŌĆó
Vehicle Speed is below 5km/h
ŌĆó
All Door Unlock State = Unlock
Event
Tailgate Release Command by SMK
Action
ŌĆó
Two Times Flashing
ŌĆó
During 0.5 sec, turn on the Tailgate Release Relay
ŌĆó
State is kept Tailgate Inhibition Mode State
T1 : TGate release time, T2 : TGate 30 sec time
Name
Value
Tailgate Release Time
0.5 sec ┬▒ 50 msec
Tailgate 30Sec Time
30 sec ┬▒ 3 sec
Power Window Control
Function
Characteristics
Name
Hardware Label
Spec. Designation
Input
Logic
L_IGN2
Ignition 2 Power
L_IGN1
Ignition 1 Input
CAN Communication
C_DRVDRSW
Driver Door Switch
C_ASTDRSW
Assist Door Switch
Internal
b_IGN1
On : A_IGN1 == On || L_IGN2 == On
Off : A_IGN1 == Off & L_IGN2 == Off
Output
CAN Communication
C_PwdwMain
Power window Timer
Logic
O_SafetyPwdwEnable
Safety Power Window ECU Enable Output
Power Window Timer Control
1.
After IGN1 is On, Power Window can operate and after IGN1
Off, it is possible to operate the Power window, for ŌĆ£PwdwTimeŌĆØ(30
sec ┬▒3 sec).
2.
During counting the PwdwTimeŌĆØ(30 sec ┬▒3 sec), if Driver or
Assistant side Door is open, the working the Power Window is stopped.
T1 : Pwdw time (30 sec ┬▒ 3 sec)
Defogger Control
Function
Characteristics
Name
Hardware Label
Spec. Designation
Input
Logic
L_DefoggerSW
Defogger Switch Input
Analog
A_IGN1
Ignition 1 Input
V_Bat
Battery Voltage
CAN Communication
C_ALT_L
Alternator Level(Engine is running)
Output
CAN Communication
C_DefoggerRly
Defogger Relay Control
C_FrontDeicerRly
Front Deicer Control
Defogger Control
1.
Defogger switch is self Return type. Therefore, when the
switch is pressed, Defogger output is on. and user press the Switch
again, the Defogger output is off.
2.
There is no occurrence of an accident at low voltage, meaning
that the Defoggers are not to be operated immediately of low voltage
detection.
3.
It is protected the battery from discharge.
4.
State Description
State
Description
Initial Condition
IGN1 = On &ALT L = On & (Defogger Relay & Front Deicer Relay) = Off & Bat ? Low Battery
Event
Defogger switch= Off > On
Action
Defogger Relay = On Front Decier Relay = On
State
Description
Initial Condition
IGN1 = On & ALT L = On & (Defogger Relay or Front Deicer Relay) = On
Event
Bat < LowBattery or IGN1 = Off or Alt L = Off or Defogger switch = Off > On or From the Defogger output On, when pass "DefoggerTime"
Action
Defogger Relay = Off Front Decier Relay=Off
T1 : Defogger time (20 min ┬▒ 1 min)
Name
Value
Defogger Time
20 min ┬▒ 1 min
Low Battery
9 Voltage
Key Interlock Solenoid Control
Function
Characteristics
Name
Hardware Label
Spec. Designation
Input
Logic
L_ACC
Accessory Input
L_KeyInterlockSW
Gear Shift Lever P Position State
L_IGN1
Ignition 1 Input
Internal
b_KeyInterlockSW100
On : L_KeyInterlockSW = On after100ms confirm
Off : L_KeyInterlockSW = Off after100ms confirm
Output
Logic
O_KeySOL
Key Interlock Solenoid Actual Output
Key Interlock Solenoid Control
1.
General Description
ŌĆō
Key Interlock Function is to check the Key Interlock Switch
Input and Ignition Ter minal position, and turn On or Off the key
interlock solenoid.
ŌĆō
Key Solenoid is Pull Type.
ŌĆō
When IGN1 is On or ACC is On, if Key Interlock Switch is On, key interlock solenoid is Off
ŌĆō
When IGN1 is On or ACC is On, if Key Interlock Switch is Off, key interlock solenoid is On
ŌĆō
During IGN1 is Off and ACC is Off, key interlock solenoid is Off
ŌĆō
The internal value "b_KeyInterlockSW100" is the signal that
means Key Interlock Switch value with 100 msec confirm time. So it is
different from filtering time.
T : 100 msec
2.
Go to Key Interlock OFF Condition
State
Description
Initial Condition
(IGN1 = On or ACC = On) & Key Interlock SW100 = Off
Event
ŌĆó
Key Interlock SW100 = On or
ŌĆó
IGN1 = Off and ACC = Off
Action
Key SOL = Off
3.
Go to Key Interlock ON Condition
State
Description
Initial Condition
(IGN1 = On or ACC = On) & Key Interlock SW100 = On
Removal
1.
Disconnect the negative (-) battery terminal.
2.
Remove the crash pad lower panel.
(Refer to the BD group - "Crash pad")
3.
Remove the BCM (A) after removing the nuts, connecto ...
Other Information:
If the engine will not start
If engine doesn't turn over or turns over slowly
1.If your car has an automatic transaxle, be sure the shift lever is in N (Neutral)
or P (Park) and the emergency brake is set.
2.Check the bat ...
Instrument cluster
1. Tachometer
2. Turn signal indicators
3. Speedometer
4. Engine temperature gauge
5.Warning and indicator lights
6. Fuel gauge
7. Odometer/Tripmeter*/Trip computer*
8. Shift position indicat ...
 Kia Sportage: Body Control Module (BCM): Description and Operation


 Body Control Module (BCM): Schematic Diagrams
 Body Control Module (BCM): Repair procedures