 Kia Sportage: General Information
Third generation SL (2010ŌĆō2016) / Kia Sportage SL Service & Repair Manual / Body (Interior and Exterior) / Body Dimensions / General Information
| General |
| 1. |
Basically, all measurements in this manual are taken with a tracking gauge. |
| 2. |
When a measuring tape is used, check to be sure there is no elongation, twisting or bending. |
| 3. |
For measuring dimensions, both projected dimension and actual-measurement dimension are used in this manual. |
| Measurement Method |
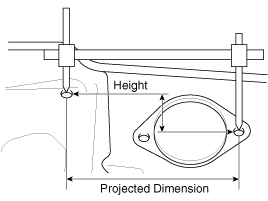
| Projected Dimensions |
| 1. |
These are the dimensions measured when the measurement
points are projected into the reference plane, and are the reference
dimensions used for body alterations. |
| 2. |
If the length of the tracking gauge probes is adjustable,
make the measurement by lengthening one probe by the amount equivalent
to the difference in height of the two surfaces.
|
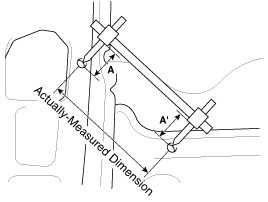
| Actual-Measurement Dimensions |
| 1. |
These dimensions indicate the actual linear distance between
measurement points, and are the reference dimensions for use if a
tracking gauge is used for measurement. |
| 2. |
Measure by first adjusting both probes to the same length (A=A'').
|
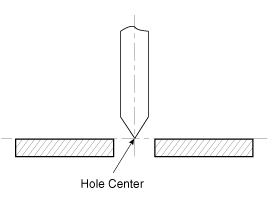
| Measurement Point |
| 1. |
Measurements should be taken at the hole center.
|
 Body Dimensions
...
 Front Body: Body Repair
Front Body A
Hood hinge mounting hole (O12)Fender apron upper panel tooling hole(O8)Front suspension mounting hole (O11)Side outer panel cornerFront pillar cornerCowl panel tooling hole (O10)
Fr ...
Other Information:
Side Body: Body Repair
Side Body A
Front side member tooling hole (O20)Fender apron panel tooling hole (O10)Front door upper hinge mounting hole(O13)Front door lower hinge mounting hole(O13)Fender panel mounting hole ( ...
Description and Operation
Description
Remote Keyless Entry System
The described function is a radio-frequency remote control
for central doors locking / unlocking, trunk release and Panic activity
of an automotive vehi ...
Categories
- Home
- Kia Sportage QL (2015-2019) Owners Manual
- Kia Sportage QL (2015-2019) Service Manual
- Kia Sportage SL 2010-2016 Owners Manual
- Kia Sportage SL 2010-2016 Service Manual
Copyright ® www.kispmanual.com 2014-2026


