 Kia Sportage: Instrument Cluster: Repair procedures
Third generation SL (2010ŌĆō2016) / Kia Sportage SL Service & Repair Manual / Body Electrical System / Indicators And Gauges / Instrument Cluster: Repair procedures
| Removal |
| 1. |
Disconnect the negative (-) battery terminal. |
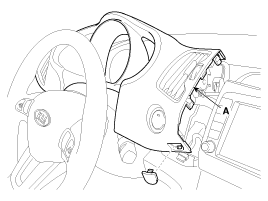
| 2. |
Remove the cluster fascia panel (A).
|
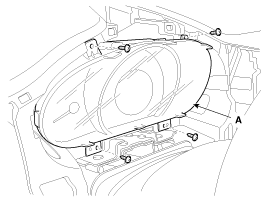
| 3. |
Remove the cluster assembly (A) after loosening 4 screws.
|
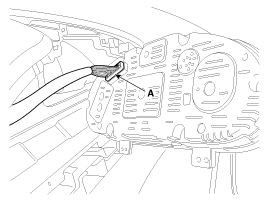
| 4. |
Disconnect the cluster fascia connector (A) and then remove the cluster.
|
| Installation |
| 1. |
Connect the cluster connector. |
| 2. |
Install the cluster assembly. |
| 3. |
Install the cluster fascia panel. |
| Inspection |
Speedometer
| 1. |
Adjust the pressure of the tires to the specified level. |
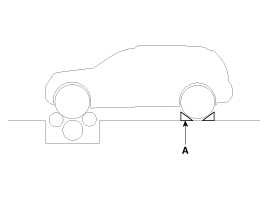
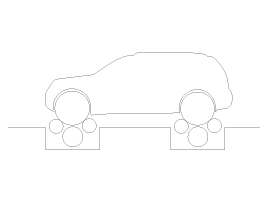
| 2. |
Drive the vehicle onto a speedometer tester. Use wheel chocks (A) as appropriate.
[2WD]
[4WD]
|
| 3. |
Check if the speedometer indicator range is within the standard values.
[Km/h]
[MPH]
|


Tachometer
| 1. |
Connect the scan tool to the diagnostic link connector or install a tachometer. |
| 2. |
With the engine started, compare the readings of the tester
with that of the tachometer. Replace the tachometer if the tolerance is
exceeded.
| |||||||||||||||||||||||||||||||||||||||
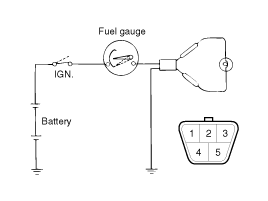
Fuel Gauge
| 1. |
Disconnect the fuel sender connector from the fuel sender. |
| 2. |
Connect a 3.4 wattages, 12V test bulb to terminals 1 and 3 on the wire harness side connector. |
| 3. |
Turn the ignition switch to the ON, and then check that the bulb lights up and the fuel gauge needle moves to full.
|
Fuel Gauge Sender
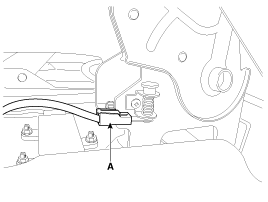
| 1. |
Using an ohmmeter, measure the resistance between terminals 1 and 3 of sender connector (A) at each float level.
|
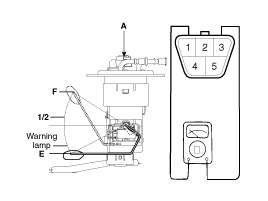
| 2. |
Also check that the resistance changes smoothly when the float is moved from "E" to "F".
|
| 3. |
If the height resistance is unsatisfied, replace the fuel sender as an assembly.
|
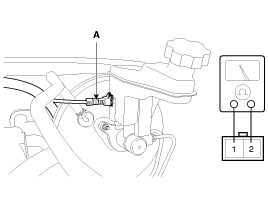
Engine Coolant Temperature Sender
| 1. |
Using an ohmmeter, measure the resistance between the terminal 2 and ground. |
| 2. |
If the resistance value is not as shown in the table, replace the temperature sender.
|
Brake Fluid Level Warning Switch
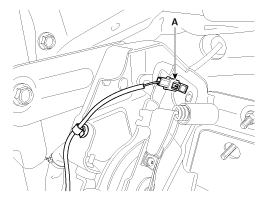
| 1. |
Remove the connector (A) from the switch located at the brake fluid reservoir. |
| 2. |
Verify that continuity exists between switch terminals 1 and 2 while pressing the switch (float) down with a rod.
|
Brake Fluid Level Warning Lamp
| 1. |
Ignition "ON". |
| 2. |
Release the parking brake. |
| 3. |
Remove the connector from the brake fluid level warning switch. |
| 4. |
Ground the connector at the harness side. |
| 5. |
Verify that the warning lamp lights. |
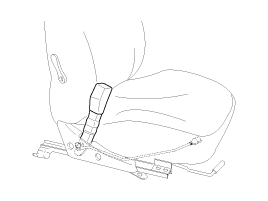
Parking Brake Switch
The parking brake switch is a pull type. It is located at the side of the parking brake lever.
| 1. |
Check that there is continuity between the terminal and switch body with the switch (A) ON. |
| 2. |
Check that there is no continuity between the terminal and switch body with the switch OFF.
If continuity is not as specified, replace the switch or inspect its ground connection.
[Pedal Type]
[Lever Type]
|
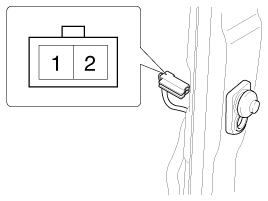
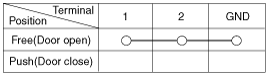
Door Switch
Remove the door switch and check for continuity between the terminals.
Seat Belt Switch
| 1. |
Remove the connector from the switch. |
| 2. |
Check for continuity between terminals.
|
Seat Belt Warning Lamp
With the ignition switch turned ON, verify that the lamp glows.
| Seat belt condition | Warning lamp |
| Fastened | OFF |
| Not fastened | ON |
 Instrument Cluster: Description and Operation
Description
ECO driving system
This system is designed to encourage eco-driving by providing real-time feedback to the driver.
The ECO indicator light assists you to drive in the most economical ...
 Troubleshooting
Troubleshooting
SymptomPossible causeRemedySpeedometer does not operateCluster fuse (10A) blownCheck for short and replace fuseSpeedometer faultyCheck speedometerCAN line faultyCheck the EMSWirin ...
Other Information:
Front Strut Assembly: Repair procedures
Replacement
1.
Remove the front wheel & tire.
Tightening torque :
88.3 ~ 107.9N.m (9.0 ~ 11.0kgf.m, 65.1 ~ 79.6lb-ft)
Be careful not to damage to the hub ...
ESC Control Module: Repair procedures
Removal
1.
Turn the ignition switch OFF.
2.
Disconnect the brake tubes from the HECU by unlocking the nuts counterclockwise with a spanner.
Tightening torque :
12.7 ~ 16.7N.m(1.3 ~ 1.7kgf. ...
Categories
- Home
- Kia Sportage QL (2015-2019) Owners Manual
- Kia Sportage QL (2015-2019) Service Manual
- Kia Sportage SL 2010-2016 Owners Manual
- Kia Sportage SL 2010-2016 Service Manual

Copyright ® www.kispmanual.com 2014-2026