 Kia Sportage: Rear Upper Arm: Repair procedures
Third generation SL (2010ŌĆō2016) / Kia Sportage SL Service & Repair Manual / Suspension System / Rear Suspension System / Rear Upper Arm: Repair procedures
| Replacement |
| 1. |
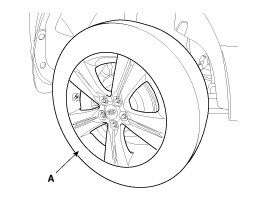
Remove the rear wheel & tire.
|

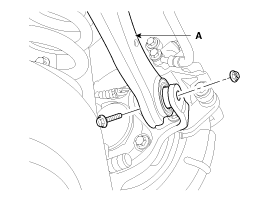
| 2. |
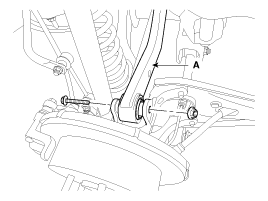
Loosen the bolt & nut and then remove the rear upper arm (A) with the rear axle.
[2WD]
[4WD]
|

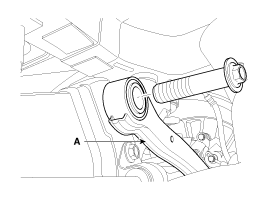
| 3. |
Loosen the bolt & nut and then remove the rear upper arm (A) with the sub frame.
[2WD]
[4WD]
|
| 4. |
Installation is the reverse of removal.
|
| Inspection |
| 1. |
Check the bushing for wear and deterioration. |
| 2. |
Check the rear upper arm or damage and deformation. |
| 3. |
Check for all bolts and nut. |
 Rear Shock Absorber: Repair procedures
Replacement
1.
Remove the rear wheel & tire.
Tightening torque :
88.3 ~ 107.9N.m (9.0 ~ 11.0kgf.m, 65.1 ~ 79.6lb-ft)
Be careful not to damage to the hub bol ...
 Rear Lower Arm: Repair procedures
Replacement
1.
Remove the rear wheel & tire.
Tightening torque :
88.3 ~ 107.9N.m (9.0 ~ 11.0kgf.m, 65.1 ~ 79.6lb-ft)
Be careful not to damage to the hub bol ...
Other Information:
Shift lock system
For your safety, the automatic transaxle has a shift lock system which prevents
shifting the transaxle from P (Park) into R (Reverse) unless the brake pedal is
depressed.
To shift the transaxle f ...
Injured person
A seat belt should be used when an injured person is being transported. When
this is necessary, you should consult a physician for recommendations. ...
Categories
- Home
- Kia Sportage QL (2015-2019) Owners Manual
- Kia Sportage QL (2015-2019) Service Manual
- Kia Sportage SL 2010-2016 Owners Manual
- Kia Sportage SL 2010-2016 Service Manual

Copyright ® www.kispmanual.com 2014-2026