 Kia Sportage: Relay Box (Passenger Compartment): Repair procedures
Third generation SL (2010ŌĆō2016) / Kia Sportage SL Service & Repair Manual / Body Electrical System / Fuses And Relays / Relay Box (Passenger Compartment): Repair procedures
| Inspection |
Fuse
| 1. |
Be sure there is no play in the fuse holders, and that the fuses are held securely. |
| 2. |
Are the fuse capacities for each circuit correct? |
| 3. |
Are there any blown fuses?
If a fuse is to be replaced, be sure to use a new fuse of the
same capacity. Always determine why the fuse blew first and completely
eliminate the problem before installing a new fuse. |
SJB Connectors
| Inspection |
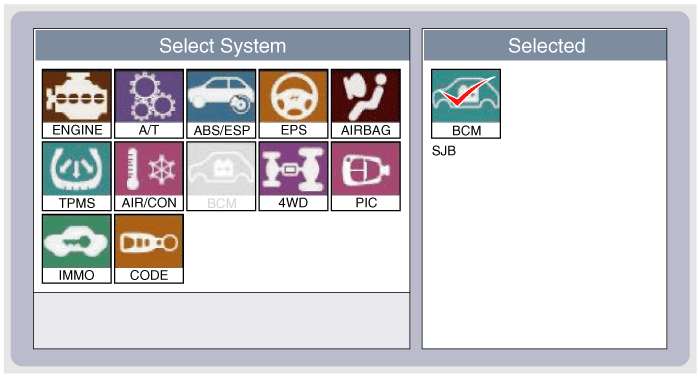
| 1. |
The SJB can be diagnosed by using the GDS. The SJB
communicates with the GDS which then displays inputs and outputs along
with codes. |
| 2. |
To diagnose the SJB function, select the vehicle model, BCM and SJB.
|
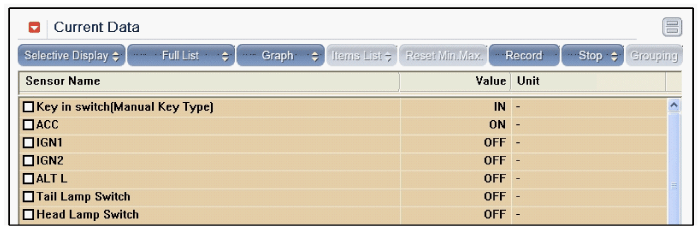
| 3. |
To consult the present input/out value of SJB, "Current DATA". It provides information of SJB input/output conditions.
|
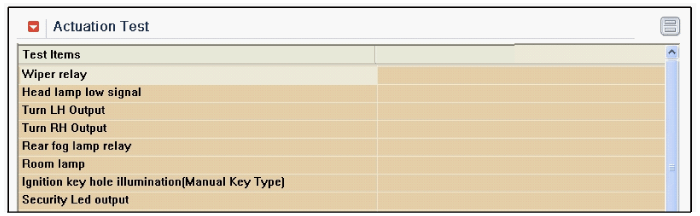
| 4. |
To perform functional test on SJB outputs, select "Actuation Test"
|
| Removal |
| 1. |
Disconnect the negative (-) battery terminal. |
| 2. |
Remove the crash pad lower panel.
(Refer to the BD group - "Crash pad") |
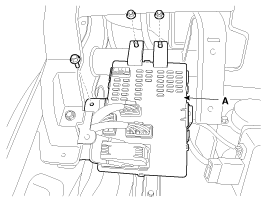
| 3. |
Remove the SJB (A) (Smart Junction Box) after removing bolt, nuts (2EA) and connectors.
|
| Installation |
| 1. |
Install SJB (Smart Junction Box). |
| 2. |
Connect the SJB connectors. |
| 3. |
Install the crash pad lower panel. |
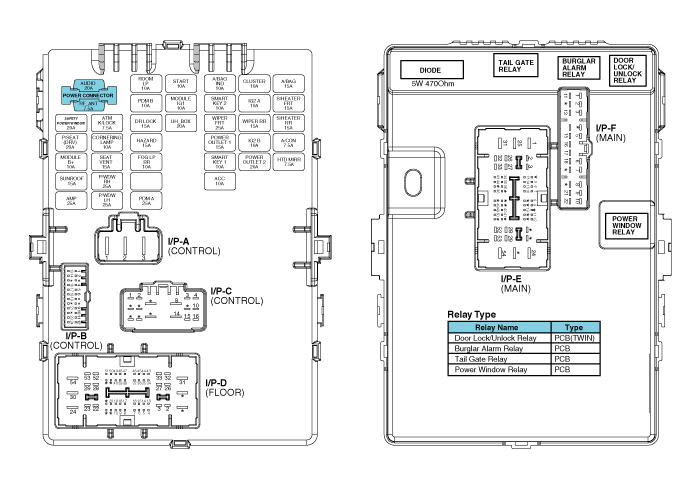
 Relay Box (Passenger Compartment): Description and Operation
Description
SJB (Smart Junction Box)
1.
Specification
ItemRequirementRemarkRated voltageDC 12V?Voltage rangeDC 9 ~ 16VNormal operating in this rangeStorage temperature-40┬░C ~ +80┬░C?Operating ...
 ICM (Integrated Circuit Module) Relay Box: Components and Components Location
Component
Pin Information
NoConnector ANoConnector A1Rear wiper motor (Power)11IPM (Rear wiper 15A)2IPM12Rear wiper motor (Signal)3Stop lamp13-4-14-5ESC unit15GND6U_H_Box (ABS 7.5A fuse)16IPM (B ...
Other Information:
Rear
9. Door
10. Fuel filler lid
11. Rear combination lamp
12. Tailgate (trunk)
13. Rear wiper blade
14. Center high mounted stop light
15. Rear window defroster
16. Antenna ...
Master Cylinder: Repair procedures
Removal
1.
Turn ignition switch OFF and disconnect the negative (-) battery cable.
2.
Disconnect the battery terminal and then remove the battery.
3.
Disconnect the ECM connector and the E ...
Categories
- Home
- Kia Sportage QL (2015-2019) Owners Manual
- Kia Sportage QL (2015-2019) Service Manual
- Kia Sportage SL 2010-2016 Owners Manual
- Kia Sportage SL 2010-2016 Service Manual

Copyright ® www.kispmanual.com 2014-2026