 Kia Sportage: Repair procedures
Third generation SL (2010ŌĆō2016) / Kia Sportage SL Service & Repair Manual / Body Electrical System / AVN System / Repair procedures
| Removal |
Take care not to damage and scratch the hazard lamp switch assembly and its related parts.
Apply the protective tapes to the hazard lamp switch assembly and its related parts. |

| 1. |
Disconnect the negative (-) battery terminal. |
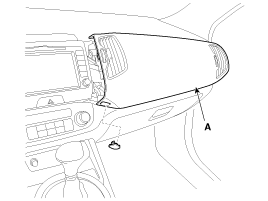
| 2. |
Remove the crash pad passenger''s garnish (A).
(Refer to BD group - "Crash pad")
|
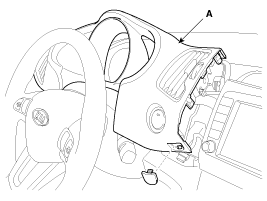
| 3. |
Disconnect the connectors and remove the cluster fascia panel (A).
(Refer to BD group - "Crash pad")
|
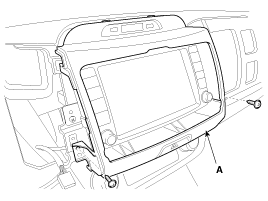
| 4. |
Remove the center fascia panel (A) after loosening the mounting screw (2EA).
|
| 5. |
Disconnect the connector (A) installed on the center fascia panel.
|
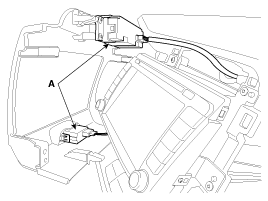
| 6. |
Remove the AVN assembly (A) after loosening the mounting screw (4EA).
|
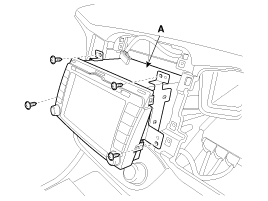
| 7. |
Disconnect the AVN connectors (A) and cable, then remove the AVN unit completely.
|


| Installation |
| 1. |
Connect the AVN head unit connectors and cable. |
| 2. |
Install the AVN head unit. |
| 3. |
Install the center fascia panel. |
| 4. |
Install the cluster fascia panel. |
| 5. |
Install the crash pad passenger''s garnish. |
| 6. |
Connect the negative (-) battery terminal.
|
 Description and Operation
Limitations Of The Navigation system
GPS Signal Reception State
As the GPS satellite frequency is received/transmitted in
straight lines, reception may not work if hiding devices are placed on
...
 AUX(Auxiliary) Jack: Description and Operation
Description
The multimedia jack on the console upper cover is for
customers who like to listen to external portable music players like the
MP3, iPod and etc., through the vehicle''s sound syste ...
Other Information:
Fuel Pressure Control Valve: Repair procedures
Inspection
1.
Turn the ignition switch OFF and disconnect the battery negative (-) cable.
2.
Disconnect the fuel pressure regulator valve connector.
3.
Measure resistance between the fuel ...
Key operations
Type A
Used to start the engine.
Used to lock and unlock the doors.
Type B
To unfold the key, press the release button then the key will unfold automatically.
To fold the key, fold the ...
Categories
- Home
- Kia Sportage QL (2015-2019) Owners Manual
- Kia Sportage QL (2015-2019) Service Manual
- Kia Sportage SL 2010-2016 Owners Manual
- Kia Sportage SL 2010-2016 Service Manual

Copyright ® www.kispmanual.com 2014-2026