 Kia Sportage: Shift Cable: Repair procedures
Third generation SL (2010ŌĆō2016) / Kia Sportage SL Service & Repair Manual / Automatic Transaxle System / Automatic Transaxle Control System / Shift Cable: Repair procedures
| Inspection |
| 1. |
Check the damage and operation of the control cable. |
| 2. |
Check the damage of the boot. |
| 3. |
Check the damage and corrosion of the bushing. |
| 4. |
Check the damage or weakening of the spring. |
| Removal |
| 1. |
Remove the center console assembly.
(Refer to "Interior(console)" in BD group.) |
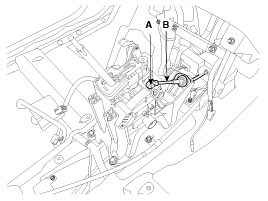
| 2. |
Take off the clip (A) and then remove the shift cable (B).
|
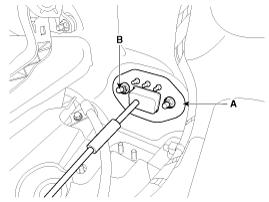
| 3. |
Remove the shift cable assembly in the vehicle after removing the nuts (B) and the retainer (A).
|
| 4. |
Remove the air duct (A).
|

| 5. |
Remove the air cleaner assembly.
|
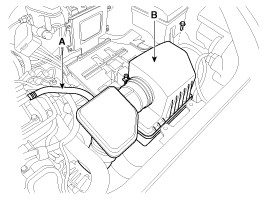
| 6. |
Remove the battery and battery tray.
(Refer to "Charging system" in EE group.) |
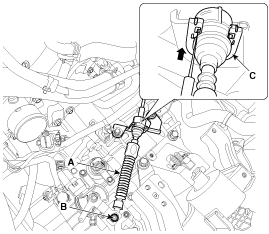
| 7. |
Remove the shift cable (A).
|

| 8. |
Remove the shift cable inside of cab. |
| Installation |
When installing, set room side shift lever and T/M side lever to "N" position. |
| 1. |
Install in the reverse order of removal. |
 Shift Cable: Components and Components Location
Components
1. Shift lever knob & boots assembly2. Shift lever assembly 3. Shift cable assembly4. Cable retainer
...

Other Information:
Rear Wheel Speed Sensor: Repair procedures
Removal
1.
Remove the rear wheel speed sensor mounting bolt (A).
Tightening torque:
6.9 ~ 10.8 N.m (0.7 ~ 1.1 kgf.m, 5.1 ~ 8.0 lb-ft)
2.
Remove the luggage side trim the disconnect the r ...
35R Clutch Control Solenoid Valve(35R/C_VFS): Schematic Diagrams
Circuit Diagram
...
Categories
- Home
- Kia Sportage QL (2015-2019) Owners Manual
- Kia Sportage QL (2015-2019) Service Manual
- Kia Sportage SL 2010-2016 Owners Manual
- Kia Sportage SL 2010-2016 Service Manual

Copyright ® www.kispmanual.com 2014-2026