 Kia Sportage: Repair procedures
Third generation SL (2010ŌĆō2016) / Kia Sportage SL Service & Repair Manual / Body Electrical System / Horn / Repair procedures
| Removal |
| 1. |
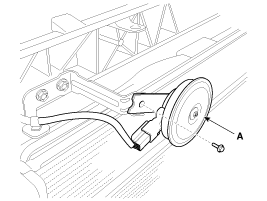
Remove the radiator upper cover.
(Refer to the BD group - "Front bumper") |
| 2. |
Remove the bolt and disconnect the horn connector, then remove the low pitch horn (A).
|
| Installation |
| 1. |
Install the horn after connecting the horn connector. |
| 2. |
Install the radiator upper cover. |
| Inspection |
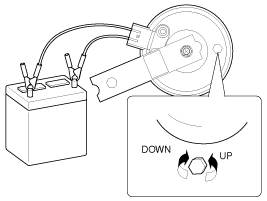
Test the horn by connecting battery voltage to the 1 terminal and ground the 2 terminal.
The horn should make a sound. If the horn fails to make a sound, replace it.
Horn Relay Inspection
| 1. |
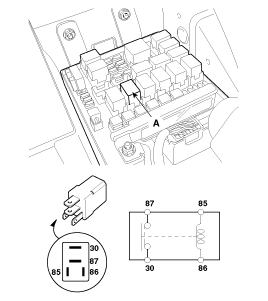
Remove the horn relay (A) from the engine room relay box. |
| 2. |
There should be continuity between the No.30 and No.87
terminals when power and ground are connected to the No.85 and No.86
terminals. |
| 3. |
There should be no continuity between the No.30 and No.87 terminals when power is disconnected.
|
| Adjustment |
| 1. |
Operate the horn, and adjust the tone to a suitable level by turning the adjusting screw.
|
 Components and Components Location
Component Location
1. Horn switch2. Horn relay (Engine room compartment)3. Horn (Low pitch)4. Clock spring
...
 AVN System
...
Other Information:
Front Seat: Components and Components Location
Components
1. Headrest2. Headrest guide3. Front seat back cover4. Front seat back heater5. Front seat back pad6. Front seat back power lumbar7. Front seat back duct8. Front seat back frame9. Fron ...
Crankshaft Position Sensor (CKPS): Description and Operation
Description
Crankshaft Position Sensor (CKPS) detects the crankshaft
position and is one of the most important sensors of the engine control
system. If there is no CKPS signal input, the engine ...
Categories
- Home
- Kia Sportage QL (2015-2019) Owners Manual
- Kia Sportage QL (2015-2019) Service Manual
- Kia Sportage SL 2010-2016 Owners Manual
- Kia Sportage SL 2010-2016 Service Manual
Copyright ® www.kispmanual.com 2014-2025


