 Kia Sportage: Relay Box (Engine Compartment): Repair procedures
Third generation SL (2010ŌĆō2016) / Kia Sportage SL Service & Repair Manual / Body Electrical System / Fuses And Relays / Relay Box (Engine Compartment): Repair procedures
| Inspection |
| 1. |
Disconnect the negative (-) battery terminal. |
| 2. |
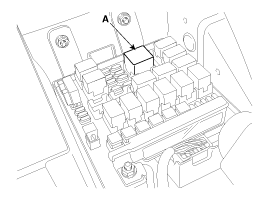
Pull out the relay from the engine compartment relay box. |
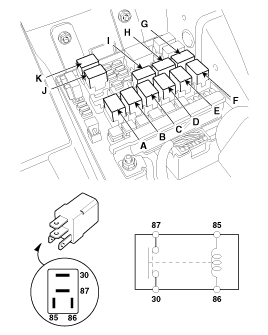
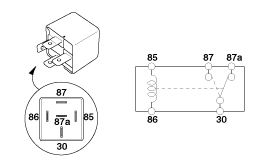
Power Relay (Type A)
Check for continuity between the terminals.
A : Blower relay
B : Horn relay
C : Cooling fan relay (Low)
D : Start relay
E : Burglar horn relay
F : Rear glass defogger relay
G : ATM relay
H : Windshield deicer relay
I : Cooling fan relay (High)
J : A/C relay
K : Fuel pump relay
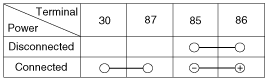
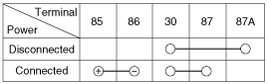
| 1. |
There should be continuity between the No.30 and No.87
terminals when power and ground are connected to the No.85 and No.86
terminals. |
| 2. |
There should be no continuity between the No.30 and No.87 terminals when power is disconnected.
|
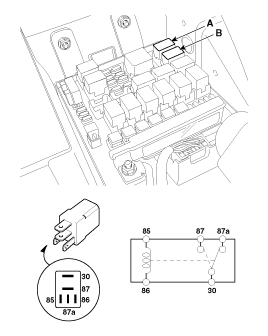
Power Relay (Type B)
Check for continuity between the terminals.
A : Wiper relay (High)
B : Wiper relay (Low)
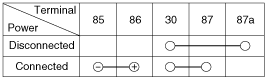
| 1. |
There should be continuity between the No.30 and No.87
terminals when power and ground are connected to the No.85 and No.86
terminals. |
| 2. |
There should be continuity between the No.30 and No.87 terminals when power is disconnected.
|
Power Relay (Type C)
Check for continuity between the terminals.
A : Main relay
| 1. |
There should be continuity between the No.30 and No.87
terminals when power and ground are connected to the No.85 and No.86
terminals. |
| 2. |
There should be no continuity between the No.30 and No.87 terminals when power is disconnected.
|
Fuse
| 1. |
Be sure there is no play in the fuse holders, and that the fuses are held securely. |
| 2. |
Are the fuse capacities for each circuit correct? |
| 3. |
Are there any blown fuses?
If a fuse is to be replaced, be sure to use a new fuse of the
same capacity. Always determine why the fuse blew first and completely
eliminate the problem before installing a new fuse. |
Multi Fuse
|

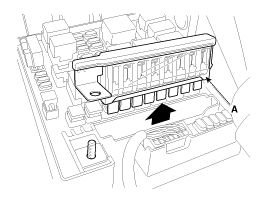
 Relay Box (Engine Compartment): Components and Components Location
Component Location
...
 Relay Box (Passenger Compartment): Components and Components Location
Component Location
...
Other Information:
Schematic Diagrams
Circuit Diagram
...
Telemetics Unit (TMU): Repair procedures
Removal
ŌĆó
Take care not to scratch the crash pad and related parts.
1.
Disconnect the negative (-) battery terminal.
2.
Remove the crash pad garnis ...
Categories
- Home
- Kia Sportage QL (2015-2019) Owners Manual
- Kia Sportage QL (2015-2019) Service Manual
- Kia Sportage SL 2010-2016 Owners Manual
- Kia Sportage SL 2010-2016 Service Manual

Copyright ® www.kispmanual.com 2014-2026