 Kia Sportage: Power Door Lock Actuators: Repair procedures
Third generation SL (2010ŌĆō2016) / Kia Sportage SL Service & Repair Manual / Body Electrical System / Power Door Locks / Power Door Lock Actuators: Repair procedures
| Inspection |
Front Door Lock Actuator
| 1. |
Remove the front door trim.
(Refer to the BD group - "Front door") |
| 2. |
Remove the front door module.
(Refer to the BD group - "Front door") |
| 3. |
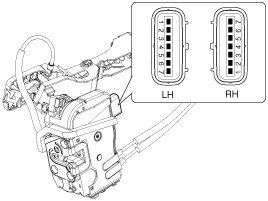
Disconnect the connectors from the actuator.
|
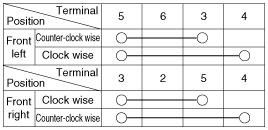
| 4. |
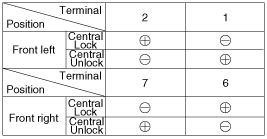
Check actuator operation by connecting power and ground
according to the table. To prevent damage to the actuator, apply battery
voltage only momentarily.
[Central Lock]
[Double Lock]
|
Rear Door Lock Actuator
| 1. |
Remove the rear door trim.
(Refer to the BD group - "Rear door") |
| 2. |
Remove the rear door module.
(Refer to the BD group - "Rear door") |
| 3. |
Disconnect the connectors from the actuator.
|
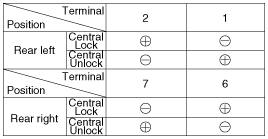
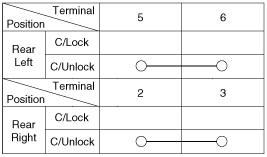
| 4. |
Check actuator operation by connecting power and ground
according to the table. To prevent damage to the actuator, apply battery
voltage only momentarily.
[Central Lock]
[Double Lock]
|
Tailgate Lock Actuator Inspection
| 1. |
Remove the tailgate trim.
(Refer to the BD group - "Tailgate") |
| 2. |
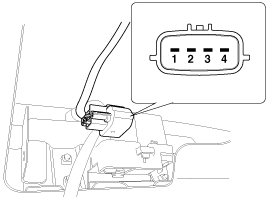
Disconnect the 4P connector from the actuator.
|
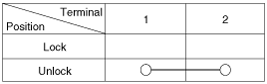
| 3. |
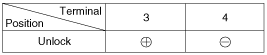
Check actuator operation by connecting power and ground
according to the table. To prevent damage to the actuator, apply battery
voltage only momentarily.
|
Front Door Lock Switch
| 1. |
Remove the front door trim.
(Refer to the BD group - "Front door") |
| 2. |
Remove the front door module.
(Refer to the BD group - "Front door") |
| 3. |
Disconnect the connectors from the actuator.
|
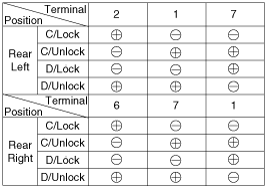
| 4. |
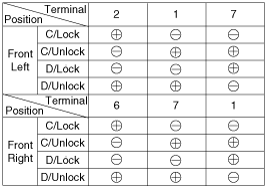
Check for continuity between the terminals in each switch position when inserting the key into the door according to the table.
[Central Lock]
[Double Lock]
|

Rear Door Lock Switch
| 1. |
Remove the rear door trim.
(Refer to the BD group - "Rear door") |
| 2. |
Remove the rear door module.
(Refer to the BD group - "Rear door") |
| 3. |
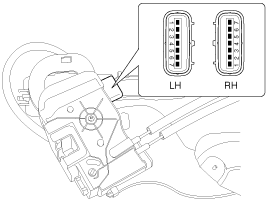
Disconnect the connectors from the actuator.
|
| 4. |
Check for continuity between the terminals in each switch position according to the table.
[Central Lock]
|
Tailgate Switch
| 1. |
Remove the tailgate trim.
(Refer to the BD group - "Tailgate") |
| 2. |
Disconnect the 4P connector from the actuator.
|
| 3. |
Check for continuity between the terminals in each switch position according to the table.
|
 Components and Components Location
Component Location
1. Driver power window switch2. Assist power window switch3. SJB (Smart Junction Box)4. Door lock switch5. Tailgate lock actuator & switch6. Front door lock actuator & ...
 Power Door Lock Switch: Repair procedures
Inspection
Driver Power Door Lock Switch
1.
Disconnect the negative battery terminal.
2.
Remove the front door trim.
(Refer to the BD group - "Front door")
3.
Disconnect the switch conne ...
Other Information:
Camshaft Position Sensor (CMPS): Schematic Diagrams
Circuit Diagram
...
Audio Unit: Components and Components Location
Components
Connector Pin Information
No.Connector AConnector B1Speaker RL (+)MM CAN HIGH 2Speaker FL (+)-3Speaker FR (+)-4Speaker RR (+)Steering Remote5--6-USB D (+)7-USB/iPOD VDD8Illuminat ...
Categories
- Home
- Kia Sportage QL (2015-2019) Owners Manual
- Kia Sportage QL (2015-2019) Service Manual
- Kia Sportage SL 2010-2016 Owners Manual
- Kia Sportage SL 2010-2016 Service Manual

Copyright ® www.kispmanual.com 2014-2026