 Kia Sportage: Receiver-Drier: Repair procedures
Third generation SL (2010ŌĆō2016) / Kia Sportage SL Service & Repair Manual / Heating,Ventilation, Air Conditioning / Air Conditioning System / Receiver-Drier: Repair procedures
| Replacement |
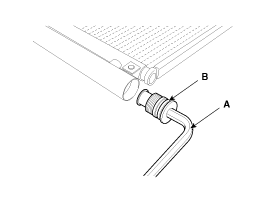
| 1. |
Remove the condenser, and then remove the bottom cap (B) with L wrench (A) from the condenser.
|
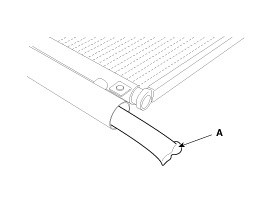
| 2. |
Remove the desiccant (A) from condenser using a long nose plier. Check for crumbled desiccant and clogged bottom cap filter.
|
| 3. |
Apply air conditioning compressor oil along the O-rings and threads of the new bottom cap. |
| 4. |
Insert the new desiccant into the receiver drier tank. The
desiccant must be sealed in vacuum before it is exposed to air for use. |
| 5. |
Install the new bottom cap to the condenser.
|

 Condenser: Repair procedures
Inspection
1.
Check the condenser fins for clogging and damage. If clogged,
clean them with water, and blow them with compressed air. If bent,
gently bend them using a screwdriver or pliers.
...
 A/C Pressure Transducer: Components and Components Location
Component Location
...
Other Information:
Side Airbag (SAB) Module: Repair procedures
Removal
The side airbag cannot be disassembled from the seat back assembly, so replace assembly when replacing the side airbag.
1.
Disconnect the battery negative ...
Transaxle Control Module (TCM): Repair procedures
Inspection
TCM Problem Inspection Procedure
1.
TEST TCM GROUND CIRCUIT: Measure resistance between TCM and
chassis ground using the backside of TCM harness connector as TCM side
check point. ...
Categories
- Home
- Kia Sportage QL (2015-2019) Owners Manual
- Kia Sportage QL (2015-2019) Service Manual
- Kia Sportage SL 2010-2016 Owners Manual
- Kia Sportage SL 2010-2016 Service Manual

Copyright ® www.kispmanual.com 2014-2026