 Kia Sportage: Releasing the parking brake

Foot type
To release the parking brake, depress the parking brake pedal a second time while applying the foot brake. The pedal will automatically extend to the fully released position.
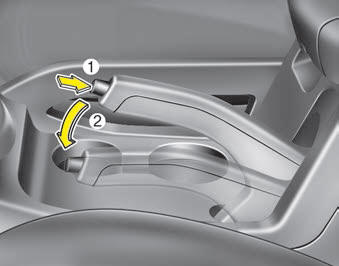
Hand type
To release the parking brake, first apply the foot brake and pull up the parking brake lever slightly. Secondly press the release button (1) and lower the parking brake lever (2) while holding the button.
![]() WARNING - Parking brake use
WARNING - Parking brake use
All vehicles should always have the parking brake fully engaged when parking to avoid inadvertent movement of the vehicle which can injure occupants or pedestrians.
Check the brake warning light by turning the ignition switch ON (do not start the engine). This light will be illuminated when the parking brake is applied with the ignition switch in the START or ON position.
Before driving, be sure the parking brake is fully released and the brake warning light is off.
If the brake warning light remains on after the parking brake is released while the engine is running, there may be a malfunction in the brake system. Immediate attention is necessary.
If at all possible, cease driving the vehicle immediately. If that is not possible, use extreme caution while operating the vehicle and only continue to drive the vehicle until you can reach a safe location or repair shop.
 Applying the parking brake
Foot type
To engage the parking brake, first apply the foot brake and then depress the
parking brake pedal down as far as possible.
Hand type
To engage the parking brake, first apply the foot ...
 Anti-lock brake system (ABS)
ABS (or ESC) will not prevent accidents due to improper or dangerous driving
maneuvers. Even though vehicle control is improved during emergency braking, always
maintain a safe distance between yo ...
Other Information:
Starter: Components and Components Location
Components
1. Front housing2. Starter solenoid assembly3. Lever4. Lever packing5. Planet shaft assembly6. Planetary gear assembly7. Packing8. Shield9. Amature assembly10. Brush holder assembly11. ...
Vehicle identification number (VIN)
Frame number
The vehicle identification number (VIN) is the number used in registering your
vehicle and in all legal matters pertaining to its ownership, etc.
The number is punched on the floor ...
Categories
- Home
- Kia Sportage QL (2015-2019) Owners Manual
- Kia Sportage QL (2015-2019) Service Manual
- Kia Sportage SL 2010-2016 Owners Manual
- Kia Sportage SL 2010-2016 Service Manual
