 Kia Sportage: Valve Body: Repair procedures
Third generation SL (2010ŌĆō2016) / Kia Sportage SL Service & Repair Manual / Automatic Transaxle System / Hydraulic System / Valve Body: Repair procedures
| Removal |
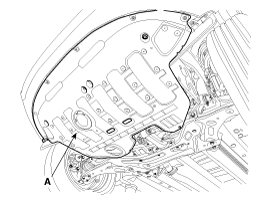
| 1. |
Remove the under cover (A).
|
| 2. |
Remove the drain plug (A) and drain the ATF totally and then reinstall the drain plug.
|


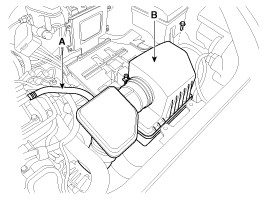
| 3. |
Remove the air duct (A).
|

| 4. |
Remove the air cleaner assembly.
|
| 5. |
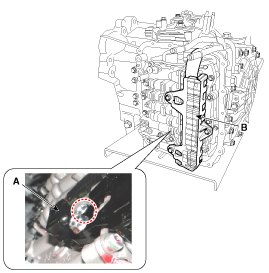
Disconnect the clip (A) from the valve body cover.
|
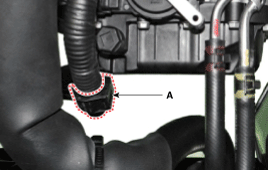
| 6. |
Remove the air breather hose (A). |
| 7. |
Remove t he valve body cover (B).
|
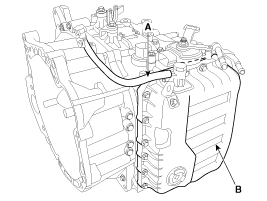
| 8. |
Remove the solenoid valve connector (B) and the oil temperature sensor (A).
|
| 9. |
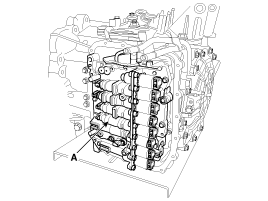
Remove the valve body assembly (A).
|
| Installation |
| 1. |
Install in the reverse order of removal.
|
 Valve Body: Description and Operation
Description
The valve body is essential to automatic transaxle control
and consists of various valves used to control the oil feed from the oil
pump. Specifically, these valves consist of press ...
 Clutch & Brake
...
Other Information:
4WD ECU: Description and Operation
Description
4WD ECU processes signals from various sensors and determines
the current road and driving conditions. The ECU then utilizes this
information to implement precision control over the ...
Luggage lamp
The luggage room lamp comes on when the tailgate is opened. ...
Categories
- Home
- Kia Sportage QL (2015-2019) Owners Manual
- Kia Sportage QL (2015-2019) Service Manual
- Kia Sportage SL 2010-2016 Owners Manual
- Kia Sportage SL 2010-2016 Service Manual

Copyright ® www.kispmanual.com 2014-2026