 Kia Sportage: Line Pressure Control Solenoid Valve: Repair procedures
Third generation SL (2010ŌĆō2016) / Kia Sportage SL Service & Repair Manual / Automatic Transaxle System / Automatic Transaxle Control System / Line Pressure Control Solenoid Valve: Repair procedures
| Inspection |
| 1. |
Turn ignition switch OFF. |
| 2. |
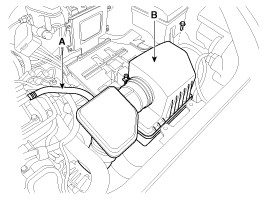
Remove the air duct (A).
|

| 3. |
Remove the air cleaner assembly.
|
| 4. |
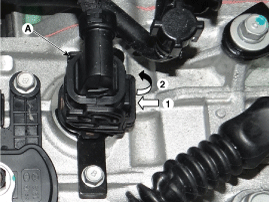
Disconnect the solenoid valve connector (A).
|
| 5. |
Measure resistance between sensor signal terminal and ground terminal. |
| 6. |
Check that the resistance is within the specification. |
| Removal |
Replacing an on/off solenoid valve (SS-A, SS-B) does not
require additional hydraulic pressure adjustment; however, the hydraulic
pressure will need to be adjusted after replacing the VFS solenoid
valve. If replacing the VFS solenoid valve; also replace the valve body
assembly.
(Refer to "Valve Body" in Hydraulic System of this group) |

 Line Pressure Control Solenoid Valve: Schematic Diagrams
Circuit Diagram
...
 35R Clutch Control Solenoid Valve(35R/C_VFS): Description and Operation
Description
35R Clutch control solenoid valve(35R/C) is attached to the
valve body. This variable force solenoid valve directly controls the
hydraulic pressure inside the 35R Clutch. ...
Other Information:
Immobilizer indicator
With smart key system
If any of the following occurs in a vehicle equipped with the smart key, the
immobilizer indicator illuminates, blinks or goes off.
When the smart key is in the vehicle, ...
ETC (Electronic Throttle Control) System: Troubleshooting
Fail-Safe Mode
ItemFail-SafeETC MotorThrottle valve stuck at 5┬░TPSTPS 1 faultECM looks at TPS2TPS 2 faultECM looks at TPS1TPS 1,2 faultThrottle valve stuck at 5┬░APSAPS 1 faultECM looks at APS 2 ...
Categories
- Home
- Kia Sportage QL (2015-2019) Owners Manual
- Kia Sportage QL (2015-2019) Service Manual
- Kia Sportage SL 2010-2016 Owners Manual
- Kia Sportage SL 2010-2016 Service Manual

Copyright ® www.kispmanual.com 2014-2026