 Kia Sportage: Propeller Shaft: Repair procedures
Third generation SL (2010ŌĆō2016) / Kia Sportage SL Service & Repair Manual / Driveshaft and axle / Propeller Shaft Assembly / Propeller Shaft: Repair procedures
| Replacement |
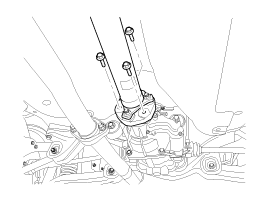
| 1. |
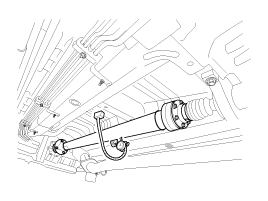
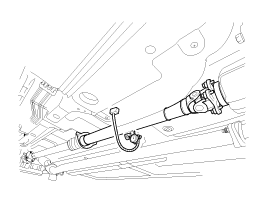
After making a match mark on the flange yoke and transaxle companion, remove the propeller shaft mounting bolts.
|
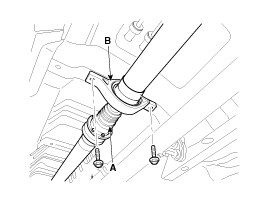
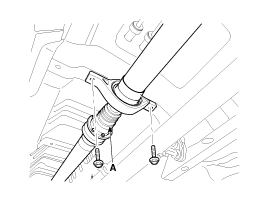
| 2. |
Remove the center bearing bracket (A) mounting bolts.
|
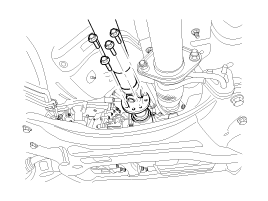
| 3. |
After making a match mark on the flange yoke and transaxle companion, remove the propeller shaft mounting bolts.
|

| 4. |
Install in the reverse order of removal. |
| Inspection |
CV Joint and boots
| 1. |
Shift the transmission lever to Neutral. |
| 2. |
Raise the vehicle off the ground, and support it with safety stands in the proper locations. |
| 3. |
Check the center bearing for excessive play or rattle and
rubber for rent. If the center bearing has excessive play or rattle and
rubber has rent, replace the propeller shaft assembly.
|
| 4. |
Check the CV joint boot for damage and deterioration. If the
boot is damaged or deteriored, replace the propeller shaft assembly. |
| 5. |
Check the CV joint for excessive play or rattle. If the CV
joint has excessive play or rattle, replace the propeller shaft
assembly. |
Propeller shaft runout
| 1. |
Install a dial indicator with its needle on the center of front propeller shaft or rear propeller shaft. |
| 2. |
Turn the propeller shaft slowly and check the runout. Repeat this procedure for the other propeller shaft.
|
| 3. |
If the runout on either propeller shaft exceeds the service limit, replace the propeller shaft assembly. |
 Propeller Shaft: Components and Components Location
Components
1. Front propeller shaft2. Center bearing bracket3. Rear propeller shaft
...

Other Information:
Starting the engine with a smart key
1.Carry the smart key or leave it inside the vehicle.
2.Make sure the parking brake is firmly applied
3.Automatic Transaxle - Place the transaxle shift lever in P (Park). Depress
the brake pedal f ...
Panoramaroof Motor: Repair procedures
Replacement
1.
Disconnect the negative (-) battery terminal.
2.
Remove the roof trim.
(Refer to the BD group - "Roof trim")
3.
Remove the panoramaroof motor (A) after disconnecting the co ...
Categories
- Home
- Kia Sportage QL (2015-2019) Owners Manual
- Kia Sportage QL (2015-2019) Service Manual
- Kia Sportage SL 2010-2016 Owners Manual
- Kia Sportage SL 2010-2016 Service Manual

Copyright ® www.kispmanual.com 2014-2026