 Kia Sportage: Audio Remote Control: Repair procedures
Third generation SL (2010ŌĆō2016) / Kia Sportage SL Service & Repair Manual / Body Electrical System / Audio / Audio Remote Control: Repair procedures
| Inspection |
| 1. |
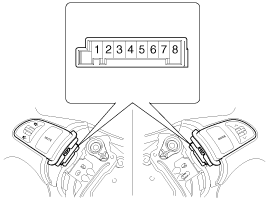
Check for resistance between No.6 and No.7 terminals in each switch position.
[Audio System]
|
| 2. |
Check for voltage between No.6 and No.7 terminal in each switch position.
[Audio System]
|
| Removal |
| 1. |
Remove the driver airbag module.
(Refer to the RT group - "Airbag module") |
| 2. |
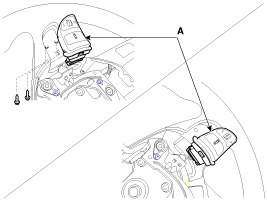
Remove the steering wheel remote control switch mounting screws (2EA).
Disconnect the connector and remove the steering wheel remote control switch (A).
|
| Installation |
| 1. |
Install the audio remote control switch on the steering wheel. |
| 2. |
Reconnect the audio remote control switch connector and airbag connectors.
|

| 3. |
Install the driver airbag module.
|
 Audio Remote Control: Schematic Diagrams
Circuit Diagram
...
 AUX(Auxiliary) Jack: Schematic Diagrams
Circuit Diagram
...
Other Information:
Specifications
Specification
ItemsInner sideOuter sideFront driveshaftJoint typeVTJBJMax. permissible angle23.5┬░46.5┬░Rear driveshaftJoint typeTJBJMax. permissible angle23.5┬░46.5┬░Rear differentialOil typeHyp ...
DonŌĆÖt let your parking brake freeze
Under some conditions your parking brake can freeze in the engaged position.
This is most likely to happen when there is an accumulation of snow or ice around
or near the rear brakes or if the bra ...
Categories
- Home
- Kia Sportage QL (2015-2019) Owners Manual
- Kia Sportage QL (2015-2019) Service Manual
- Kia Sportage SL 2010-2016 Owners Manual
- Kia Sportage SL 2010-2016 Service Manual

Copyright ® www.kispmanual.com 2014-2026