 Kia Sportage: Heater & A/C Control Unit(Full Automatic): Components and Components Location
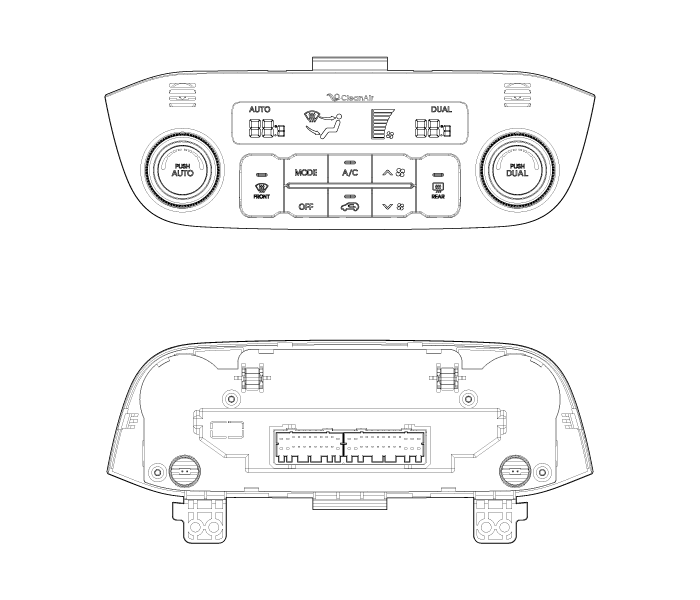
Third generation SL (2010ŌĆō2016) / Kia Sportage SL Service & Repair Manual / Heating,Ventilation, Air Conditioning / Controller / Heater & A/C Control Unit(Full Automatic): Components and Components Location
| Component |
Connector Pin Function
| Connector | Pin NO | Function | Connector | Pin NO | Function |
| Connector(A) | 1 | Battery | Connector(B) | 1 | CAN (LOW) |
| 2 | Tail Lamp (ILL+) | 2 | CAN (HIGH) | ||
| 3 | IG2 | 3 | Intake Actuator (F/B) | ||
| 4 | DR Temp Actuator (COOL) | 4 | Mode Actuator (F/B) | ||
| 5 | DR Temp Actuator (WARM) | 5 | PS Temp Actuator (F/B) | ||
| 6 | Detent | 6 | DR Temp Actuator (F/B) | ||
| 7 | Mode Actuator (VENT) | 7 | Diagnosis (Cluster Ion) | ||
| 8 | Mode Actuator (DEF) | 8 | V Ref (+5V) | ||
| 9 | - | 9 | - | ||
| 10 | - | 10 | - | ||
| 11 | - | 11 | ECV IN | ||
| 12 | Rheostat (ILL-) | 12 | GND | ||
| 13 | GND | 13 | HI- Scan(L-line) | ||
| 14 | IG1 | 14 | Evaporator Sensor | ||
| 15 | Ion Signal | 15 | Ambient Sensor | ||
| 16 | Intake Actuator (FRE) | 16 | - | ||
| 17 | Intake Actuator (REC) | 17 | LH Photo (-) | ||
| 18 | Clean Signal | 18 | RH Photo (-) | ||
| 19 | Blower Motor (+) | 19 | - | ||
| 20 | PS Temp Actuator (COOL) | 20 | - | ||
| 21 | PS Temp Actuator (WARM) | 21 | - | ||
| 22 | Power Mosfet (GATE) | 22 | ECV Out | ||
| 23 | Power Mosfet (DRAIN) | | |||
| 24 | HTD(Rear Def Ind.) | ||||
| 25 | Rear Def S/W (Low) | ||||
| 26 | Sensor GND | ||||
 Heater & A/C Control Unit(Manual): Repair procedures
Replacement
1.
Disconnect the negative (-) battery terminal.
2.
Using the screwdriver, remove the cluster facia panel (A).
3.
Using the screwdriver, remove the crash pad garnish (A).
4. ...
 Heater & A/C Control Unit(Full Automatic): Repair procedures
Self Diagnosis
1.
Self-diagnosis process
2.
How to read self-diagnostic code
After the display panel flickers three times every 0.5
second, the corresponding fault code flickers on the setu ...
Other Information:
Injector: Troubleshooting
Signal Waveform
The three waveforms below are taken from the #1 and #4
injectors. The top waveform is from the high side (feed side) of the #1
and #4 injectors, while the middle waveform is fro ...
Front Wheel Transfer Assembly: Components and Components Location
Components Location
1. Automatic transaxle2. Transfer assembly3. Propeller shaft4. Coupling assembly5. Differential assembly
...
Categories
- Home
- Kia Sportage QL (2015-2019) Owners Manual
- Kia Sportage QL (2015-2019) Service Manual
- Kia Sportage SL 2010-2016 Owners Manual
- Kia Sportage SL 2010-2016 Service Manual

Copyright ® www.kispmanual.com 2014-2026