 Kia Sportage: Smart key unit: Repair procedures
Third generation SL (2010ŌĆō2016) / Kia Sportage SL Service & Repair Manual / Body Electrical System / Smart key System / Smart key unit: Repair procedures
| Removal |
Smart Key Unit
| 1. |
Disconnect the negative (-) battery terminal. |
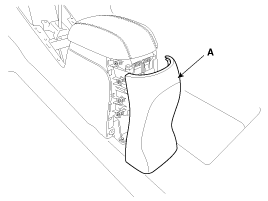
| 2. |
Remove the glove box.
(Refer to the BD group - "Crash pad") |
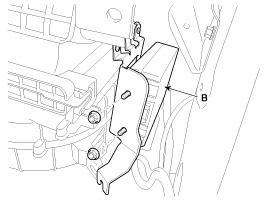
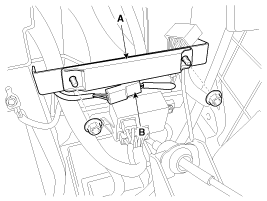
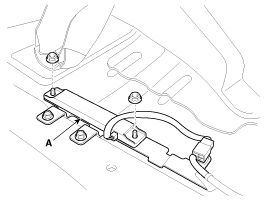
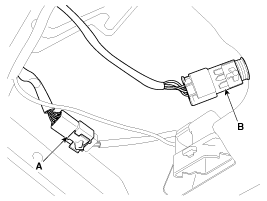
| 3. |
After disconnecting the smart key unit connectors (A), loosen
the smart key unit mounting nuts (2EA), and remove the smart key unit
(B).
[USA]
[Canada]
|
RF Receiver
| 1. |
Disconnect the negative (-) battery terminal. |
| 2. |
Remove the floor console.
(Refer to the BD group - "Console") |
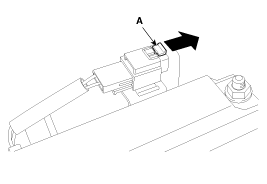
| 3. |
Disconnect the RF receiver connector and remove the RF receiver mounting screws. Remove the RF receiver.
|
Interior 1 Antenna
| 1. |
Disconnect the negative (-) battery terminal. |
| 2. |
Remove the floor console.
(Refer to the BD group - "Console") |
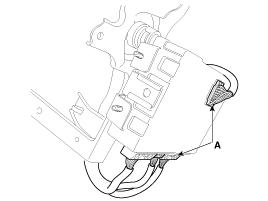
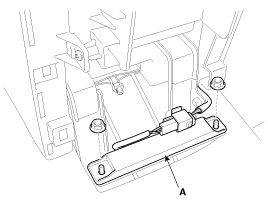
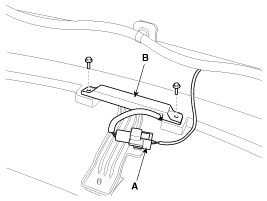
| 3. |
After loosening the antenna nuts (2EA) and connector (B), remove the interior 1 antenna (A).
|

Interior 2 Antenna
| 1. |
Disconnect the negative (-) battery terminal. |
| 2. |
Remove the floor console rear panel (A) using the appropriate tool.
|
| 3. |
After loosening the antenna nuts (2EA) and connector, remove the interior 2 antenna (A).
|
Interior 3 Antenna
| 1. |
Disconnect the negative (-) battery terminal. |
| 2. |
After loosening the mounting bolts, then remove the rear seat assembly.
(Refer to the BD group - "Rear seat") |
| 3. |
Remove the luggage side trim (RH, LH), and then remove the rear floor carpet.
(Refer to the BD group - "Interior trim") |
| 4. |
After loosening the antenna nuts (2EA) and connector (A), remove the interior 3 antenna (B).
|
Exterior Bumper Antenna
| 1. |
Disconnect the negative (-) battery terminal. |
| 2. |
Lift the vehicle up using the lift.
(Refer to the GI group - "Lift And Support Points") |
| 3. |
Remove the rear bumper.
(Refer to the BD group - "Rear bumper") |
| 4. |
Disconnect the antenna connector (A) on the center of rear bumper.
|
| 5. |
After loosening the screws (2EA), remove the exterior bumper antenna (B). |
Buzzer
| 1. |
Disconnect the negative (-) battery terminal. |
| 2. |
Remove the front left fender.
(Refer to the BD group - "Fender") |
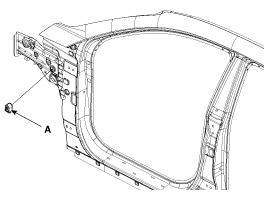
| 3. |
Disconnect the connector, then remove the buzzer (A).
|
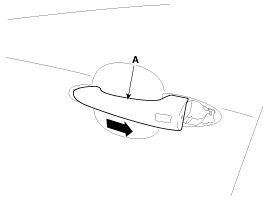
Door Outside Handle
| 1. |
Disconnect the negative (-) battery terminal. |
| 2. |
Disconnect the connector after removing the door trim.
(Refer to the BD group - "Front door") |
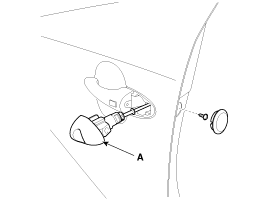
| 3. |
After loosening the mounting bolt, then remove the key holder (A).
|
| 4. |
Remove the outside handle (A) by sliding it rearward.
|
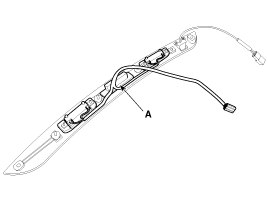
Tailgate Switch
| 1. |
Disconnect the negative (-) battery terminal. |
| 2. |
Remove the tailgate trim.
(Refer to the BD group - "Tailgate trim") |
| 3. |
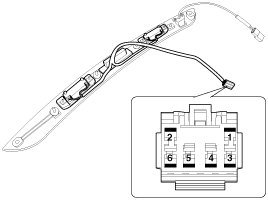
Disconnect the license lamp and tailgate switch connector (A). Disconnect the back warning camera connector (B).
|
| 4. |
Remove the screws (2EA) and clips (4EA). Remove the tailgate garnish (A).
|
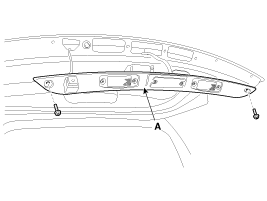
| 5. |
Loosen the tailgate outside handle mounting screw. Remove the outside handle and license lamp (A).
|
| Inspection |
Smart Key Unit
| ŌĆō |
Refer to BE group - Smart key system - inspection / self diagnosis with scan tool. |
Smart Key Switch
| ŌĆō |
Refer to BE group - Smart key system - inspection / self diagnosis with scan tool. |
Antenna
| ŌĆō |
Refer to BE group - Smart key system - inspection / self diagnosis with scan tool. |
Tailgate Switch
| 1. |
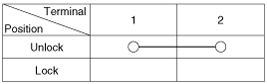
Check for continuity between the tailgate switch terminals.
|
| 2. |
If needed, replace the switch. |
| Installation |
Smart Key Unit
| 1. |
Install the smart key unit. |
| 2. |
Install the smart key unit mounting nuts, and then connect the connector. |
| 3. |
Install the glove box. |
| 4. |
Install the negative (-) battery terminal and check the smart key system. |
RF Receiver
| 1. |
Install the RF receiver. |
| 2. |
Install the floor console. |
| 3. |
Install the negative (-) battery terminal and check the smart key system. |
Interior 1 Antenna
| 1. |
Install the interior 1 antenna. |
| 2. |
Install the floor console. |
| 3. |
Install the negative (-) battery terminal and check the smart key system. |
Interior 2 Antenna
| 1. |
Install the interior 2 antenna. |
| 2. |
Install the floor console rear cover after connecting the connector. |
| 3. |
Install the negative (-) battery terminal and check the smart key system. |
Interior 3 Antenna
| 1. |
Install the interior 3 antenna. |
| 2. |
Install the rear seat assembly. |
| 3. |
Install the negative (-) battery terminal and check the smart key system. |
Exterior Bumper Antenna
| 1. |
Install the exterior bumper antenna. |
| 2. |
Install the negative (-) battery terminal and check the smart key system. |
Buzzer
| 1. |
Install the buzzer. |
| 2. |
Install the front left fender. |
| 3. |
Install the negative (-) battery terminal and check the smart key system. |
Door Outside Handle
| 1. |
Install the outside handle. |
| 2. |
Install the door trim. |
| 3. |
Install the negative (-) battery terminal and check the smart key system. |
Tailgate Switch
| 1. |
Install the tailgate switch. |
| 2. |
Install the tailgate garnish. |
| 3. |
Install the tailgate trim. |
| 4. |
Install the negative (-) battery terminal and check the smart key system. |
 Smart key unit: Schematic Diagrams
Circuit Diagram
...

Other Information:
Change to "winter weight" oil if necessary
In some climates it is recommended that a lower viscosity "winter weight" oil
be used during cold weather. See section 8 for recommendations. If you aren't sure
what weight oil you s ...
Rear Parking Assist System Control Unit: Specifications
Specifications
DescriptionSpecificationUltrasonic sensorDetecting range9.8~47.2 in (250 ~ 1,200 mm)Operating voltageDC 8~10 VRated currentMAX. 20 mAOperating temperature -22┬░F~+176┬░F(-30┬░ ...
Categories
- Home
- Kia Sportage QL (2015-2019) Owners Manual
- Kia Sportage QL (2015-2019) Service Manual
- Kia Sportage SL 2010-2016 Owners Manual
- Kia Sportage SL 2010-2016 Service Manual

Copyright ® www.kispmanual.com 2014-2026