 Kia Sportage: Rheostat: Repair procedures
Third generation SL (2010ŌĆō2016) / Kia Sportage SL Service & Repair Manual / Body Electrical System / Lighting System / Rheostat: Repair procedures
| Inspection |
| 1. |
Disconnect the negative (-) battery terminal. |
| 2. |
Remove the crash pad lower panel.
(Refer to the BD group - "Crash pad") |
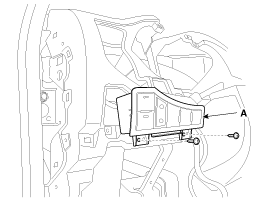
| 3. |
Remove the crash pad side switch assembly (A) after loosening 2 screws.
|
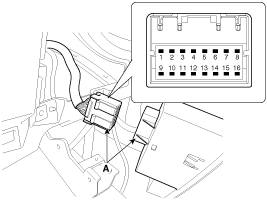
| 4. |
Remove the side crash pad switch after disconnecting the connectors (A).
|
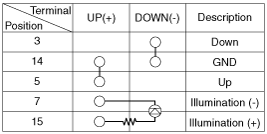
| 5. |
Operate the switch and check for continuity between terminals with an ohmmeter.
|
 Hazard Lamp Switch: Repair procedures
Removal
1.
Disconnect the negative (-) battery terminal.
2.
Remove the center fascia panel (A).
(Refer to BE group - "Audio unit")
Take care not to damage and sc ...
 Front Fog Lamps: Repair procedures
Inspection
Front Fog Lamp Switch
1.
With the fog lamp switch in each position, make sure that
continuity exists between the terminals below. If continuity is not as
specified, replace the mul ...
Other Information:
Jack and tools
The jack, jack handle, wheel lug nut wrench are stored in the luggage compartment.
Pull up the luggage box cover to reach this equipment.
(1) Jack handle
(2) Jack
(3) Wheel lug nut wrench
Jacki ...
To defrost outside windshield
1.Set the fan speed to the highest position.
2.Set the temperature to the extreme hot position.
3.Select the position.
4.The outside (fresh) air and air conditioning will be selected automatical ...
Categories
- Home
- Kia Sportage QL (2015-2019) Owners Manual
- Kia Sportage QL (2015-2019) Service Manual
- Kia Sportage SL 2010-2016 Owners Manual
- Kia Sportage SL 2010-2016 Service Manual
Copyright ® www.kispmanual.com 2014-2026


