
 Kia Sportage: Seat Heater: Repair procedures
Third generation SL (2010–2016) / Kia Sportage SL Service & Repair Manual / Body Electrical System / Seat Electrical / Seat Heater: Repair procedures
| Removal |
| 1. |
Remove the seat back cover and cushion cover.
(Refer to the BD group - "Front seat") |
| 2. |
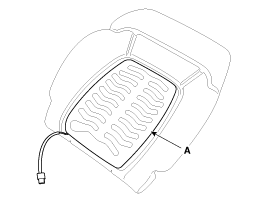
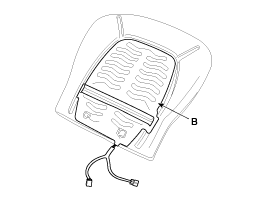
Remove the driver / assist seat back heater (A) and cushion heater (B).
|
| 3. |
Remove the cushion cover of rear seat.
(Refer to the BD group - "Rear seat") |
| 4. |
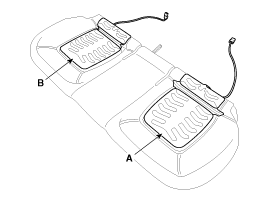
Remove the heater (A) of rear seat (LH) and the heater (B) of rear seat (RH).
|
| Installation |
| 1. |
Install the driver / assist seat back and cushion heater.
(Refer to the BD group - "Front seat") |
| 2. |
Install the heater of rear seat (LH & RH).
(Refer to the BD group - "Rear seat") |
| Inspection |
Driver / Assist Seat
| 1. |
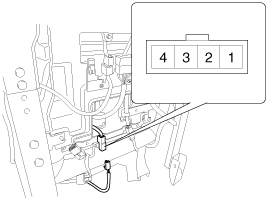
Check for continuity and measure the resistance between terminals as below.
|
| 2. |
Operate seat warmer after connecting the 4P connector, and
then check the thermostat by measuring the temperature of seat surface.
|
Rear Seat
| 1. |
Check for continuity and measure the resistance between terminal 2 and 3.
|
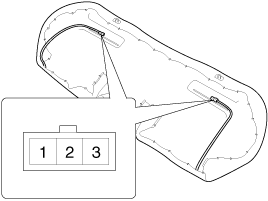
| 2. |
Operate seat warmer after connecting the 4P connector, and
then check the thermostat by measuring the temperature of seat surface.
|
 Seat Heater: Components and Components Location
Component Location
...
 Climate Seat: Components and Components Location
Components
1. Ventilation blower2. Ventilation ECU3. Ventilation seat switch4. Blower connector5. Heater connector6. Ventilation ECU connector
...
Other Information:
Interior: Body Repair
Interior A
Front pillar trim mounting hole (O8.5)Front pillar trim mounting hole (O7)Cowl crossbar mounting hole (O9)Front door checker mounting hole (O13)Cowl side trim mounting hole (O8.5)Seatb ...
Accelerator Position Sensor (APS): Specifications
Specification
AcceleratorPositionOutput Voltage (V)APS1APS2C.T0.7 ~ 0.80.29 ~ 0.46W.O.T3.85 ~ 4.351.93 ~ 2.18
...
Categories
- Home
- Kia Sportage QL (2015-2019) Owners Manual
- Kia Sportage QL (2015-2019) Service Manual
- Kia Sportage SL 2010-2016 Owners Manual
- Kia Sportage SL 2010-2016 Service Manual

Copyright © www.kispmanual.com 2014-2026