 Kia Sportage: Seat Heater Switch: Repair procedures
Third generation SL (2010ŌĆō2016) / Kia Sportage SL Service & Repair Manual / Body Electrical System / Seat Electrical / Seat Heater Switch: Repair procedures
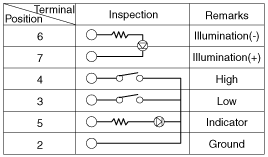
| Inspection |
Driver / Assist seat
| 1. |
Disconnect the negative (-) battery terminal. |
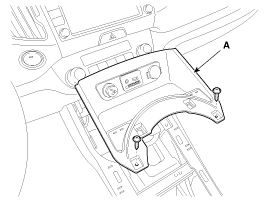
| 2. |
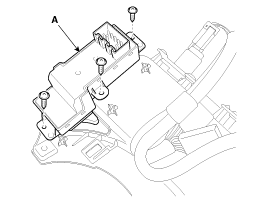
Remove the gear knob. Remove the floor console upper cover (A) using the appropriate tool.
(Refer to BD group - "Console")
|
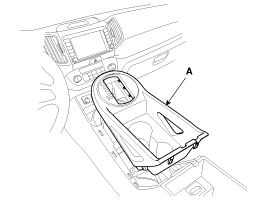
| 3. |
Remove the floor console tray (A).
|

| 4. |
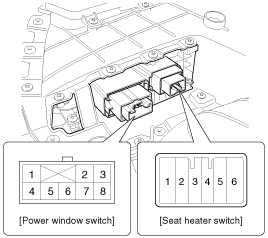
Disconnect the driver / assist seat heater switch connector.
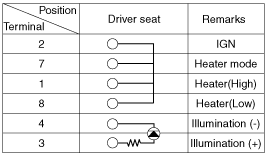
Driver [Heater]
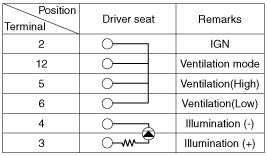
Driver [Ventilation + Heater]
Assist [Heater]
|
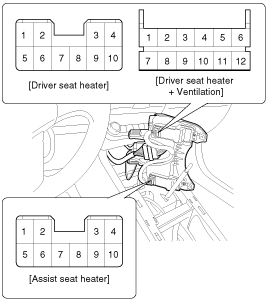
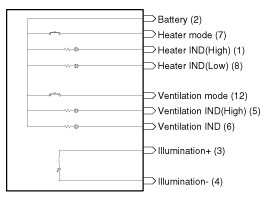
| 5. |
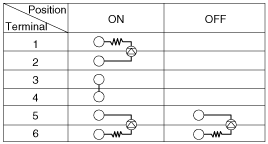
Operate each seat heater switch and check that continuity exists between the terminals.
[Heater]
Driver [Ventilation + Heater]
Driver [Ventilation + Heater]
|
| 6. |
Inspect the switch pin. If needed, replace the seat heater switch (A) after loosening the screws (3EA).
|
Rear Seat Heater Switch
| 1. |
Disconnect the negative (-) battery terminal. |
| 2. |
Remove the power window switch from the rear door trim.
(Refer to BE group - "Power window switch")
|
| 3. |
Inspect the switch pin. If needed, replace the seat heater switch.
|
 Power Seat Control Switch: Repair procedures
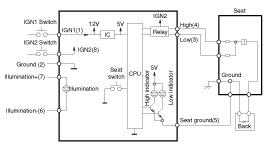
Inspection
1.
With the power seat switch in each position, make sure that
continuity exists between the terminals below. If continuity is not as
specified, replace the power seat switch.
Remo ...
 Seat Heater: Components and Components Location
Component Location
...
Other Information:
Crash Pad: Repair procedures
Replacement
Cluster Replacement
ŌĆó
When prying with a flat-tip screwdriver, wrap it with
protective tape, and apply protective tape around the related parts ...
To defrost outside windshield
1.Set the fan speed to the highest position.
2.Set the temperature to the extreme hot position.
3.Select the position.
4.The outside (fresh) air and air conditioning will be selected automatical ...
Categories
- Home
- Kia Sportage QL (2015-2019) Owners Manual
- Kia Sportage QL (2015-2019) Service Manual
- Kia Sportage SL 2010-2016 Owners Manual
- Kia Sportage SL 2010-2016 Service Manual

Copyright ® www.kispmanual.com 2014-2026