1.
Loosen the wheel nuts slightly.
Raise the vehicle, and make sure it is securely supported.
2.
Remove the front wheel and tire (A) from front hub.
Tightening torque :
88.3 ~ 107.8N.m (9.0 ~ 11.0kgf.m, 65.0 ~ 79.5Ib-ft)
Be careful not to damage to the hub bolts when removing the front wheel and tire (A).
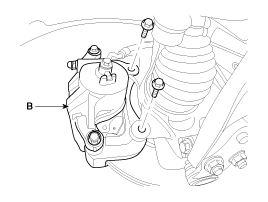
3.
Remove the brake caliper mounting bolts, and then hold the brake caliper assembly (B) with wire.
Tightening torque :
78.4 ~ 98.0N.m (8.0 ~ 10.0kgf.m, 57.8 ~ 72.3lb-ft)
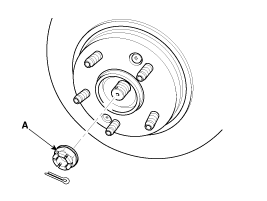
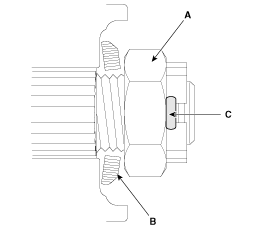
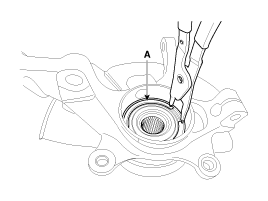
4.
Remove castle nut (A) from the front hub.
Tightening torque :
196.1 ~ 274.5N.m (20.0 ~ 28.0kgf.m, 144.6 ~ 202.5lb-ft)
The washer (B) should be assembled with convex surface
outward when installing the castle nut (A) and split pin (C) Also,
don''t reuse split pin (C) when reassembling.
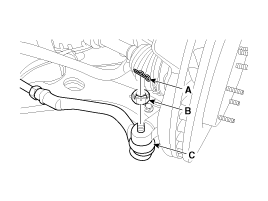
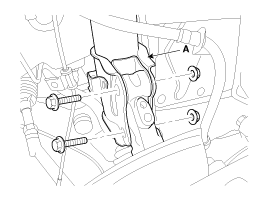
5.
Remove the brake hose (A) and wheel speed sensor (B).
Tightening torque :
6.8 ~ 10.8N.m (0.7 ~ 1.1kgf.m, 5.1 ~ 7.9lb-ft)
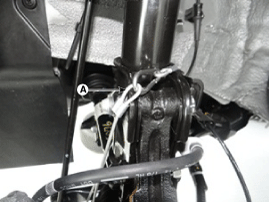
6.
Remove the tie rod end ball joint(C) from the knuckle.
(1)
Remove the split pin (A).
(2)
Remove the castle nut (B).
Tightening torque :
34.3 ~ 44.1N.m (3.5 ~ 4.5kgf.m, 25.3 ~ 32.5lb-ft)
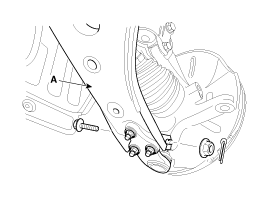
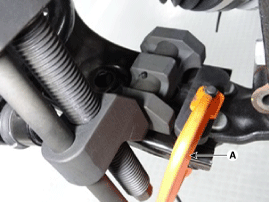
7.
Remove the lower arm (A) mounting bolt and nut from the knuckle.
Tightening torque :
98.0 ~ 117.6N.m (10.0 ~ 12.0kgf.m, 72.3 ~ 86.7lb-ft)
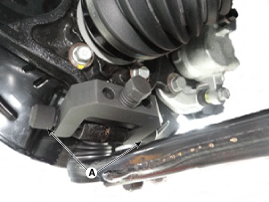
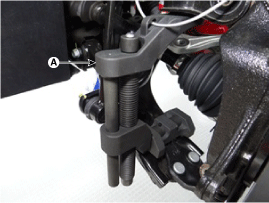
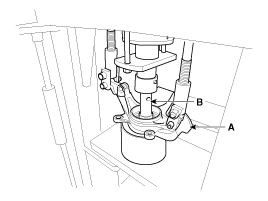
8.
Remove the front lower arm from the front knuckle using the SST (0K545-A9100).
(1)
After removing bolts from the front knuckle, install and tighten the sub body bolt (A) .
(2)
Input the sub body (A) between the front knuckle and the sub body bolt.
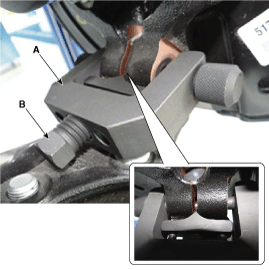
(3)
Tighten bolt (B) of the sub body bolt to broaden the gap of the front knuckle.
(4)
Install the safe wire (A).
Install a safe wire on the front strut to prevent dropping the SST and hurting technicians.
(5)
Install the main body, between the front strut and the lower arm.
(6)
To avoid the main body coming off, install a fixing clamp (A) beside the main body.
(7)
After installing a fixing clamp, rotate the handle (B) clock wise till the clamp is fixed on a lower arm.
(8)
Tighten a main body bolt (A) of the slowly and remove the lower arm from the front knuckle.
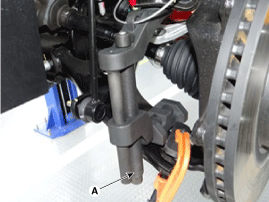
9.
Disconnect the drive shaft end (A) from the knuckle.
10.
Loosen the strut mounting bolts and then remove the hub and knuckle assembly from the strut assembly (A).
Tightening torque :
137.2 ~ 156.9N.m (14.0 ~ 16.0kgf.m, 101.2 ~ 115.7Ib-ft)
Be careful not to damage the boot and rotor teeth.
1.
Install in the reverse order of removal.
1.
Check the hub for cracks and the splines for wear.
2.
Check the brake disc for scoring and damage.
3.
Check the knuckle for cracks
4.
Check the bearing for cracks or damage.
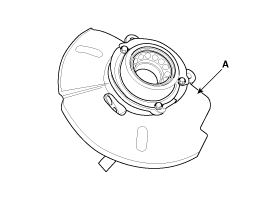
1.
Using the snap ring pliers, remove the snap ring (A).
2.
Remove the hub assembly from the knuckle assembly.
(1)
Install the front knuckle assembly (A) on press.
(2)
Lay a suitable adapter (B) upon the hub assembly shaft.
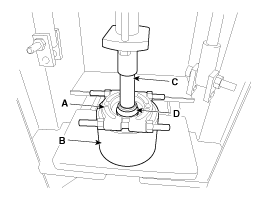
3.
Remove the dust cover (A).
4.
Remove the hub bearing inner race from the hub assembly
(1)
Install a suitable tool (A) for removing the hub bearing inner race on the hub assembly.
(2)
Lay the hub assembly and tool (A) upon a suitable adapter (B).
(3)
Lay a suitable adapter (C) upon the hub assembly shaft.
(4)
Remove the hub bearing inner race (D) from the hub assembly by using press.
5.
Remove the hub bearing outer race from the knuckle assembly.
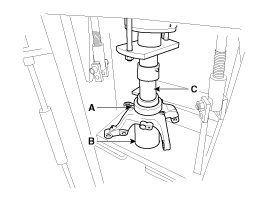
(1)
Lay the hub assembly (A) upon a suitable adapter (B).
(2)
Lay a suitable adapter (C) upon the hub bearing outer race.
(3)
Remove the hub bearing outer race from the knuckle assembly by using press.
6.
Replace hub bearing with a new one.
1.
Install the dust cover (A).
2.
Install the hub bearing to the knuckle assembly.
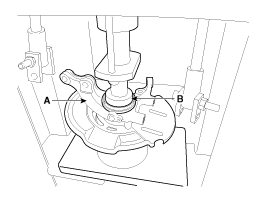
(1)
Lay the knuckle assembly (A) on press.
(2)
Lay a new hub bearing upon the knuckle assembly (A).
(3)
Lay a suitable adapter (B) upon the hub bearing.
(4)
Install the hub bearing to the knuckle assembly by using press.
Do not press against the inner race of the hub bearing because that can cause damage to the bearing assembly.
Always use a new wheel bearing assembly.
3.
Install the hub assembly to the knuckle assembly.
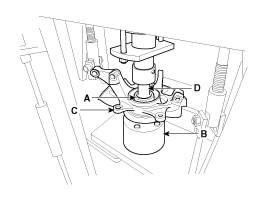
(1)
Lay the hub assembly (A) upon a suitable adapter (B).
(2)
Lay the knuckle assembly (C) upon the hub assembly (A).
(3)
Lay a suitable adapter (D) upon the hub bearing.
(4)
Install the hub assembly (A) to the knuckle assembly (C) by using press.
Do not press against the inner race of the hub bearing because that can cause damage to the bearing assembly.
4.
Install the snap ring (A).
Components
1. Brake disc screw2. Brake disc3. Hub4. Hub bolt5. Dust cover6. Knuckle 7. Wheel bearing8. Snap ring
...
 Kia Sportage: Front Hub / Knuckle / Tone Wheel: Repair procedures
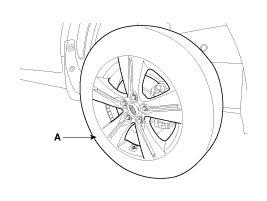


 Front Hub / Knuckle / Tone Wheel: Components and Components Location
