 Kia Sportage: Thermostat: Repair procedures
Third generation SL (2010ŌĆō2016) / Kia Sportage SL Service & Repair Manual / Engine Mechanical System / Cooling System / Thermostat: Repair procedures
| Removal and Installation |
Disassembly of the thermostat would have an adverse effect,
causing a lowering of cooling efficiency. Do not remove the thermostat,
even if the engine tends to overheat. |
| 1. |
Drain engine coolant so its level is below thermostat. |
| 2. |
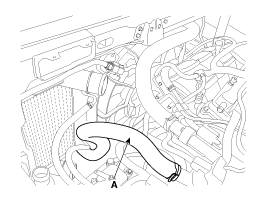
Disconnect the radiator lower hose (A).
|
| 3. |
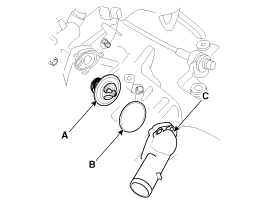
Remove water inlet fitting (C), gasket (B) and thermostat (A).
|
| 4. |
Installation is reverse order of removal.
|
| 5. |
Fill the engine coolant. |
| 6. |
Start the engine and check for leaks. |
| 7. |
Recheck the coolant level. |
| Inspection |
| 1. |
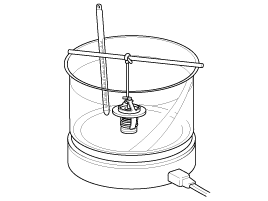
Immerse thermostat in water heated to over 95┬░C (203┬░F), then heat for at least 3 minutes to check valve lift.
|
| 2. |
Check the valve opening temperature.
If the valve opening temperature is not as specified, replace the thermostat. |
| 3. |
Check the valve lift.
If the valve lift is not as specified, replace the thermostat. |
 Water pump: Troubleshooting
Troubleshooting
Water Pump
SymptomsPossible CausesRemedyCoolant leakage
ŌĆó
From the bleed hole of the water pump
Visually check
ŌĆó
Check leaks after about ten-minute warming u ...
 Thermostat: Troubleshooting
Troubleshooting
SymptomsPossible CausesRemedyCoolant leakage
ŌĆó
From the thermostat gasket
Check the mounting bolts
ŌĆó
Check the torque of the mounting bolts
ŌĆó
Reti ...
Other Information:
Stowing the rear seat belt
The rear seat belt buckles can be stowed in the pocket between the rear seatback
and cushion when not in use.
Routing the seat belt webbing through the rear seat belt guides will help keep
the ...
Parking brake
Checking the parking brake
Type A
Check whether the stroke is within specification when the parking brake pedal
is depressed with 20 kg (44 lb, 196 N) of force. Also, the parking brake alone sho ...
Categories
- Home
- Kia Sportage QL (2015-2019) Owners Manual
- Kia Sportage QL (2015-2019) Service Manual
- Kia Sportage SL 2010-2016 Owners Manual
- Kia Sportage SL 2010-2016 Service Manual
Copyright ® www.kispmanual.com 2014-2026


